| Everything you've done so far is invisible at runtime. You've set up a DataAdapter object, a Connection object, and a DataSet object, but you can't see any of these things. In order to actually see the data you're working with, you'll need to add controls to the page. ASP.NET makes this simple. Adding the Grid Now that you've set up all the data-handling components, it's time to add the DataGrid control to the page and hook it up. Follow these steps to display the data retrieved by the DataAdapter in a grid: -
In the Solution Explorer window, select Products.aspx and select View, Designer (or simply double-click) to view the page in the designer. -
From the Web Forms tag of the Toolbox window, drag a DataGrid control from the Toolbox window onto the page. -
Set properties for the grid as shown in Table 11.1. Table 11.1. Set These Properties for the Sample Grid | Property | Value | Description | | ID | grdProducts | You're going to need to interact with this control programmatically, so you should set its name to something that indicates its purpose. | | DataSource | dsProducts1 | The DataSource property of the grid indicates where it should look in order to retrieve its data. | | DataMember | Products | The DataMember property of the grid allows you to specify which table within the data source to use to fill the grid. In this case, there's only one table in there, so you don't really have to specify this value. There may be multiple tables in the DataSet, however, and in that case, you'd need to indicate the specific table you want to use. (Note that the programmer filling the DataSet specifies the table name-this normally isn't tied directly to the name of the table from which the data was retrieved. In this case, the wizard set the name for you. You simply choose the name from the list provided in the Properties window.) | -
In the Solution Explorer, right-click the Products.aspx page, select Build and Browse from the context menu, and load the page. (You expect to see data, don't you?) As you can see, setting the DataGrid control's properties isn't all you need to do. It takes a few lines of code to fill the DataSet and bind the grid. The next section walks you through the final steps necessary to display data in the grid. NOTE The DataGrid control, as you're using it here, isn't terribly attractive. If you want to make it look "prettier," right-click the control and select Auto Format from the context menu. You're on your own, for now. You'll find information on formatting the DataGrid control in Chapter 16, "Using the DataGrid Control."
Populating the DataGrid with Data Although you've set properties that would appear to bind the DataGrid control to a DataSet, the page doesn't automatically populate the DataSet when you load the page. You'll need to use the page's Page_Load event procedure to populate the DataGrid control with data as the page is loaded. To display the data in the grid, follow these steps: -
If the page is still loaded in a browser window, close the browser window. -
Back in the page designer, double-click the page (not on a specific control) to load the code-behind file, which is ready for you to enter the contents of the Page_Load procedure. -
Modify the Page_Load procedure so that it looks like this: Private Sub Page_Load( _ ByVal sender As System.Object, _ ByVal e As System.EventArgs) _ Handles MyBase.Load daProducts.Fill(DsProducts1) grdProducts.DataBind() End Sub TIP The Fill method of the DataAdapter object accepts a DataSet or DataTable object as its parameter, and it fills its parameter with data. The DataBind method of the DataGrid object tells the control to bind itself to its data source, effectively filling the grid from the DataSet you specified as its data source. -
In the Solution Explorer window, right-click the sample page, select Build and Browse from the context menu, and verify that the page looks like Figure 11.1. You've now managed to load the data from the SQL Server table using only two lines of code! Filling a DropDownList Control with Data Using the design-time components that create Connection, DataAdapter, and DataSet objects is fine, but it is hard to see everything that is going on behind the scenes. In fact, the wizards actually build a complete class that handles adding, editing, deleting, and retrieving data. This is generally overkill when all you need to do is load a list full of data. In these cases, it may make more sense to write the code yourself. Extending the example you built in the first half of this chapter, in this second part, you'll add a drop-down list of available categories and filter the displayed products based on the category you select. In this case, you'll write all the code required to bind the DropDownList control to a DataSet, instead of using the design-time components. TIP Once you've worked through this section, you may find it useful to go back and revise the previous example so that it uses a similar technique that is, modify the example so that you fill the DataGrid control by hand, as well.
Follow these steps to set up the DropDownList control: -
With the Products.aspx page open in the designer, add a Label control and a DropDownList control to the page. Modify the properties of the controls as shown in Table 11.2. When you're done, the page should look like Figure 11.9. Figure 11.9. How the finished page should look in Design view.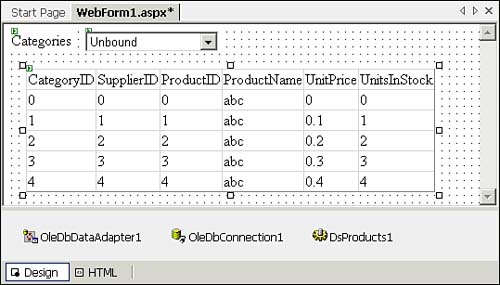
Table 11.2. Set Properties of the Controls Using These Values | Control | Property | Value | | Label1 | Text | Categories | | DropDownList1 | ID | ddlCategories | | | AutoPostBack | True | TIP Setting the AutoPostBack property to True for the DropDownList control causes the page to post back to the server each time you select an item from the list. Using this technique, you can provide immediate feedback, after the user selects a new category. Without using AutoPostBack, you would need some way to trigger a roundtrip, so you could run the code necessary to refill the grid. -
Select View, Code to load the code-behind file in the code editor and then find the Page_Load procedure. Modify the Page_Load procedure so that it looks like this: Private Sub Page_Load( _ ByVal sender As System.Object, _ ByVal e As System.EventArgs) _ Handles MyBase.Load If Not Page.IsPostBack Then CategoryLoad() End If End Sub HANDLING POSTBACK Clearly, the CategoryLoad procedure call fills a list of categories, but what's with Page.IsPostBack? This property of the page makes sure you don't reload the list of categories each time the form is posted back to itself. This list can't change, so why refill it? Selecting an item from the list will raise the SelectedIndexChanged event procedure but will also cause the Page_Load event procedure to run, because the page will be reloaded. Page.IsPostBack is False the first time the page loads, and the page framework sets the Page.IsPostBack property to True after the first loading of this page. You'll use this technique often to ensure that you only calculate things you must calculate when you post back to a page. |
-
Add the following statement at the very top of the code-behind file (adding this allows you to refer to classes within the OleDb namespace without having to explicitly include the OleDb name each time): Imports System.Data.OleDb -
Add the procedure in Listing 11.1 below the Page_Load procedure (but above the End Class statement). Listing 11.1 Load the Category Drop-Down List with Category Information Private Sub CategoryLoad() Dim ds As DataSet Dim da As OleDbDataAdapter Dim strSQL As String = _ "SELECT CategoryID, CategoryName " & _ "FROM Categories" ds = New DataSet() da = New OleDbDataAdapter(strSQL, cnNorthwind) da.Fill(ds) With ddlCategories .DataTextField = "CategoryName" .DataValueField = "CategoryID" .DataSource = ds .DataBind() End With End Sub -
In the Solution Explorer window, right-click Products.aspx and select Build and Browse from the context menu. The page should contain a drop-down list containing all the available categories. (Of course, you're no longer filling the grid that comes back in the next section.) Before going further, you should investigate what happened in the CategoryLoad procedure. This procedure first declares the two ADO.NET variables it will need DataSet and OleDbDataAdapter: Dim ds As DataSet Dim da As OleDbDataAdapter The code then creates the SQL string it will need in order to retrieve just the columns it requires for the drop-down list: Dim strSQL As String = _ "SELECT CategoryID, CategoryName " & _ "FROM Categories" TIP Although Visual Basic .NET allows you to initialize variables on the same line of code on which they're declared, we generally shy away from this technique. There is a good reason for not doing this: error handling. If an error could occur as you're declaring the variable, you'll need to place the declaration in a Try/End Try block. But placing the declaration in a Try/End Try block scopes the variable so that it's only available within that block it's not even available in the Catch block! This makes it impossible to use the variable throughout the procedure, so we tend to declare the variable outside the error-handling block and supply its value within the error handling. Our rule of thumb: We only take advantage of this new feature for assigning constant values, where it's not possible that a runtime error could occur. This is just a personal preference, and you may do what you like. However, that's the style you'll see throughout this book.
The code then instantiates the DataAdapter object, passing in a SQL string (which supplies the SELECT command for this DataAdapter object) and an OleDbConnection object, supplied at design time on the form. Next, the code calls the Fill method of the DataAdapter object, filling the data in the DataSet: ds = New DataSet() da = New OleDbDataAdapter(strSQL, cnNorthwind) da.Fill(ds) We had a number of options in the preceding code fragment. We could have created a new OleDbConnection object and supplied the connection information in the code. Because we had the available connection object already created, there didn't seem much sense in doing that. We had no command information (that is, information on retrieving the data) already prepared, so this example sets up its own SQL string and its own OleDbDataAdapter object. Finally, the code sets up the DropDownList control so that it fills itself with data. This requires setting three properties and calling a method: With ddlCategories .DataTextField = "CategoryName" .DataValueField = "CategoryID" .DataSource = ds .DataBind() End With The DataTextField property contains the name of the field from the data source that provides the content to be displayed within the drop-down portion of the control. This is the information you see on the screen. The DataValueField property contains the name of the field from the data source that provides the value of each list item. Although this could be the same field as the DataTextField property, most of time it won't be. Most often, you want to display one item but have the option of retrieving a different value when the user makes a choice. In this case, you're displaying the category name and retrieving the category ID when the user selects a category. You must set the DataSource property, telling the control which DataSet or DataTable it should use to provide its data. Finally, when you're ready to display the data, call the DataBind method, which binds the control to its data source. It's interesting to see the HTML created by the .NET page framework. If you view the page in a browser and then right-click and select the View Source option, you'll see code like Listing 11.2 for the drop-down list control (we've removed extraneous attributes). Listing 11.2 In the Browser, You'll See HTML Like This, Rendered by ASP.NET <select name="ddlCategories"> <option value="1">Beverages</option> <option value="2">Condiments</option> <option value="3">Confections</option> <option value="4">Dairy Products</option> <option value="5">Grains/Cereals</option> <option value="6">Meat/Poultry</option> <option value="7">Produce</option> <option value="8">Seafood</option> </select> As you can see, the page framework retrieved the CategoryName field and set it as the displayed text of each list item and set the CategoryID field as the value for each item. Using the DropDownList Control to Filter by Categories As the final step in this demonstration, you need to hook up the code that will display a list of products within the selected category. To do that, follow these steps: -
Make sure you've closed any browser windows displaying Products.aspx. -
In the page designer, double-click the DropDownList control, loading the code editor with the ddlCategories_SelectedIndexChanged procedure selected. -
Modify the procedure so that it looks like this: Private Sub ddlCategories_SelectedIndexChanged( _ ByVal sender As System.Object, _ ByVal e As System.EventArgs) _ Handles ddlCategories.SelectedIndexChanged ProductsLoad End Sub -
Add the code in Listing 11.3 to the page's class: Listing 11.3 Filter the DataGrid Control Based on the Selected Category Private Sub ProductsLoad() Dim ds As DataSet Dim strSQL As String strSQL = daProducts.SelectCommand.CommandText & _ " WHERE CategoryID = " & _ ddlCategories.SelectedItem.Value ds = New DataSet() With daProducts .SelectCommand.CommandText = strSQL .Fill(ds) End With With grdProducts .DataSource = ds .DataBind() End With End Sub -
Modify the Page_Load procedure once again, adding a call to the ProductsLoad procedure: Private Sub Page_Load( _ ByVal sender As System.Object, _ ByVal e As System.EventArgs) _ Handles MyBase.Load If Not Page.IsPostBack Then CategoryLoad() ProductsLoad() End If End Sub -
In the page designer, select the DataGrid control. In the Properties window, remove the text from the DataSource and DataMember properties because you're setting the DataSource property in code, you don't need these values. -
Build and browse the page once again. This time, you should be able to select a category from the drop-down list and see the associated products displayed in the grid. -
When you're done, close the browser window and save your project. The code in the ProductsLoad procedure does the work of loading the grid with products from the selected category. It starts by retrieving the SQL string from the DataAdapter object you set up on the page, in the first half of the chapter. The code uses the CommandText property of the SelectCommand property and then concatenates a WHERE clause to the SQL: strSQL = daProducts.SelectCommand.CommandText & _ " WHERE CategoryID = " & _ ddlCategories.SelectedItem.Value This new SQL expression pulls in all the fields you set up originally but limits the rows to only those whose CategoryID field matches the selected item in the drop-down list. The code then instantiates a new DataSet object, resets the CommandText property of the DataAdapter's SelectCommand object, and fills the DataSet with the newly filtered rows: ds = New DataSet() With daProducts .SelectCommand.CommandText = strSQL .Fill(ds) End With The code finishes up by setting the DataGrid control's DataSource property to be the new DataSet (instead of dsProducts1, which it used in the earlier example), and then binds the grid to its new data source. |
