| Unlike the DataGrid control (but more like the Repeater), you must supply at least a single HTML template in order to use the DataList control. As you saw in the previous section, you must supply layout information in the ItemTemplate. Creating templates for the DataList control is much like creating templates for the DataGrid control it's up to you to supply the appropriate HTML within each DataList template to render the correct user interface. Although you only have to supply a single template, the DataList control supports all the templates shown in Table 19.3. Table 19.3. You Can Define All These Templates for the DataList Control | Template Name | Description | | AlternatingItemTemplate | If defined, this template provides the content and layout for alternating items in the DataList control. If it's not defined, ItemTemplate is used. | | EditItemTemplate | If defined, this template provides the content and layout for the item currently being edited in the DataList control. If it's not defined, ItemTemplate is used. | | FooterTemplate | If defined, this template provides the content and layout for the footer section of the DataList control. If it's not defined, a footer section will not be displayed. | | HeaderTemplate | If defined, this template provides the content and layout for the header section of the DataList control. If it's not defined, a header section will not be displayed. | | ItemTemplate | A required template that provides the content and layout for items in the DataList control. | | SelectedItemTemplate | If defined, this template provides the content and layout for the currently selected item in the DataList control. If it's not defined, ItemTemplate is used. | | SeparatorTemplate | If defined, this template provides the content and layout for the separator between items in the DataList control. If it's not defined, a separator will not be displayed. | TIP Creating the ItemTemplate requires a bit of care as well as some time. If you don't wish to follow these steps, you can simply copy and paste the appropriate HTML from the file Jumpstart\DataList\ItemTemplate.txt. Paste the contents of the file within the asp:DataList element in HTML view.
In this section, you'll finish the ItemTemplate section. In a later section, you'll add the EditItemTemplate. To get started, follow these steps: -
With EmployeeInfo.aspx open in the page designer, right-click the DataList control. -
From the context menu, select Edit Template, Item Templates. You should see a designer like the one shown in Figure 19.5, including the Label control you added in the previous section. Figure 19.5. Use this designer to edit the Item, AlternatingItem, and EditItem templates.
-
Add the controls to the ItemTemplate section and set their properties using Table 19.4 as your guide. When you're done, the section should look like Figure 19.6. Figure 19.6. Your finished ItemTemplate section should look like this.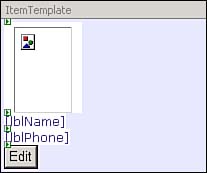
Table 19.4. Set Control Properties Using These Values | Control | Property | Value | | Image | ID | imgPhoto | | | Height | 93px | | | Width | 66px | | Label | ID | lblName | | | Text | (Delete the text from this property.) | | Label | ID | lblPhone | | | Text | (Delete the text from this property.) | | Button | ID | btnEdit | | | Text | Edit | | | CommandName | Edit | TIP To get the controls "close together" (inserting a <br> tag, rather than a <p> tag, into the page's HTML), press Shift+Enter rather than Enter to insert a new line in the designer. -
You also must set the data-binding properties for each control. One by one, select each control, find the DataBindings property in the Properties window, click the … button to display the dialog box, and bind the properties as shown in Table 19.5. (You already set up the binding for lblName; the information is included here for completeness.) Table 19.5. Set Data-Binding Properties for Each Control | Control | Property | Custom Binding Expression | | imgPhoto | ImageURL | DataBinder.Eval(Container.DataItem, "PhotoURL") | | lblName | Text | DataBinder.Eval(Container.DataItem, "Name") | | lblPhone | Text | DataBinder.Eval(Container.DataItem, "HomePhone") | | btnEdit | CommandArgument | DataBinder.Eval(Container.DataItem, "EmployeeID") | TIP Because the custom binding expression values for all the controls are so similar, you may want to type one, copy and paste the others, and then modify each field name. For a refresher on the DataBinder and Container objects, see Chapter 18, "Using the Repeater Control." -
When you're done, right-click the DataList control and select End Template Editing from the context menu. -
Test your page in a browser and verify that you now see the image and all the data for each row in the data source. |
