1.6. Personalizing a Site For a user, the layout and design of a site is just as important as the content. A user will want the ability to make the site his own by choosing a layout and styles that suit his personality. SharePoint supports personalization that allows users to: Modify a site Move Web Part locations Apply themes Add alerts
Some or all of these personalization features may be limited by the user's specific permission level within a specific site. For more information on permissions, see Chapter 4. 1.6.1. Changing the Arrangement of Web Parts on a Page Through your personal view you can change the layout of Web Parts on a team site page. Whenever you view the page, you will see it displayed the way you have specified. Other users who view the page will either see their own personal view, or the default view. SharePoint allows you to: To modify the layout of a page: Click on the link Modify My Page.  | If you belong to the web designer or administrator site group for the site, the link may say Modify Shared Page. Click on the link and select Personal View before selecting Modify My Page. |
|
Select the option "Design this page" in the menu that appears. SharePoint changes the page to design mode. Drag and drop Web Parts from one location to another to create your personal view. Remove Web Parts from the screen by clicking the X button.
Figure 1-12 shows a team site home page displayed in design mode. Notice that while in design mode, the main content is surrounded by two frames: Left and Right. You can move any Web Part from the Right side to the Left side by simply dragging and dropping. Figure 1-12. Page layout modification mode 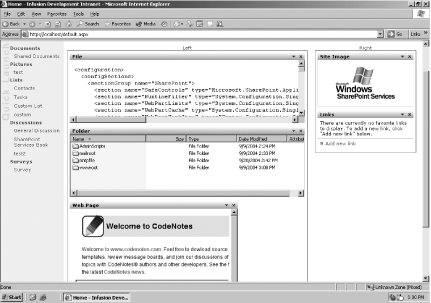
1.6.2. Modifying the Settings of a Web Part In design mode you can also modify the settings of a Web Part. If you have the proper site permissions, you can change the appearance, layout, and custom features of any Web Part. To modify a Web Part: Click on the down arrow inside the Web Part title bar. A list of options appears. Select Modify My Web Part. The screen changes to resemble Figure 1-13. On the righthand side of the screen you can specify the modifications to the Web Part. In this section, you can change the appearance, layout, and custom options for the Web Part. Click OK.
Figure 1-13. Web Part modification 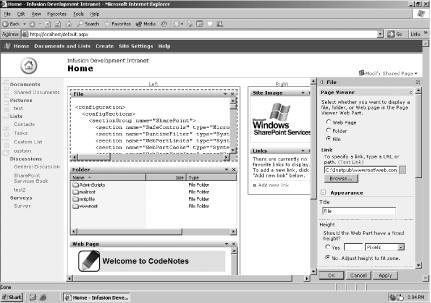
All the modifications you make are only visible when you view the page. None of your personal modifications will change the view other users see. 1.6.3. Applying Themes Themes allow you to apply a uniform site style across an entire site. Only users assigned to the web designer or administrator site group can create a theme and apply it to a site. When a theme is applied to the site, every user will see the same theme. Themes are custom style sheets that, when applied to a site, change the colors, fonts, and overall appearance of the site. SharePoint ships with twenty default themes that you can choose from. You can also create a custom theme through Microsoft FrontPage and add it to the list of available themes. Creating a theme is beyond the scope of this book and requires advanced development knowledge. To apply a theme to a SharePoint team site, perform the following actions: Click the Site Settings link on the top link bar. Select "Apply theme to web site" under the Customization section. Figure 1-14 shows the Apply Theme to web site page. Select one of the themes on the righthand side. The team site will preview on the lefthand side with the new theme. Click the Apply button to assign the theme to the site.
Figure 1-14. Applying a theme 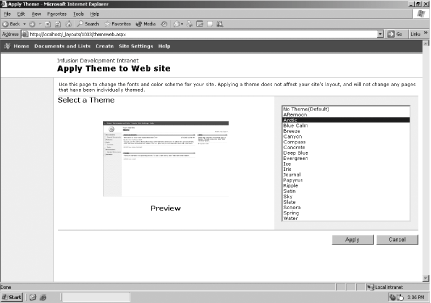
To remove a theme, follow the first two steps mentioned above. At Step 3, select No Theme (Default) and click the Apply button. 1.6.4. Setting Alerts As a user, you can set an alert to notify you by email if a particular piece of content changes. You can create an alert to track the following items: Document libraries Documents Picture libraries Images Lists List items Discussion boards Discussion messages Surveys
For example, a user may decide to sign up for an alert on a discussion board. If any other user posts a response to a discussion item, or creates a new item, the first user receives an email notification. This feature is particularly useful for discussion board moderators.  | The only drawback to alerts relates to security. If you delete a user or remove a user's access rights from content in SharePoint, the user will continue to receive alerts that he created on that content. To fix this situation, the administrator must remove all alerts that the user originally created on the content. |
|
1.6.4.1 Creating an alert The procedure you follow to create an alert is similar for all content, regardless of whether you are creating the alert for a document, list, discussion, or image. You will need to fill in three main areas of a form to create an alert:
- Send Alerts To
-
The email address where the alert will be sent
- Change Type
-
Which modification to the item will create an alert
- Alert Frequency
-
How often to be notified
To add an alert to an item such as a document library, perform the following steps: Click on the document library to which you want to add the alert. Select the Alert Me link on the lefthand side. Figure 1-15 shows the New Alert page that is displayed after clicking the Alert Me link. Figure 1-15. Adding an alert to a document library 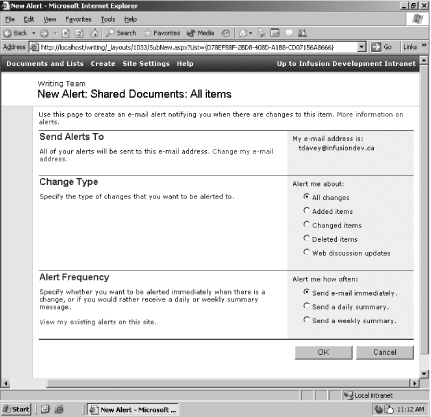
Your email address is pulled from the SharePoint configuration information. You should always verify that the email address is correct. If your email address is incorrect, click on the "Change my e-mail address" link to change your email address. Select the type of changes that you want to be alerted to under the Change Type section. The alert type options include:
- All changes
-
Whenever a change is made, you are alerted.
- Added items
-
Whenever a new item is added, you are alerted.
- Changed items
-
Whenever an item is modified, you are alerted.
- Deleted items
-
Whenever an item is deleted, you are alerted.
- Web discussion updates
-
Whenever a web discussion based on this library is updated, you are alerted.
Select how often you want to receive alerts under the Alert Frequency section. The alert frequency options include:
- Send e-mail immediately
-
At defined intervals (five minutes is the default), SharePoint sends out immediate alerts. You will receive an email at the default interval time whenever any change is made.
- Send a daily summary
-
You will receive a daily email summarizing all changes. If no changes occurred during a day, you won't get an email.
- Send a weekly summary
-
You will receive an email once a week summarizing all changes. Once again, if no changes occurred during the week, you won't get an email.
1.6.4.2 Viewing your alerts Once you have created an alert for yourself, you may need to delete the alert or change the settings of the alert. SharePoint lists all of your alerts for a site on the My Alerts page. To view your alerts for a site: Click on the Site Settings link on the top menu bar. Select "My alerts on this site" under the Manage My Information section. After selecting "My alerts on this site," the My Alerts on this Site page is displayed. Figure 1-16 shows the My Alerts on this Site page.
Figure 1-16. Viewing all alerts 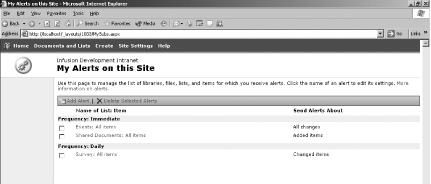
On this page, you can add, edit, and delete your alerts. 1.6.4.3 Deleting an alert To delete an alert or a group of alerts from your My Alerts page: Select the checkbox beside each alert that needs to be deleted. Click the Delete Selected Alerts button. Select OK when the message box appears to confirm the deletion.
1.6.4.4 Adding an alert To add an alert to your My Alerts page, click the Add Alert button. Clicking the Add Alert button brings up the New Alert page displayed in Figure 1-17: Select which list or document library for which you wish to create an alert. Alternatively, you can view the items in the list or document library to add an alert for an individual item. After selecting the list or document library, click Next. Follow Steps 3-5 in the section "Section 1.6.4.1" to fill in the form, then select OK.
Figure 1-17. Creating a new alert from View Alerts screen 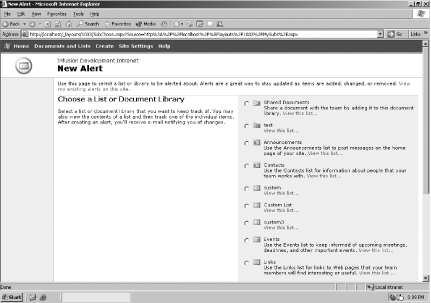
To edit the settings of an alert: Click on the name of the alert you wish to edit. You can modify the same options that you set during the creation processed outlined in the section Chapter 1. Click OK to save the changes or Delete to delete the alert.
|