Managing SQL Server Security
There are two directions you can come from to attack user access. First, you can go directly to the database you are managing and create users, and from there set up logins for the users, or you can set up logins as part of a DBMS-wide, or data center, security plan.
I prefer-actually enforce-the latter approach. Logins are created and managed by a member of the securityadmin or sysadmin roles, according to policy and mechanisms that go through a change control or management authority. I will tackle the subject of change control at the end of this chapter. Essentially, the change control board (CCB) is approached by a department head or application manager and requests user access to databases. Change control management approves the access and forwards the request to the DBAs for execution.
The routine I just described is identical to the one required in the external environment where the CCB (or its security manager) requests the network administrator to add, change, or delete user accounts and manage group and OU membership. This practice centralizes control and prevents breakdown in security requirements outlined in your plan. If you willy-nilly added logins at every turn or allowed anyone to create user accounts and logins on the fly, very soon you would have power user logins created for one database accessing others they should not access. Remember, logins are global and exist above all databases. So a login intended for one database can be used to access any other one (associated with a user, of course). I will discuss this issue further in the security plan to follow shortly.
The following sections first deal with surface area configuration, then we will get into the subject of creating database roles, then logins, and then users.
Surface Area Configuration
The more exposed a server or system, the less secure it is. Surface area reduction involves reducing the so-called “attack-surface” of a system by stopping or disabling unused components; thereby leaving it less exposed. Like the Windows Server 2003 platform it operates on, a number of features, services, and connections are disabled or stopped to prevent their access while a server is being introduced.
To perform surface area configuration use SQL Server Surface Area Configuration tool from the the Start menu, All Programs, Microsoft SQL Server 2005, Configuration Tools, and then click SQL Server Surface Area Configuration. The first page to appear is the SQL Server Surface Area Configuration start page.
On the start page, specify which server you want to configure. The default value is “localhost,” but you can select a named server, and connect to it over the network.
After selecting the server to configure, you can launch tools to enable and disable features of the Database Engine, Analysis Services, and Reporting Services. Or you can enable or disable Windows services and remote connectivity. You can also use the Surface Area Configuration command line utility or SAC tool.
Using this tool you can import and export surface area settings making it easy to configure a number of servers off a template server. You simply export the configuration settings to a file and then use that file to apply the same settings to SQL Server 2005 components on other servers.
Creating and Configuring Database Roles
Database roles can be created programmatically or interactively using the Management Studio. Roles are an internal environment security mechanism; in other words, they do not have any relationship with an external object (like a Windows security principal) on which their existence depends.
To create and manage a role, do the following:
-
Expand the database you are working in, expand Security and then Roles, and select the Database Roles node (under the root Roles node you have both Database Roles and Application Roles).
-
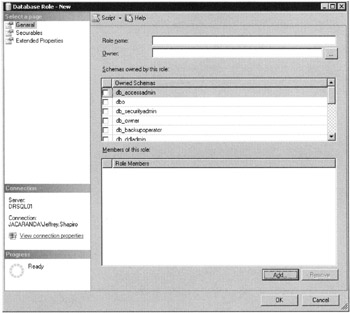
Next click New Database Role to add a role. The Database Role-New dialog box, shown in Figure 5–13, loads. Note that you can nest roles here, or add user members. Click OK and your role is created.

Figure 5–13: The Database Role-New dialog box
To define permissions for the role, follow these steps:
-
Select the role from the Details pane (or you can do this as part of the preceding Step 2), right-click, and select Properties.
-
From the Database Role Properties dialog box, click Permissions. The Permissions dialog box for the role will load (see the section “Permissions” earlier in this chapter).
Creating and Configuring Logins
Logins can be created programmatically or interactively using the Management Studio. Creating logins using T-SQL is discussed in Appendix. To create logins interactively in Management Studio, do the following:
-
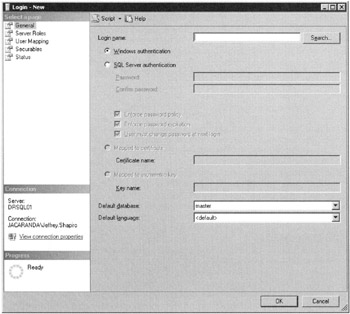
Go directly to the Security node in Management Studio and expand the node. Right-click the node and select New Login from the context menu. The New Login dialog box, as shown in Figure 5–14, loads. Logins are created on the General page of the Login-New dialog box.

Figure 5–14: Login-New dialog box -
Next, either enable Windows Authentication or, if you are supporting nontrusted access, enable the SQL Server Authentication options. If you are going to add users from security groups in the external environment to the login, the Name field accesses user accounts from the NT SAM or Active Directory. If you are creating a nontrusted login, you need to come up with a name and password for the login.
-
The last item you need to set on this page is the default database for the login. This default should usually be the database for which the login is being created; however, you can leave it at the default (master) or make the default database pubs or some other database that contains no data worth worrying about. Making master the default database is a risky proposition in my book, even though the login does not get immediate access to the data because it has to go through more checkpoints before it can reach into a table.
-
Now click the User Mapping. (You can bypass the Server Roles page because that is for DBA access, which we discussed in the earlier section on server roles.) The User Mapping page will let you select the databases to permit the login to access (still no access to data). You will also be able to select the database role for the login (if it has been created), but until you save this information and connect the role to a user account in a database, you still have no direct access to data.
You can drill further into permissions at this point, but I recommend you manage permissions through role creation and management in the respective database first. Unless you know your way around these pages like a blind fish in a cave, navigation here can be a little stressful.
| Note | There are several items to notice about the logins and the User Mapping page. First, you can allow a login to access more than one database. Second, the login can be in more than one database role. Third, the database role is peculiar to the database that you select in the database list, on the User Mappings page. |
If you are adding a group of users from the domain environment, make sure the Windows Authentication section on the General page is checked.
Creating SQL Server Logins with T-SQL
The syntax in T-SQL to create a SQL Server login based on a Windows user account is as follows:
Create Login [domain\user] from Windows
The syntax in T-SQL to create a SQL Server login is as follows:
Create Login login_name with password='password'
The following options can also be included in your login creation scripts:
-
MUST_CHANGE Specifies that the user must change the password at the next login.
-
CHECK_EXPIRATION Specifies that SQL Server will check with Windows for the expiration policy affecting the login.
-
CHECK_POLICY Specifies that SQL Server defers to the Windows password policy over the login.
Creating and Configuring Users
To create database users from Management Studio, select the server in which the database resides and drill down to the database. To create users, do the following:
-
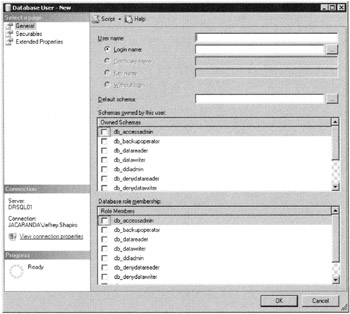
Go to the Users node in your target database. Right-click the node and select New User. The Database User-New dialog box loads, as illustrated in Figure 5–16.
-
Now select the login from the login pop-up Select Login dialog box. Both trusted and nontrusted logins are available to be used for the new user. You can make the User Name field the same as the login, or you can provide your own name, which then becomes an alias.
Next, select the schema and database role for the user. You can place the user into multiple roles (see the section “Creating and Configuring Database Roles” earlier in this chapter).

Figure 5–15: Database User-New dialog box
Deleting Logins and Users
As discussed earlier, logins and users are not joined at the hip. Deleting a login does not cause any loose ends with respect to a database user a login was using. Deleting users does not delete a login, nor does deleting a login delete a user. To delete a login or a user, do the following:
-
To delete a login, expand the Security node under the SQL Server 2005 instance you are managing. In the Details pane select the login, right-click, and then select Delete.
-
To delete a user, expand the User node in the database containing the user. Select the user in the Details pane, right-click, and then select Delete.
One thing to remember concerning the deleting of users: Users can own database objects, such as tables, views, and stored procedures. If you try to delete a user that owns objects that still exist in a database, the DBMS will prevent you from deleting the user.
There are several steps you can take to render a user “out of service” if it still owns objects in the database:
-
Remove the permissions accessible to the user. Select the user, right-click, and select the Properties menu item. The User Properties dialog box will load. Click Permissions and clear or deny any permission defined for the user.
-
Or, remove the user from any roles it has been placed in. Select the Properties option as described in the preceding step and then click the Properties button. The Database Role Properties dialog box will load. Remove the user from the role and then click OK.
-
Or, using the stored procedure sp_changeobjectowner, you can transfer the ownership of the object to another user and then delete the user.
Securing Objects with GRANT, DENY and REVOKE
Three T-SQL DML statements can be used for code level configuration of permissions on objects. These are GRANT, DENY, and REVOKE. The systax for all three is as follows:
GRANT { ALL [ PRIVILEGES ] } | permission [ ( column [ ,...n ] ) ] [ ,...n ] [ ON [ class :: ] securable ] TO principal [ ,...n ] [ WITH GRANT OPTION ] [ AS principal ] DENY { ALL [ PRIVILEGES ] } | permission [ ( column [ ,...n ] ) ] [ ,...n ] [ ON [ class :: ] securable ] TO principal [ ,...n ] [ CASCADE ] [ AS principal ] REVOKE [ GRANT OPTION FOR ] { [ ALL [ PRIVILEGES ] ] | permission [ (column [ ,...n] ) ] [ ,...n ] } [ ON [class :: ] securable ] { TO | FROM } principal [ ,...n ] [ CASCADE] [ AS principal ] These statements do not GRANT, DENY, or REVOKE all possible permissions on objects. Use the following list as a guideline:
-
If the securable is a database, ALL means you can only reference BACKUP DATABASE, BACKUP LOG, CREATE DATABASE, CREATE DEFAULT, CREATE FUNCTION, CREATE PROCEDURE, CREATE RULE, CREATE TABLE, and CREATE VIEW.
-
If the securable is a scalar function, then ALL means you can reference EXECUTE and REFERENCES.
-
If the securable is a table-valued function, ALL means you can only reference DELETE, INSERT, REFERENCES, SELECT, and UPDATE.
-
If the securable is a stored procedure, ALL means you can only reference DELETE, EXECUTE, INSERT, SELECT, and UPDATE.
-
If the securable is a table, ALL means you can only reference DELETE, INSERT, REFERENCES, SELECT, and UPDATE.
-
If the securable is a view, ALL means you can only reference DELETE, INSERT, REFERENCES, SELECT, and UPDATE.
The following list describes usage:
-
PRIVILEGES These are included for SQL-92 compliance, but it does change the behavior of ALL in the above list.
-
permission This argument refers to the name of a permission.
-
Column This argument specifies the name of a column in a table on which permissions are being revoked. The parentheses are required.
-
class This argument specifies the class of the securable on which the permission is being revoked. The scope qualifier :: is required.
-
securable This specifies the securable on which the permission is being revoked.
-
TO | FROM principal These arguments represent the name of the principal, the beneficiary. The principals from which permissions on a securable can be revoked vary, depending on the securable.
-
CASCADE This argument applies to DENY and REVOKE and indicates that the permission that is being denied or revoked is also denied or revoked from other principals to which it has been granted by this principal. When you use the CASCADE argument, you must also include the GRANT OPTION FOR argument.
-
AS principal This argument specifies a principal from which the principal executing this query derives its right to apply, deny, or revoke the permission.
See also Appendix for references to these statements.
EAN: 2147483647
Pages: 239