Putting It All Together: Textanoid
| [ LiB ] |
Putting It All Together: Textanoid!
Okay, now, using all we have learned, let's put it together and make a game. This game is a simple text-based copy of Arkanoid that uses all of the processes discussed in this long chapter.
Because we will be using text, the basic game commands will be run by Text and KeyDown commands. Basically, the idea of the game is to get rid of all the blocks by hitting them with the ball. The player controls a paddle, which can be moved left or right. The player attempts to keep the ball from hitting the bottom wall of the game board. Each time you clear the field of blocks, you reach a new level. Theoretically, you can go on to an infinite level (because the difficulty never increases ), but I'm betting the player will get bored before then.
The full source of the game can be found on the CD under the name demo03-13.bb. This game might be extremely hard to understand for a beginning programmer; however, I am going to help you through the tough parts of the code. Let's start off with the defined types.
;TYPES Type paddle ;the player type Field x,y ;coordinates End Type Type ball Field x,y Field directionx, directiony End Type
The output is shown in Figure 3.31.
Figure 3.31. How DirectionX and DirectionY work.
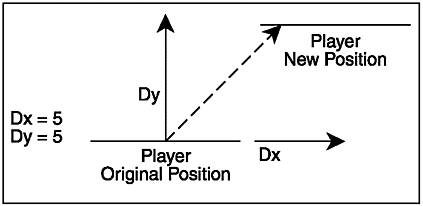
These types define the player and the ball in the game. The x and y coordinates should be easily understandable to you (they are simply the position of each object on the screen), but the directionx and directiony variables may seem strange .
NOTE
Notice that I decided not to make a block type. I felt that it would be easier to create it as an array. For an exercise, try to make and use a block type in the program.
The direction variables define how the ball movesthe directionx defines the left and right movement, and the directiony variable defines the up and down movement. Referring to Figure 3.31, you can see that as directionx moves the paddle left, directiony moves the paddle up. The end result is a new position that is to the upper-left of the original position.
Next up is the constants section:
;Constants Const BLOCKSTRING$ = "XXXXXXX" Const PADDLESTRING$ = "-" Const BALLSTRING$ = "O" Const BLOCKROWS = 3 Const BLOCKCOLUMNS = 6 Const BLOCKXGAP = 85 Const BLOCKYGAP = 32 Const BLOCKXORIGIN = 16 Const BLOCKYORIGIN = 8 Global BLOCKHEIGHT = FontHeight() Global BLOCKWIDTH = Len(BLOCKSTRING$) * FontWidth() Global PADDLEHEIGHT = FontHeight() Global PADDLEWIDTH = Len(PADDLESTRING$) * FontWidth() Global BALLHEIGHT = FontHeight() Global BALLWIDTH = Len(BALLSTRING$) * FontWidth() Const STARTX = 300 Const STARTY= 340 Const ESCKEY = 1, LEFTKEY = 203, RIGHTKEY = 205
Refer to Table 3.7 to see what each constant means. By the way, the function FontHeight() (which is used in each of the height variables) returns the height in pixels of the selected font (you will learn how to change the font later). The FontWidth() function returns the width of one character of the selected font. The Len function returns the number of characters in a string. Figure 3.32 shows what FontWidth() and Len would return on a sample string.
Figure 3.32. Len and FontWidth() .

Table 3.7. Textanoid's Constants
| Variable | Description |
|---|---|
| BLOCKSTRING | Defines what each block looks like |
| PADDLESTRING | Defines what the paddle looks like |
| BALLSTRING | Defines what the ball looks like |
| BLOCKROWS | The number of rows of blocks |
| BLOCKCOLUMNS | The number of columns of blocks |
| BLOCKXGAP | The number of pixels between each column |
| BLOCKYGAP | The number of pixels between each row |
| BLOCKXORIGIN | The number of pixels from the top-left corner of the window to the first column |
| BLOCKYORIGIN | The number of pixels from the top-left corner of the window to the first row |
| BLOCKHEIGHT | The height of each block |
| BLOCKWIDTH | The width of each block |
| PADDLEHEIGHT | The height of the paddle |
| PADDLEWIDTH | The width of the paddle |
| BALLHEIGHT | The height of the ball |
| BALLWIDTH | The width of the ball |
| STARTX | The starting x coordinate of the player |
| STARTY | The starting y coordinate of the player |
| ESCKEY | The key code for the Esc button |
| LEFTKEY | The key code for the Left arrow |
| RIGHTKEY | The key code for the Right arrow |
NOTE
You might be wondering why the HEIGHT and WIDTH variables are global and not constant. The reason is that a constant value can never be variable. The FontHeight() function can return a different value, and therefore it is variable. Because I need to use the HEIGHT and WIDTH variables throughout the program, I made them global.
Okay, next is the initialization section.
;Initialization SeedRnd MilliSecs() Global score = 0 Global blockhits = 0 Global level = 1 Dim blocks(BLOCKROWS, BLOCKCOLUMNS) Global ball.ball = New ball Global player.paddle = New paddle NewLevel()
Let's discuss this section. First the SeedRnd command seeds the random generator. Next, we create the score , blockhits , and level variables. score is the points the player has accumulated , blockhits tells how many times the player has hit a block, and level shows the player what level he is on. All of these variables are used in the function DrawHUD() .
NOTE
What Is SeedRnd?
You may wonder why we always use the command SeedRnd Millisecs() before using the Rand function. The fact is, no computer is random. Because it was created to do certain tasks correctly each time, it cannot truly create random numbers . Because of this fact, using Rand by itself in a program would cause the same number to be generated over and over. We use SeedRnd to change the starting point of the random generator each time, so it does not generate the same numbers over and over. MilliSecs() is a good function to use to seed the generator because MilliSecs() is never the same twice.
The command
Dim blocks(BLOCKROWS, BLOCKCOLUMNS)
creates a multidimensional array called blocks . If you recall, a multidimensional array is just like a regular array, but it has rows as well as columns. This fits in easily with our block setup.
Refer to Figure 3.33 to see the block rows and columns, complete with subscripts. You can see that the columns extend from the top to the bottom, and the rows extend from the left to the right.
Figure 3.33. Rows and columns.
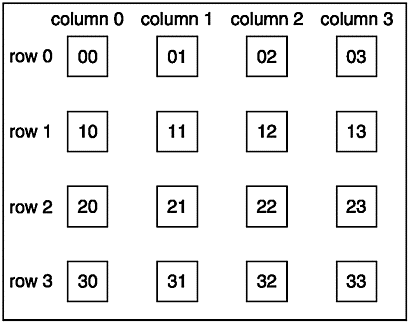
The next two variables created are ball and player . These two variables create the ball and player from the ball and paddle types.
Finally, we initialize the level by calling NewLevel(). This user -defined function creates all of the blocks and sets up the ball and paddle. The function is defined as:
Function NewLevel() For rows=0 To BLOCKROWS - 1 For cols=0 To BLOCKCOLUMNS - 1 blocks(rows,cols) = 1 Next Next ResetLevel() End Function
The first for loop counts each of the rows and the second for loop counts each of the columns. Notice that I make the for loops count to the number of rows and columns minus 1. This subtraction offsets the fact that the starting number in an array is 0. Referring to Figure 3.34, you can see that this counter goes through each of the columns in the first row before moving to the next row and starting again. Whenever you see dual for loops to count through the blocks, all of the columns in the first row are counted before moving to the next row. Each of the blocks are set to one, which means they will be drawn (if they are destroyed , the blocks are set to zero).
Figure 3.34. The For loops.
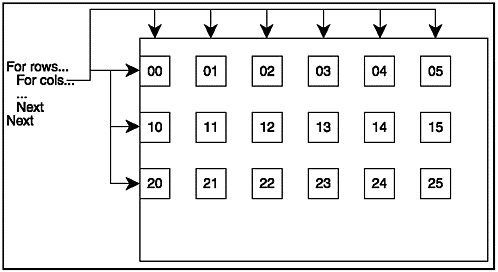
The next line calls the function ResetLevel() . ResetLevel() is defined as this:
Function ResetLevel() ball\x = 320 ball\y = 150 ball\directiony = 12 ball\directionx = Rand(-5,5) player\x = STARTX player\y = STARTY Delay 500 End Function
This function sets up the starting variables for the player and ball. The ball is put into the top center of the screen and the player is put into his constant starting position. The ball is set to move toward the paddle at 12 pixels a frame and left or right randomly . The randomness of the ball's movement can sometimes cause a problem, however. There is always a chance that directionx will be equal to 0, and the ball will move straight up and down, without moving left or right at all. I left this problem in the program to illustrate a problem with random functions, and to give you an exercise. Try to fix this problem so a directionx of 0 can never occur!
Well, that was initialization. Next up, the game loop: While Not KeyDown(1) Cls DrawHUD() TestInput() DrawBlocks() DrawPaddle() CheckBall() Flip Wend
As you can see, the loop does almost nothing other than calling other functions. If you look at Figure 3.35, you will see the function layout for this programwhat functions call which functions, and so on.
Figure 3.35. Textanoid's function outline.
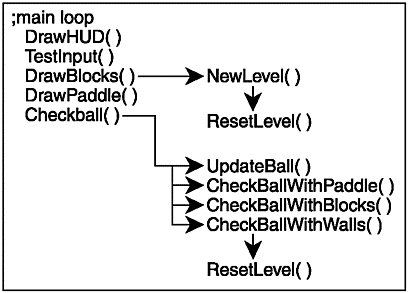
NOTE
You may wonder what the Flip command does. This command switches the back ground buffer with the foreground buffer. Don't worry what this meansit will be explained soon in Chapter 6, "Page Flipping and Working with Buffers."
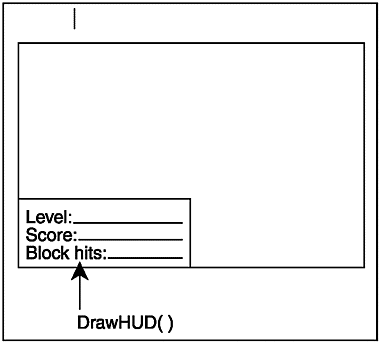
The first call the loop makes is to DrawHUD() . Referring to Figure 3.36, you can see that DrawHUD() simply shows the player what level he is on, what his score is, and how many blocks he has hit.
Figure 3.36. The DrawHud() function.
Function DrawHUD() Text 0,440, "Level: " + level ;write the level Text 0,450, "Score: " + score ;write the score Text 0,460, "Block Hits: " + blockhits ;write the block hits End Function
Not too bad, huh? The only thing you might want to notice is the coordinates. The x coordinate is 0, which means it is on the left side of the screen, and the y coordinate is 440, 450, and 460, which is pretty close to the bottom. (The total height of this window is 480, as seen in the Graphics call at the beginning of the program.)
The next call from the loop is to TestInput() . TestInput() checks if the player moves his paddle or quits the game.
Function TestInput() If KeyDown(ESCKEY) ;hit Esc End ;quit the game ElseIf KeyDown(LEFTKEY) ;hit left arrow player\x = player\x - 10 ;move paddle left ElseIf KeyDown(RIGHTKEY) ;hit right arrow player\x = player\x + 10 ;move paddle right EndIf End Function
Just for review, the KeyDown( scancode ) function tests to see if the selected key was hit. This function tests the Esc key, the left arrow, and the right arrow. If Esc is hit, the game ends. The left and right arrows move the paddle around the board.
The next function is DrawBlocks() . This function loops through each block and draws it if it is equal to 1. If a block is set to 0 (a block is set to 0 when it is hit by the ball), it is not drawn.
Function DrawBlocks() x = BLOCKXORIGIN y = BLOCKYORIGIN newlevel = 0 ;This variable creates a new level if there are no blocks For rows = 0 To BLOCKROWS x = BLOCKXORIGIN ;reset rows position For cols = 0 To BLOCKCOLUMNS If (blocks(rows,cols) = 1) Then;If the block exists Text x,y, BLOCKSTRING$ newlevel = newlevel + 1 EndIf x = x + BLOCKXGAP Next y = y + BLOCKYGAP Next If newlevel = 0 level = level + 1 NewLevel() EndIf End Function
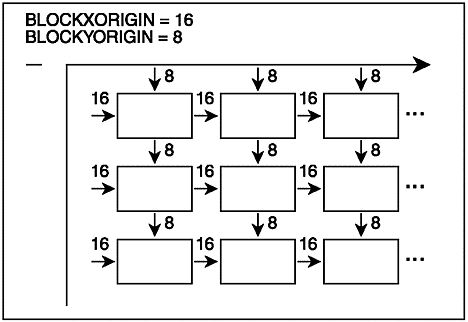
This may be tough to understand, but I'm here to help! The function starts by setting x and y to BLOCKXORIGIN and BLOCKYORIGIN . Refer to Figure 3.37 to see how the origin variables define how far from the top-left corner the first block is.
Figure 3.37. The X and Y origins.
The newlevel variable checks to see if there are any blocks left. Every time a block is found, newlevel is incremented. At the end of the function, if newlevel equals 0, a new level is created.
The function now creates two for loops to iterate through the rows and columns of blocks (just like in DrawBlocks() ). The only line between the two for loops is
x = BLOCKXORIGIN
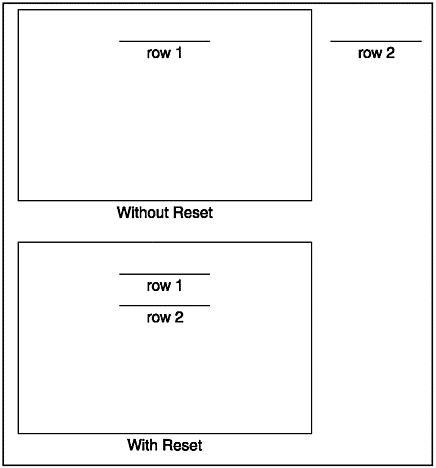
This line resets the x value to BLOCKXORIGIN after all of the columns in one row have been tested . This line is necessary; if it were not included, the program would believe that the second row started offscreen . This is shown in Figure 3.38.
Figure 3.38. DrawBlocks() with and without reset.
The next few lines test each block:
If (blocks(rows,cols) = 1) Then;If the block exists Text x,y, BLOCKSTRING$ newlevel = newlevel + 1 EndIf
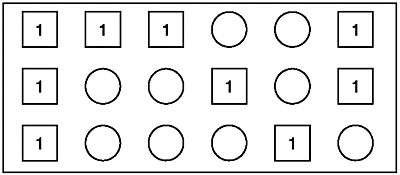
Figure 3.39 shows how each block is tested. If the current block is equal to 1, the block is drawn; if not, it is not drawn. At least one block must be drawn to continue the level; if none are drawn, the newlevel variable never increases and stays at 0.
Figure 3.39. The block test.
The final line before the column loop's Next command is
x = x + BLOCKXGAP
This line advances the x variable to the next block. The BLOCKXGAP constant contains the number of pixels between each block in a single row ( otherwise known as every column).
After all the columns in the first row have been tested, the loop moves to the next row. This is achieved by adding a gap to the y variable:
y = y + BLOCKYGAP
Just like BLOCKXGAP , BLOCKYGAP is the number of pixels between each row. After all the boxes in one row are tested, the y value moves down a few pixels to begin drawing a new row.
The final lines of the function test the newlevel variable to see if any blocks were hit. If none were (and newlevel equals 0), the level is increased, and NewLevel() is called. This call begins the next level and redraws all the blocks.
Back to the game loop. The next function called is DrawPaddle(). DrawPaddle() is very simple.
Function DrawPaddle() Text player\x,player\y,PADDLESTRING$ End Function
The only action this function performs is drawing the player at his x and y position.
Finally, the game loop makes its final call ProcessBall() .
Function CheckBall() UpdateBall() ;Move and draw ball CheckBallWithPaddle() CheckBallWithBlocks() CheckBallWithWalls() End Function
This function is the biggest one in the program. First off, it updates the position of the ball.
Function UpdateBall() ball\x = ball\x + ball\directionx ;Move the ball to the left ball\y = ball\y + ball\directiony ;Move the ball up Text ball\x, ball\y, BALLSTRING$ ;Draw the ball End Function
This function begins by moving the ball based on its directionx and directiony variables. Then it draws the ball on the screen.
Next, the CheckBall() function calls CheckBallWithPaddle(). Function CheckBallWithPaddle() If ball\x >= player\x And ball\x <= player\x + PADDLEWIDTH And ball\y + BALLHEIGHT>= player\y And ball\y + BALLHEIGHT <= player\y + PADDLEHEIGHT ball\directiony = -ball\directiony + Rand(-3,3) EndIf End Function
This function is pretty simple. The If statement checks if the ball has hit the paddle. You might have trouble understanding the If test, so I'll explain it to you.
See Figure 3.40 to understand how the test works. The line tests the ball and checks whether its x value is between the left side of the paddle and the right side, and whether its y value is between the top and the bottom of the paddle.
Figure 3.40. The ball- paddle collision.
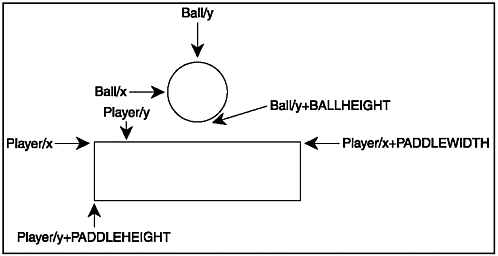
If the ball has collided with the paddle, the directiony variable is flipped . This makes the direction move upward instead of downward. Also, if it hits the paddle, the speed of the ball is increased by a value between 3 and 3 (if it is increased by a negative value, the ball slows down).
Next, the CheckBall() function calls CheckBallWithBlocks() . This function tests the ball to see if it has hit any blocks.
Function CheckBallWithBlocks() ;y is the first row y = BLOCKYORIGIN For rows=0 To BLOCKROWS - 1 ;Reset x to first block of column x = BLOCKXORIGIN For every column of blocks For cols = 0 To BLOCKCOLUMNS - 1; ;If it exists If blocks(rows,cols) ;If the ball hit the block, delete the block If ball\x >= x And ball\x <= x + BLOCKWIDTH And ball\y >= y And ball\y <= y + BLOCKHEIGHT blocks(rows,cols) = 0 ;Delete block ball\directiony = -ball\directiony + Rand(-2,2) ;Reverse its direction and add randomizer score = score + 75 blockhits = blockhits + 1 ;It can't hit more than one block, so leave function Return EndIf EndIf ;move to next column x = x + BLOCKXGAP Next ;move to next row y = y + BLOCKYGAP Next End Function
This function might seem tough, but it is a lot like DrawBlocks( ). The first thing the function does is set up the origins. Then it begins the rows loop and resets the x value, just as in DrawBlocks() . Now, in the column loop, the block is tested to see if it exists. If it does, the ball is tested with the block. If the ball does hit the block, the block is deleted (by setting it to 0) and the direction is reversed along with a random speed increase. Finally, the score is updated, the blockhits variable is increased, and the function returns (because the ball can't hit two blocks in one frame).
The last action the CheckBall() function performs is to check the ball with the walls.
Function CheckBallWithWalls() ;If ball hits the left wall, reverse its direction and add randomizer If ball\x <= 0 ball\directionx = -ball\directionx + Rand(-2,2) ;If ball hits top wall, reverse its direction and add randomizer ElseIf ball\y <= 0 ball\directiony = -ball\directiony + Rand(-2,2) ; If it hits right wall, reverse its direction and add randomizer ElseIf ball\x >= 640 - BALLWIDTH ball\directionx = -ball\directionx + Rand(-2,2) ; ;If ball hits lower wall, dock points for missing ball ElseIf ball\y >= 480 score = score - 200 ;Reset the level ResetLevel() EndIf End Function
If the ball hits the top, left, or right wall, it is reversed. If it hits the bottom wall (if the paddle fails to hit it), 200 points are subtracted from the score, and the level is reset.
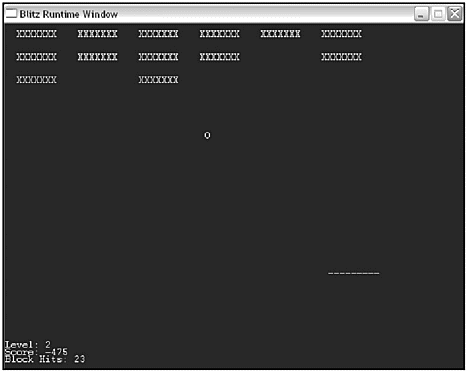
Hey, take a look at Figure 3.41. It's our final version of Textanoid!
Figure 3.41. Textanoid!
| [ LiB ] |
EAN: 2147483647
Pages: 94
If you may any questions please contact us: flylib@qtcs.net