The Process Template Editor
As you could probably imagine, the XML documents that constitute the process templates can get messy and complicated. The Process Template Editor eases the burden of process template modification by providing you with a graphical interface. The tool performs multiple forms of validation on the process template to help prevent making errors or inconsistencies within the process template.
| Warning | Even though the Process Template Editor was created to make editing process templates much easier, you should still have some understanding of XML. |
You can obtain the Process Template Editor as part of the Team Foundation Power Toys download available from the Microsoft Download Center ( http://www.microsoft.com/downloads).
The Process Template Editor provides features that will make process template editing much quicker and easier. The following sections detail how to use the tool to customize process templates and work items for the benefit of your teams and organization.
Life before the Process Template Editor was not good for project managers. The only way to edit a process template was through the use of a text editor, because changes needed to be made directly to the XML files. Intimate knowledge of the structure and rules of the underlying XML was required, and mistakes were frequent. Also, there was no way to validate any of your changes until you imported the process template back into Team Foundation Server, making testing difficult and time consuming.
In addition, you needed a couple of important command-line tools if you wanted to manage work item type definitions and Global lists. WITImport and WITExport (WIT stands for Work Item Type) are tools that were used to import and export, respectively, work item types from a Team Project into and from XML files that needed to be edited by hand. Similarly, GLImport and GLExport are similar command-line tools that were used to import and export Global list definitions.
Modifying Process Template Information
You can launch the Process Template Editor from Visual Studio 2005. On the Team menu, point to Process Template, and then click Open Process Template. This will allow you to specify a process template that you wish to edit. To select this template, navigate to the location of the process template you downloaded from the Team Foundation Server until you find the ProcessTemplate.xml file. The next step you should take is to ensure that the Process Template Editor is connected to a Team Foundation Server. By default, the Process Template Editor does not connect to the default Team Foundation Server you configured in your Team Explorer. To specify a Team Foundation Server you wish the Process Template Editor to connect to, choose Connect from the drop-down list box in the top right corner of the Process Template Editor window to show a dialog box that will allow you to specify the Team Foundation Server. This may seem strange at first because the tool is used primarily to edit the XMLbased process template files stored on your local computer or corporate file share. The reason for the required connection has to do with validation-the Process Template Editor uses Team Foundation Server itself to help validate the contents of the process templates as you go. If you choose not to connect to Team Foundation Server, by clicking the Work Disconnected button (Figure 7-11), you will still have the ability to edit process templates; however, some validation will not occur until you attempt to import the process template to Team Foundation Server. To have the Process Template Editor help validate your process template as you make changes, specify the name of your server in the Connect to Team Foundation Server dialog box (simply replace the name of your server between http:// and :8080). For example, if the name of your computer running Team Foundation Server is TeamFoundation01, the connection specified in the dialog box should be http://Team Foundation01:8080.
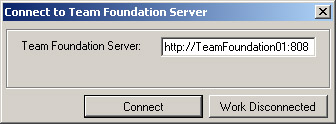
Figure 7-11: Specifying a computer running Team Foundation Server by using the Process Template Editor
After you open the ProcessTemplate.xml file, you will be presented with the Process Template Editor window, as shown in Figure 7-12. The left side of the Process Template Editor is a tree that represents the configuration areas of a process template. As you navigate through the tree, the right side of the process template will change to show you all of the available configuration options for the selected configuration area.
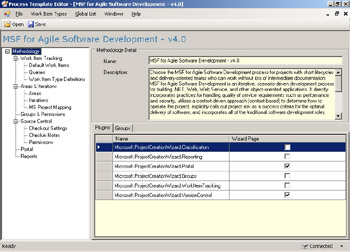
Figure 7-12: The Process Template Editor main window
The first set of options you will see when you open a process template is general methodology information, such as the methodology name, description, and a list of plugins that the opened process template makes reference to, of which only name and description can be edited. If you made a copy of an existing process template as the basis for a new process template, provide a unique name for your new template; otherwise, when you upload it, you will overwrite the existing version.
Editing Default Work Items
Let’s start by looking at how you can maintain work item type definitions within a process template. If you have already opened up a process template within the Process Template Editor, you will see that the first configuration node in the process template configuration navigation area is called Work Item Tracking. Let’s start by maintaining the default set of work items within a process template. Just to recap, a process template contains a set of work items that are automatically created for you when you create a new Team Project based on that template. For example, MSF for Agile Software Development ships with 15 default work items such as Set up: Set Permissions and Create Vision Scope Statement. The Process Template Editor provides you with a convenient way to modify this list, allowing you to add new default work items, edit existing work items, or delete default work items from the process template.
To add a new default work item to a process template, perform the following steps:
-
Click the Default Work Items node in the Process Template configuration navigation tree. This will display the Default Work Items tab and a list of all of the default work items in the process template.
-
On the Default Work Items tab toolbar, click New to specify the type of default work item you would like to add to your process template. Note that only work item types that are part of your process template are listed.
-
When you have specified the work item type, Risk for example, the Process Template Editor will display the form (as shown in Figure 7-13) associated with the work item type. Here, you will be able to provide details for your work item such as Title, Description, and any other details you want to add. When you are finished, click OK to add the work item to the list of default work items.
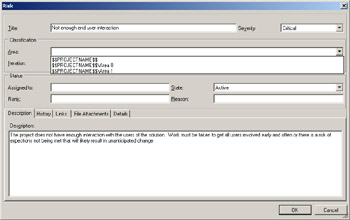
Figure 7-13: Adding a new Risk work item to a process template
There are some important aspects of the default work item form to point out. First, this form does not provide any of the validation you would normally see when filling out work item forms from within Team Explorer. Second, when you are typing classifications, you will see $$PROJECTNAME$$ in the drop-down lists for the Area and Iteration fields. This is a placeholder for the name of the project this work item will eventually be created under and will be replaced when the work item is created in projects that are created from the process template you are editing.
| Tip | One of the most common types of default work items added to process templates are Risk work items to help ensure that the most common issues your team deals with from project to project are specifically addressed during every project. |
If you make a mistake when you are filling out the details of a default work item, don’t worry- you can always go back and edit the default work item by selecting the work item from the list of default work items and clicking Open on the Default Work Item tab toolbar. Deleting default work items is simple: click the default work item you want to remove from the process template and then click Delete on the Default Work Item tab toolbar. Delete default work items with care because there is no undo feature in the tool.
Editing Work Item Queries
Work Item Queries are the very essence of how your team will find and work with work items. The Process Template Editor provides the ability to manage the default list of a Team Project’s work item queries. It also provides you with the ability to create new simple work item queries through the Work Item Query Editor. To see the list of default work item queries in your process template (Figure 7-14), click the Queries node of the Process Template Editor’s configuration navigation tree.
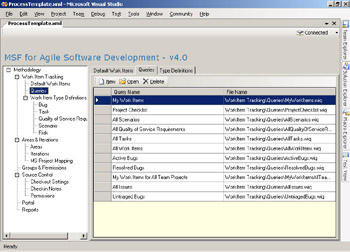
Figure 7-14: Managing work item queries by using the Process Template Editor
| Note | If there is one aspect of a Team Project that changes often throughout the life of a project, it is work item queries. Invariably, teams will create new work item queries for their projects no matter how much work they perform up front trying to identify queries they think they might need. In addition, Team Explorer makes editing work item queries almost trivial, and for this reason, many project managers choose not to spend a lot of time using the Process Template Editor to create many new work item queries. |
When creating a new work item query by clicking New on the toolbar of the Queries tab, you will be prompted to specify a name for the query. From the same dialog box that prompts for the name of the query, you can click Edit Query Definition to show the Process Template Editor’s work item query editor (shown in Figure 7-15).
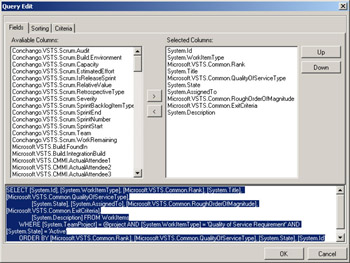
Figure 7-15: The query editor in the Process Template Editor
The query editor will allow you to add and remove fields from the query results (using the Fields tab), change the query result sort order, and specify the criteria for the query. The query editor also displays the details of the underlying query definition in SQL, which can also be edited in place to produce complex queries the editor isn’t able to produce, such as nested query conditions. If you are already familiar with the Team Explorer work item query building interface, you will have no problems using the Process Template Editor’s version of the tool.
| Tip | The Process Template Editor does not provide the same graphical abilities as Team Explorer for creating complex work item queries. It will be easier to create placeholders for the work item queries within the Process Template Editor and update their definition once you have created a new project. |
Editing Work Item Types
For many project managers, work item customization is quite important because it allows them to control exactly what to track and how to track it. For this reason, the Process Template Editor helps to provide an environment that makes it much easier to edit work item type definitions. In fact, there are three ways you can modify work item type definitions by using the Process Template Editor: editing work item type definitions in a Process Template; editing in individual work item type definition files; and editing work item type definitions against a live Team Project, an operation that allows you to easily make changes to work items without having to create a new Team Project or use cryptic command-line utilities.
Let’s start by looking at how you can manage work item type definitions as part of a process template definition. You will start by bringing up the list of work items in your process template by clicking the Work Item Type Definitions node of the configuration navigation tree. You can use the Process Template Editor to create new work item type definitions, edit existing definitions, remove definitions from the process template, and import work item type definitions from outside of the process template. Although you have the ability to create a work item type definition from scratch, this is rarely a good idea. You should always create a new work item type based on the definition of another, and for this reason, when you click New on the Type Definition tab’s toolbar, you will get a dialog box that allows you to make a copy of an existing work item first, as shown in Figure 7-16.
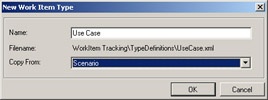
Figure 7-16: Creating a new work item from the definition of another
| Caution | If you create a work item type definition without first copying a definition from another work item, you will be responsible for adding all fields, workflow, and field layouts to the work item from scratch, which can be tedious and time consuming. |
After you create a new work item, you can then edit its definition by clicking Open on the Type Definitions tab’s toolbar to show the Work Item Type Edit window. This window contains three tabs. The Fields tab lists all work item fields associated with the work item type you are editing. The Fields tab will also allow you to create new fields or edit or delete existing fields. The Workflow tab will allow you to manage the workflow definition for the work item, and the Layout tab provides tools that will help you design the form users will use to fill out work item details.
| Note | You might notice the View XML button on many of the tabs of the Work Item Type Edit window. Clicking this button displays the underlying XML of the section of the work item type you are working on. This feature is really only for more technical users of the tool to help understand how the Process Template Editor is managing the underlying XML of the work item type. |
Editing Work Item Fields
Managing the fields of a work item is likely one of the first things you will do after creating a new work item type. You can add new fields to capture additional information within the work item (most typical), edit the definition of existing fields (such as to change field rules), or even delete fields. When you are either editing a field or creating a new field type, you will be working with the Field Definition dialog box (Figure 7-17), where you will be able to specify the name of the field, the field type, the internal reference name of the field, associated help information, and data warehouse integration parameters.
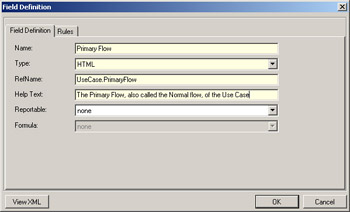
Figure 7-17: Editing field definitions within a work item type definition
After providing a name for your field, you will also need to specify a field type, details of which are provided in Table 7-4. The RefName value is used internally in Visual Studio Team System and must uniquely reference your new field within all Team Projects on the Team Foundation Server instance. The RefName value also needs to contain one period, and you may not use the words System or Microsoft. Some examples of RefNames include MyCompany.UseCase-Name and UseCase.NormalFlow. The Help Text field will help users understand how the field is to be used when they are filling out work item information. The Reportable field tells Team Foundation Server how to treat the value of the field with respect to the underlying data warehouse. The Reportable field value can either be none, dimension (which will allow the field value to act much as a pivot field in an Microsoft Office Excel pivot table), detail, or measure, which indicates that it is to be used as a calculated field. If you specify that the field value should be a measure, you must then specify the formula, selecting from sum, count, distinct count, average, minimum, or maximum data warehouse calculations.
| Warning | Working with reportable fields should not be taken lightly. A detailed explanation of the Team Foundation Server data warehouse is beyond the scope of this book, and you must have a certain depth of understanding of this data warehouse before you work with reportable fields. So unless you are working with software developers who understand the structure and relevance of the underlying data warehouse, do not mark your fields as reportable.
|
Each field can have one or more rules associated with it. For example, you might want to create a mandatory field called Customer Name and provide a list of valid customers that will appear in a drop-down list. In this case, there are actually two rules: a mandatory rule and an allowed values list. To add a rule to a field, open the field definition and click the Rules tab (shown in Figure 7-18).
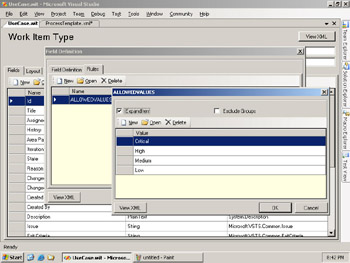
Figure 7-18: Work item field rules
There are many available rules that you can apply to a field, which are described in Table 7-5. However, by far the most common rules you will use will be the Allowed Values, Default, Read Only, and Suggested Value Rules.
| Field Rule | Description |
|---|---|
| ALLOWEDVALUES | Provides a list of values allowed for the field. The user must select from one of these values when filling out the form. You can also specify group names and global lists as an allowed value and specify that groups be expanded and listed individually in the field drop-down list. For example, you can specify [Project]\Contributors as an allowed value. If you select the Expand Item check box, the work item will display a list of all users who are a member of the current Contributors group in the Team Project in addition to the name of the Contributors group itself. If you select the Exclude Groups check box, only the members of the Contributors group are listed, and the group name will be omitted from the list. |
| ALLOWEXISTINGVALUE | Allows a field to retain an existing value, even if that value is no longer allowed. |
| CANNOTLOSEVALUE | Indicates that the value of the field cannot be lost. |
| COPY | Indicates that the value of the field should be copied from the system clock or the name of the current user. |
| DEFAULT | Specifies a default value for the field. Default values can be obtained from the system clock (used, for example, for capturing a particular time a work item has changed), the name of the current user initiating the change (for example, the Changed By field would capture the name of the current user editing the work item), a particular value expression, or the value of another field in the work item. |
| EMPTY | The field value will be cleared on a work item save, and the user will not be allowed to enter any value. This rule can be made conditional by providing names of groups for which this rule will be invoked or specifically ignored. For example, you can represent a rule that requires a given field to remain empty for Project Contributors and not be required to remain empty for Team Foundation Administrators. |
| FROZEN | Specifies that after the field value has been set, it cannot change. This rule can be made conditional by providing names of groups for which this rule will be invoked or specifically ignored. For example, you can represent a rule that requires a given field to be frozen for Project Contributors and not required to be frozen for Team Foundation Administrators. |
| MATCH | Specifies that the string field must match a particular pattern or patterns. Valid values are A, N, and X. All other values are taken as literals. A represents an alphabetical character. N represents a numeric character. X represents any alphanumeric character. For example, the pattern XXX-XXX-XXX will allow values 123-abc-r4g and not allow values such as 123.455-23. |
| NOTSAMEAS | Specifies that a field value cannot be the same as the value of another field in the current work item. |
| PROHIBITEDVALUES | Provides a list of values that the field explicitly cannot contain. |
| READONLY | Indicates that this field is read only. This rule can be made conditional by providing names of groups for which this rule will be invoked or specifically ignored. For example, you can represent a rule that sets a given field as read only for Project Contributors and as not required for Team Foundation Administrators. |
| REQUIRED | Indicates that this field must be specified in the form. This rule can be made conditional by providing names of groups for which this rule will be invoked or specifically ignored. For example, you can represent a rule that causes a given field to be required for Project Contributors and not required for Team Foundation Administrators |
| SERVERDEFAULT | This rule is similar to the COPY rule; however, this rule fills in a value when the work item is saved instead of when it is first opened, and the user cannot override the value. When this rule is turned on, fields will appear readonly on the form. This rule is used for fields such as Last Changed By and Last Changed On to support secure audit trails. |
| SUGGESTEDVALUES | This rule is very similar to the ALLOWEDVALUES rule except that using this rule, the users are free to type in any other value they want in the field, whereas the ALLOWEDVALUES rule forces them to select from a pre-established list. |
| VALIDUSER | Displays a list of users of Team Foundation Server. |
| WHEN | Used for conditional rules. This rule specifies that further rules are enabled when a particular field has a particular value. |
| WHENNOT | Used for conditional rules. This rule specifies that further rules are enabled when a particular field does not have a particular value. |
| WHENCHANGED | Used for conditional rules. This rule specifies that further rules are enabled when a particular field has changed in a work item. |
| WHENNOTCHANGED | Used for conditional rules. This rule specifies that further rules are enabled when a particular field has not changed in a work item. |
As you can see, you can be quite verbose with field rules, and it will likely take a bit of practice to get things right. I have learned from the experiences of many customers worldwide that field rules should be kept as simple as possible. Work items that contain many complex rules will dissuade your users from using work items. Use rules to make work items easier for your team members to use, not to make then more difficult.
You may have noticed that you can make reference to groups from certain field rules such as ALLOWEDVALUES and SUGGESTEDVALUES. Groups can be Visual Studio Team System Global groups, Active Directory groups, or Team Foundation groups. For example, you will notice that when adding a list item to a list rule such as ALLOWEDVALUES, there is a field drop-down list that also displays any Global groups on the server to which you are currently connected. By default, Team Foundation Server stores build numbers in Global lists on the server. If you specify a Global group as a list item and set it to expand by selecting the Expand Item check box, the values within the group will be listed in the field. You can also specify Team Foundation Security groups such as [Project]\Contributors or [Server]\Team Foundation Server Administrators or groups from Active Directory such as MyDomain\Domain Users.
Editing Work Item Workflow
After creating fields and their rules, you can also change the workflow specification for a work item. Each work item type specifies its own workflow specification, which consists of a set of states and a set of valid transitions between two states. To modify a work item type’s workflow definition by using the Process Template Editor, click the Workflow tab of the Work Item Type Editor, shown in Figure 7-19.
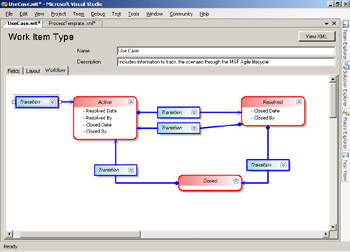
Figure 7-19: Editing workflow within a work item type definition
The Process Template Editor will allow you to specify all of the valid states of a work item. Each state can also specify a set of rules that apply when the work item is in that state. For example, in the Task work item type that is shipped with the MSF Agile process template, the Active state specifies a few new rules, specifically that when the state of the work item is Active, the Closed Date and Closed By fields of the work item must be empty.
To create a new workflow state, perform the following steps:
-
Open the work item type definition for editing and click the Workflow tab to show the work item workflow designer. Ensure that the Visual Studio 2005 Toolbox window is visible by clicking Toolbox on the View menu. Drag a new state from the workflow designer toolbox onto the design surface.
-
Select the new state object on the workflow design surface and type the name of the state. The name of the state must be unique to the work item type.
-
Add rules that will be activated when a work item enters the new state. Right-click on the new state object on the workflow design surface and click Open Details from the context menu. To add a new rule to a field, click New. You will then need to specify a field you would like to add a new rule to and specify the rule you want to apply (shown in Figure 7-20). Use the same process as when creating rules for work item fields.
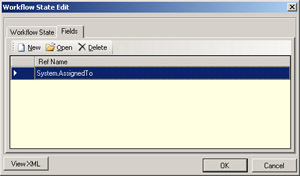
Figure 7-20: Selecting a field when adding a rule
Workflow transitions specify the rules that allow a work item to move from state to state. By default, when you create a new work item, it doesn’t have any state at all. For this reason, you will need to have a transition specified from the “nothing” state to one of the states you just created. When creating state transitions, there are many options you can specify. To create transitions from the Process Template Editor, click the Transition object from the workflow designer’s toolbox onto the design surface. Next, click the state you wish to create a transition from followed by the state you wish to make a transition to. To specify the details of the transition, right-click on the transition object that was just created for you on the workflow design surface, and click Open Details from the context menu. The result is shown in Figure 7-21.
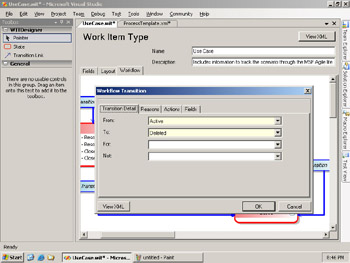
Figure 7-21: Adding a workflow transition to a work item
On the Workflow Transition form on the Transition Detail tab, you can specify the state you are transitioning from in addition to the state you are allowing transition to. In addition, you can use the For and Not drop-down lists to specify groups of people for whom this transaction is allowed or not allowed. For example, you may want to give only project managers the ability to reopen a work item, in this case moving a work item from the closed to active state. In this case, you can click [Project]\Project Managers in the For drop-down list if you have this group set in your process template.
Every state transition typically has a reason, which corresponds to the Reason field on a work item form. Reasons allow you to specify why a transition is being made. For example, you may have a transition from the Active to the Closed state because the work item has been completed, deferred, cut from scope, or has been deemed obsolete. Each of these reasons would be listed in the list of reasons for the transition definition. You can also specify the default reason that will automatically be chosen for you when you initiate state change. In the case of the workflow definition of a Task work item in the MSF Agile template, the default reason for the transition from Active to Closed transition is Completed. To make this even more complicated, every reason selected by a user during a transition can invoke even more field rules in the same way that workflow states can create new rules. Just when you thought it couldn’t get more complicated, you should also know that transitions can also invoke additional rules. For example, for the transition from Active to Closed states for a Task in MSF Agile, the Close Date of the work item will have a SERVERDEFAULT rule, the value of the Closed By field will be from the current user (according to the COPY rule), must be a VALIDUSER, and is a required field as determined by the REQUIRED rule.
Workflow transactions can also be triggered by something called an action. For example, Microsoft provides a CheckIn action that gets triggered when a developer associates a work item during a check-in operation. When the check-in is performed by the developer, Visual Studio Team System will automatically trigger the appropriate transition associated with the action. Note that the check-in action is the only action you can associate with a transaction until Microsoft provides additional actions or tools that extend Team Foundation Server provide additional actions.
To create new field rules on transactions, perform the following steps:
-
While editing the details of a transition of a workflow in the workflow designer, click the Fields tab in the Workflow Transition dialog box to show a list of fields to which you want to apply rules.
-
Click New to add a field to the list or click an existing field to open its properties. From this point on, specifying a rule for the transition is very similar to adding rules to work item fields.
To modify the list of reasons for a transition, follow these steps:
-
While editing the details of a transition of a workflow in the workflow designer, click the Reasons tab in the Workflow transition details dialog box to show a list of reasons for the selected transition.
-
Click New above the list of reasons to create a new transition reason or Open to view an existing reason. You can also mark one of the reasons in the list as default by selecting the check box in the Is Default column.
-
On the Reasons tab, you will need to specify a name of the reason, which needs to be unique for the transition. The Fields tab in this dialog box is where you would add rules that will be activated when the reason is selected during a transition. Perform the same steps as you would when adding field rules in other areas of a work item type definition.
Customizing Work Item Layouts
Up until this point, you have learned how to add fields and control the workflow and rules that determine how work items behave. None of these new fields, however, will be visible until you ensure that they are properly displayed on the work item form. Each work item type has its own layout that determines how work items are displayed to users from within Visual Studio. The Process Template Editor provides the Work Item Layout Editor to help with the structure of the work item forms, allowing you to quickly change the entire look and feel of a work item for your team. While editing a work item type definition, you can click the Layout tab of the Work Item Type Edit window to view the layout details of the work item, as shown in Figure 7-22.
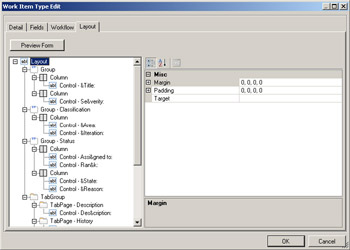
Figure 7-22: Editing a work item’s layout
The layout of a work item consists of a number of different elements. Field controls are used to capture data for work item fields. Field controls can either be simple text boxes (called FieldControls in the Process Template Editor), Date and Time controls (referred to as DateTimeControls) that help capture date/time-based fields by adding a calendar to the dropdown list of the field, or HTML controls (referred to as HTMLFieldControls) that allow the capture of fully formatted text information for HTML-based fields. Work item forms can also contain Group controls, which act to group a number of related fields together on the screen. For example, if you view a Risk work item, you will see that the fields Assigned to, State, Rank, and Reason are grouped together on a Group control called Status. A Column is another element you must consider when modifying the layout of work item forms. For example, the Status group on the Risk work item just mentioned displays the four fields it contains across two columns. You will also notice that work item forms contain tabs that help to organize other controls such as group controls and other field controls. A cluster of tabs on a work item form is called a Tab Group.
When designing the layout of forms, you should be aware of some restrictions on where you can place certain controls. For example, Tab Group controls must be contained within a Tab Group. Group Controls must have at least one Column. Field controls can be placed just about anywhere on the form except for directly within Groups or Tab Groups; in both of these cases, field controls must be assigned to a Column contained within a Group. And finally, Columns must be contained with a Group or Tab Page. What you are left with is a hierarchy of work item form elements. In addition, each element that you can create (tab groups, tabs, groups, columns, and field controls) all have a set of properties, which are displayed as property pages in the Process Template Editor, which you can configure to control how the elements are displayed. Table 7-6 displays the available properties for each element type of a work item form.
| Element Name | Property | Element Properties |
|---|---|---|
| Field Control | Dock | If specified, the dock property allows a field to stretch to fill the remainder of the container. Valid field docking values are Top, Bottom, Left, and Right. |
| FieldName | Specifies the name of the underlying work item field the control will map values to. | |
| Label | Specifies text to help identify associated field contents. | |
| LabelPosition | Indicates where the label should be placed relative to the field data. Possible values are Top, Bottom, Left, and Right. | |
| Margin | Specifies the amount of room you want around the outside of the control (between it and its neighbors) in pixels. The amount of space can vary on each side. | |
| Padding | Specifies the amount of room you want around the border of the control (between it and its contents) in pixels. | |
| ReadOnly | Allows you to show a field in a control but not perform any editing. | |
| Type | Specifies the type of the control. | |
| Group/Tab | Label | Specifies the label of the group section. |
| Margin | Specifies the amount of room you want around the outside of the control (between it and its neighbors) in pixels. The amount of space can vary on each side. | |
| Padding | Specifies the amount of room you want around the border of the control (between it and its contents) in pixels. | |
| Column | FixedWidth | Specifies the column width as a number of pixels. |
| Percentage-Width | Specifies the width the column should occupy as a percentage of the width within the containing element. PercentWidth and FixedWidth are mutually exclusive. | |
| Tab Group | Margin | Specifies the amount of room you want around the outside of the control (between it and its neighbors) in pixels. The amount of space can vary on each side. |
| Padding | Specifies the amount of room you want around the border of the control (between it and its contents) in pixels. |
Specifies the width the column should occupy as a percentage of the width within the containing element. PercentWidth and FixedWidth are mutually exclusive.
To add new controls or change the position of existing controls on the form, perform the following steps:
-
In the Work Item Type Edit window, click the Layout tab to show the control tree and the properties pane.
-
To add a control to the work item layout, right-click the area you want to add the control in and select from the valid list of controls that appear in the shortcut menu. Note that the Process Template Editor will show you only controls that you can add based on the area of the layout hierarchy you selected. For example, if you chose a Tab Group in the tree, the Process Template Editor will allow you to add only a Tab Page. Set the appropriate properties for the control in the properties pane on the right side of the Work Item Type Edit window.
-
To move a control to a different position in the layout tree, right-click the control you want to move, and on the shortcut menu, choose either Move Up or Move Down depending on the direction you want to move the control in the tree. Continue this operation until the control has moved into the desired location.
-
Click the Preview Form button in the Work Item Type Edit window to have the Process Template Editor give you a representation of what the work item will look like when you’re finished.
Of course, as with anything else, save your work often. The work item type definition will not be saved until you choose to save the entire process template by clicking Save on the File menu (or pressing Ctrl+S) in Visual Studio 2005.
Other Work Item Features in the Process Template Editor
We have just covered how to edit work item type definitions that are part of a larger process template. The Process Template Editor provides a few extra handy features that provide you with more options on how you work with work item type definitions. Specifically, the Process Template Editor provides you with the ability to export work item type definitions from a Team Project to an XML file on your computer. To do this, select Process Editor >Work Item Types >Export WIT from the Team menu in Visual Studio 2005 The Process Template Editor will prompt you to identify a Team Project on the server you just made a connection to, and from there, you can select the work item type definition you want to export along with the name you want to give the file and location you want to export the definition into, as shown in Figure 7-23. The Process Template Editor allows you to edit the work item type definition independent of a process template definition.
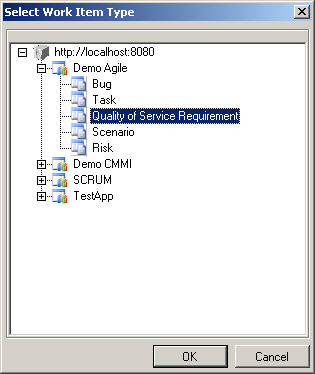
Figure 7-23: Selecting a work item to export
When you have successfully exported the work item, in Visual Studio 2005, on the Team menu, point to Process Editor, then point to Work Item Types, and then click Open WIT from File to open the work item type definition where you can use the Process Template Editor to perform all of the aforementioned work item modifications. When you’re finished, you can save the work item type definition and then re-import to either the same Team Project or another Team Project on your server in Visual Studio 2005. On the Team menu, point to Process Editor, then point to Work Item Types, and then click Import WIT. During the import process, you will be given a chance to select a target Team Project you want to import the work item into. If you choose a Team Project that already has a work item with the same name, you will be asked whether you want to overwrite the version of the work item type stored on the server with the new version you are importing.
Another very handy feature is the ability to open a work item type definition directly in a Team Project without having to export, modify, and then re-import the work item type definition. To modify live work item types, on the Team mean, point to Process Editor, and then click Open WIT from Server and specify the Team Project and work item type you want to edit. When you are finished, simply save the work item type definition, and updates will be made to the server for you. The next time your team uses a work item of that type, they will be able to see the appropriate changes.
| Warning | Be careful when editing work item type definitions on the server. If you make a mistake, it will affect your entire team. A good practice when editing work items involves having a test project available where changes can be made in isolation from other team members. After you have verified that all appropriate changes are acceptable, you can then use the Export and Import features of the Process Template Editor to move the work item type definition from your test project to the live Team Project for your team to start using. |
Editing Global Lists by Using the Process Template Editor
Global lists are structures stored within Team Foundation Server that list items. An example of a Global list is a list of automated build numbers. These lists can be used to provide values for drop-down lists associated with work item fields, as described in previous sections of this chapter. Many organizations have taken the use of Global lists to the next level, using these lists to provide a convenient way of storing a single representation of available list options. For example, you can create a Global list called Allowed Ranks that contains the values {1,2,3,4,5}. You could then change the definition of the Rank field in all of your project’s work item type definitions to use the Allowed Ranks Global list to specify the ALLOWEDVALUES field rule. When using the work item, the Rank field will allow you to select {1,2,3,4,5} from the dropdown list. Suppose at some point in the future it is decided that the possible Rank values should be changed to {1,2,3,4,5,6,7,8,9,10}; because you used a Global list to store these values, you could simply edit the Allowed Ranks Global list, and every field definition that uses this Global list will reflect this change instantly.
Similar to work item type definitions, the Process Template Editor provides you with the ability to edit Global lists directly on a server, export global lists to an XML file where it can be edited offline, and import Global list XML files back to Team Foundation Server. In Visual Studio, on the Team menu, point to Process Editor and then click Global List to perform these operations. Figure 7-24 depicts the Global List editor within Visual Studio Team System. Right-click any node in the editor to obtain a list of options. These options include New Global List, New Item (which will create a new value under an existing global list), and Delete (which will delete either an item in a list or the entire Global list itself).
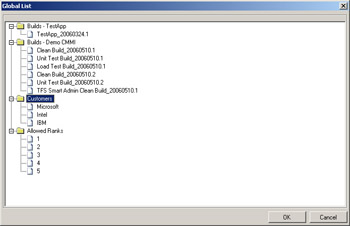
Figure 7-24: Managing Global lists with the Process Template Editor
Editing Classifications
Process templates also specify the default list of areas and iterations for new projects. This is why new Team Projects created from templates such as MSF for Agile Software Development come preloaded with three iterations. The Process Template Editor provides you with the ability to create default classification hierarchies in the same manner as you would from the Team Explorer interface, as shown in Figure 7-25. To navigate to the area of the Process Template Editor where you can manage these default classifications, open a process template definition and click the Areas & Iterations node in the configuration navigation tree.
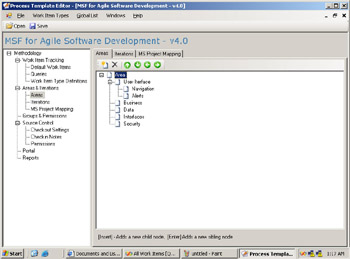
Figure 7-25: Managing default classifications by using the Process Template Editor
| Tip | When editing classifications, you can press the Insert key to add new child nodes and the Enter key to quickly add new sibling nodes to the classification hierarchy. |
Editing Microsoft Office Project Field Mappings
As a project manager, you no doubt have some experience with Microsoft Office Project to plan and manage projects. Visual Studio Team System provides the ability to integrate work items with Office Project, with each task in an Office Project file mapping to a work item in Visual Studio Team System. Unlike Office Excel, however, Office Project has built-in columns such as Predecessor, Resource, Work, and Duration. These fields do not have a one-to-one relationship with fields specified in a work item, especially if you have made considerable changes to a work item by adding and removing fields. The process template specifies how work item fields map to fields in Office Project, and the Process Template Editor provides a way of managing this mapping. By clicking the Office Project Mapping node in the Process Template Editor’s configuration container, you can view and change these default mappings. The Office Project Mapping section displays a list of mapped fields represented by four columns. The Work Item Tracking Field Reference Name represents the work item field you want to map into Office Project. The Project Field column represents the name of the field in Office Project you are targeting. Note that the field name is prefixed with pjTask. The Project Name column specifies a change in the name of the target column in Office Project. For example, the System.State field gets mapped to the Text13 column in Office Project. The value in the Project Name column is State, which indicates that Office Project should display State instead of Text13 when displaying the column. The Project Units column identifies the unit of measurement that will be assumed when values are mapped from work items to a numeric field in Office Project. For example, the work item field Completed Work contains a numeric value, and the field mapping pjHour specifies that Office Project should treat that value as an hour instead of a day, week, or month.
You can either add new field mappings by clicking New on the Office Project Mappings toolbar or Open on an existing mapping to show the Project Mapping dialog box. The Project Mapping dialog box contains one extra option not displayed on the field mapping list called Publish Only. The Publish Only option indicates that the Microsoft Office Project Visual Studio Team System add-in will receive information for this field from Visual Studio Team System and will never be used to update work item information during a Publishing action.
Editing Default Security Settings
Process templates also specify the default security groups and their permissions for new Team Projects. The Groups & Permissions node in the configuration container of the Process Template Editor allows you to create groups and set their default permissions. By default, the MSF Agile template specifies three groups: Readers, Contributors, and Build Services. You might want to change this list to something such as Developers, Testers, Customers, Project Managers, and Architects with each group having its own set of permissions. Click New and Open on the Groups & Permissions toolbar to create or edit groups.
Setting permissions by using the Process Template Editor is a bit more complex. After you create a group, you can click the group in the list to show the permissions assigned to that group in the permission grid. The permission grid has two perspectives, the right to perform an activity, and the Visual Studio Team System component on which you can perform that activity. The Process Template Editor lists all of the available permissions in the first column of the grid under the group listings. Along the top of the grid is a list of the objects that can apply permissions. The cell that is at the intersection of the permission and the target object specifies the appropriate permission. For example, if you select the Readers group in the list of security groups, the grid will display an Allow value in the cell at the intersection of GENERIC_READ and PROJECT. This indicates that the Readers Group can read project-level information. Cells that are gray indicate that the combination of the permission and the target object, which intersect at that cell, cannot exist. For example, the PUBLISH_TEST_RESULTS permission makes sense for a project, but it doesn’t make much sense for EVENT_SUBSCRIPTION. Table 7-7 explains the listed permissions, and Table 7-8 provides an explanation of the target objects listed in the grid.
| Permission Name | Description |
|---|---|
| GENERIC_READ | Ability to read information from the target |
| GENERIC_WRITE | Ability to update information about the target |
| WORK_ITEM_READ | Ability to read work items |
| PUBLISH_TEST_RESULTS | Ability to publish test results to Team Foundation Server |
| WORK_ITEM_WRITE | Ability to write work item information |
| START_BUILD | Ability to launch a build process |
| UPDATE_BUILD | Ability to update a build |
| EDIT_BUILD_STATUS | Ability to edit the build status after a build has completed |
| MANAGE_EVERYONE_GROUP | Permission to manage the Everyone group |
| CREATE_PROJECTS | Ability to create new Team Projects |
| ADMINISTER_WAREHOUSE | Ability to configure settings on the Visual Studio Team System data warehouse |
| CHECK_IN | Ability to check in code |
| DELETE | Ability to perform a delete operation |
| DELETE_TEST_RESULTS | Ability to delete recorded test results from the server |
| ADMINISTER_BUILD | Ability to administer a build |
| CREATE_CHILDREN | Ability to create child notes of a classification tree |
| UNSUBSCRIBE | Ability to unsubscribe from alerts |
| Target Name | Description |
|---|---|
| PROJECT | A Team Project |
| CSS_NODE | Classification Notes (Areas and Iterations) |
| NAMESPACE | Team Foundation Server |
| EVENT_SUBSCRIPTION | Team Foundation Server events |
Editing Default Source Control Settings
The Process Template Editor also allows you to configure Team Project default source control settings such as enabling/disabling multiple checkouts, default check-in notes, and default permissions. To edit these settings from the Process Template Editor, click the Source Control node in the configuration container, as shown in Figure 7-26. The Process Template Editor mimics how Team Explorer configures checkout settings and check-in notes as described earlier in this chapter.
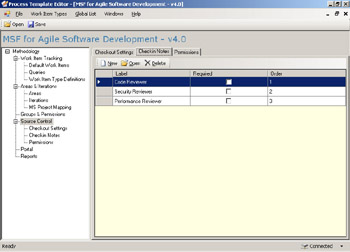
Figure 7-26: Configuring default source control settings in the Process Template Editor
Editing Default SharePoint Structure and Contents
Microsoft Windows SharePoint Server sites act as the project portal for each Visual Studio Team System project. The process templates used to create new projects specify the default document libraries and their contents for each new site. You can use process templates to deposit all of the appropriate templates and documents your project will need so that your team will never have to search for the appropriate documents again. The Process Template Editor allows you to create document libraries and their contents so that you can embed your own organization’s content and policies for all new projects.
To create a new document library for your Team Projects:
-
Click to the Portal node of the Process Template Editor to show the Portal document library and contents configuration pane (shown in Figure 7-27).
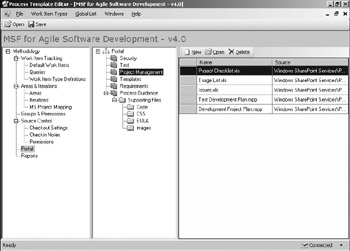
Figure 7-27: Editing default document libraries and documents -
Right-click the root of the Portal tree and choose New Document Library from the shortcut menu, on which you will be prompted to specify a name and a description.
-
To add documents, for example, templates or empty delivery artifacts ready to be filled out by the team, right-click your new document library and click Import from the shortcut menu. Note that you can also choose New Folder from the shortcut menu, allowing you to create a hierarchy of folders underneath the document library you just created.
-
After choosing Import, you will be prompted to specify a directory of files you want to import. Click Browse to navigate to this folder. You can also specify that the Process Template Editor retrieve the entire contents of the specified directory, including all subdirectories. Click Import to add the selected folder and its contents to the document library definition. The Process Template Editor takes a copy of the files you specify and moves them into the appropriate location within the process template document structure.
Editing Report Listings and Parameters
As already mentioned, the modification of report definitions used by Visual Studio Team System to provide the rich reporting capabilities will not be covered in this chapter. Modifying the list of reports that get installed during the creation of a new Team Project, however, is something that is managed by the Process Template Editor, because all report definitions are actually part of the process template definition files.
Reports are stored in files with the extension .rdl. To see the list of reports for your project, click the Reports configuration node in the Process Template Editor. From a nontechnical project manager’s perspective, there really isn’t much to do with this list other than to remove reports from this list. Each listed report has a configured set of technical parameters such as cache expiration, report parameters, and data source declarations. These should be modified only by software developers familiar with Microsoft SQL Server Reporting Services and Visual Studio Team System reports.
Uploading the Modified Process Template
When you have completed all of your changes to the process template, as long as you have the appropriate permissions, you can now upload them back into Team Foundation Server. To upload the process template, launch Visual Studio and Team Explorer. On the Team menu, point to Team Foundation Server Settings, and then click Process Template Manager to open the Process Template Manager dialog box. Click Upload and navigate to the location of the process template you want to import into Visual Studio Team System. Note that if the process template you selected has the same name as a process template that already exists within Team Foundation Server, you will be prompted to confirm an overwrite. If you choose to overwrite, there is no undo option, so be very careful. If you are uploading a template whose name is different than that of any others on the server, it will be added as a new process template and be available to be the basis of the next Team Project.
| Note | Process templates are used only during the creation of new Team Projects. If you make a modification to a process template that was the basis of existing Team Projects, those projects will not be affected by any update you make. |
EAN: N/A
Pages: 93