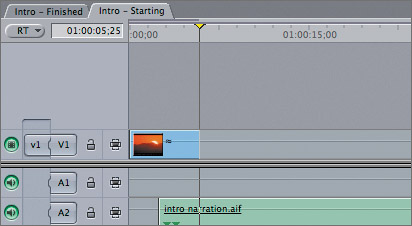
| Another reason to mark in the Timeline is if you want to edit new material on top of existing clips. For example, if you are cutting picture to an audio track, such as music or narration, you will need to mark certain portions of the audio track in order to know where the video clip should go. Whenever you mark in the Timeline and use a new source clip from the Viewer, the theory of three-point editing comes into play. Three-point editing is the term used when you edit a clip to the Timeline using any combination of three edit points to determine the duration, location, and content of a clip. When you made edits to the Timeline in previous lessons, you identified the edit duration and content by setting In and Out points in the Viewer, and you identified the location of the edit by moving the playhead to a specific point in the Timeline. These three points Source In, Source Out, and playhead position determined the duration, location, and content of this edit. This is one example of three-point editing. But you can also use Timeline In and Out points to determine duration and location of a new edit. Marking a Narration Track Often when you edit to narration, the script or narration takes priority. So instead of opening a source clip in the Viewer and setting edit points on the video clip, you first need to know what the narrator is saying in order to pick the appropriate video clip and content. In this exercise, you will mark the narration track in the Timeline to determine the duration and location for each new video clip. Then you will open a source clip in the Viewer and mark it to determine the content, or what part of it you will use in the edit. 1. | In the Timeline, close all open sequences. From the Browser, open the Intro Finished and Intro Starting sequences.
| 2. | To preserve a copy of the Intro Starting sequence to work with later, duplicate it in the Browser, and name the copy Intro Starting backup.
| 3. | In the Timeline, click between the two sequence tabs to compare the sequences, then play the Intro Finished sequence.
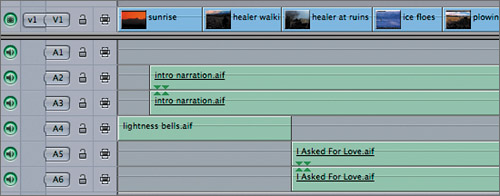 You worked with a version of the Intro Finished sequence in Lesson 1. This version has one stereo narration clip on A2 and A3. It has a music sound effect on A4 and a stereo music track on A5 and A6. The Intro Starting sequence has only audio clips. You will add the video clips to this sequence, and later in this lesson, you will add sound effects to the A1 track. You worked with a version of the Intro Finished sequence in Lesson 1. This version has one stereo narration clip on A2 and A3. It has a music sound effect on A4 and a stereo music track on A5 and A6. The Intro Starting sequence has only audio clips. You will add the video clips to this sequence, and later in this lesson, you will add sound effects to the A1 track.
| 4. | Click the Intro Starting sequence tab to make it the active sequence.
| 5. | Move the playhead to the beginning of the sequence, and press I to set an In point. Play the sequence, and stop a beat after the narrator says, "…wake up and shine." Press the O key to set an Out point at this location.
NOTE An In mark at the head of the sequence may be difficult to see. When you move the playhead away from the In point, it's easier to see the edge of the mark. You can also see the edit points in the Canvas. 
The duration from the In point to the Out point is displayed in the Canvas Timecode Duration field. This is the duration you will need for the first video clip.
| 6. | In the Browser, display the contents of the Intro Clips bin, and open the sunrise clip. Scrub through this clip.
Since you have already defined the duration and location for this clip in the Timeline, you only need an In point to determine where you will begin using the source content.
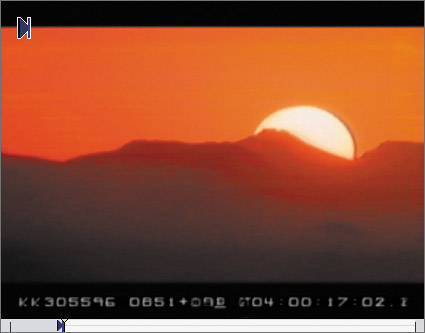
| 7. | Set an In point in the sunrise clip somewhere between the beginning of the clip and where the sun is halfway over the mountain's edge.
| 8. | In the Timeline, make sure the v1 source control is patched to the V1 destination control.
NOTE In this situation, you don't need to position the playhead because Timeline marks take priority over the playhead location. | 9. | Edit this clip as an Overwrite edit, using any of the methods you've used before.
In the Timeline, the clip is edited to the V1 track. The edit points have been removed, and the playhead is aligned to the first frame after this clip, where you will edit the next video clip.
| 10. | While the playhead is in its current position, set an In point in preparation for the next clip. Play from the beginning of the sequence, and set an Out point after the narrator says, "Breathe it all in."
TIP You can also set In and Out points on the fly as the sequence is playing, just as you did in the Viewer. | 11. | In the Browser, open the healer walking clip, and set an In point when the healer begins to walk. Edit this clip as an Overwrite edit, and play the new clip in the sequence.
|
Backtiming a Clip When you have an Out point in the Timeline, you can take advantage of another approach to three-point editing called backtiming. You can use this approach when the placement of the last frame of a source clip is more important than the first frame. In this case, you set In and Out points in the Timeline to create the edit location and duration, and set an Out point in the Viewer on what is to be the last frame of the clip content. 1. | Snap the playhead to the first empty video frame after the healer walking clip. Set an In point at this location as the beginning of the next clip. Play the sequence, and set an Out point before the narrator says, "We have met along the way."
TIP This is a good time to use the J and L keys to play backward or forward to find this edit point. | 2. | In the Browser, open the healer at ruins clip, and scrub down toward the end of the clip. Set an Out point where the healer bows down.
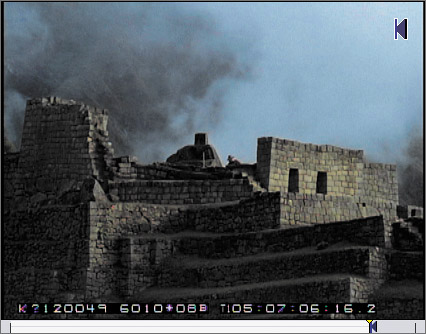
The Out point in this source clip is more important than the In point.
NOTE This type of edit is referred to as backtiming because Final Cut Pro starts from the end of the clip and measures the duration backward to determine where the clip begins. | 3. | Edit the clip as an Overwrite edit, and play the clip.
The source Out point was aligned to the Timeline Out point. The source In point was determined by backtiming the clip, or filling in the distance back to the Timeline In point.
| 4. | Press the up or down arrow to move the playhead to the first empty frame in the video track, and set an In point at this location. Play from this point, and set an Out after the narrator says, "hunting on the ice floes of Alaska."
TIP Just as you viewed audio waveforms in the Viewer, you can also view audio waveforms in sequence clips in the Timeline. It can be helpful for focusing on where specific audio references occur. To see the audio waveforms appear in the Timeline, press Option-Cmd-W. You will work more with this feature in a later lesson. 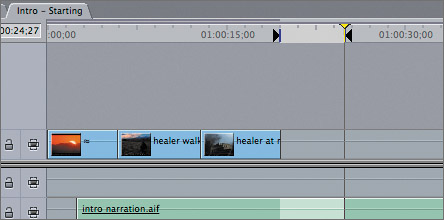
| 5. | In the Browser, open the ice floes clip, and play the middle portion where the snowmobile goes over a few bumps. Set an Out point after the second bump, around 5:16:22:00.
In this situation, as in the previous source clip, the action where the clip stops is more important than where it begins.
TIP To change or adjust an existing Out point, drag the mark left or right in the Viewer scrubber bar. As you drag, you see the new frame in the Viewer image area. When you stop dragging, the image in the Viewer reverts to the playhead location. Be sure to drag from the black triangle of the Out point, otherwise you will move the playhead instead. 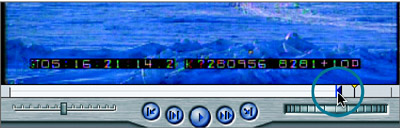
| 6. | Edit this clip as an Overwrite edit, and play the clip.
As before, the source clip's Out point is aligned to the Timeline Out point, and the rest of the source clip is backtimed into position.
|
TIP When backtiming clips, make sure there is no In point in the Viewer. Otherwise, the clip's In point will line up with the Timeline In point instead of lining up Out point to Out point.
Using a Source Duration A third way to use three-point editing is to set an In and Out point in the Viewer and set just an In point in the Timeline. In this situation, you are giving priority to the source clip duration. NOTE If you have In and Out points in both the Viewer source clip and the Timeline, and they represent different durations, the Timeline edit points will always take priority, and the Out point in the Viewer will be ignored.
1. | Use the up or down arrow to move the playhead to the first empty frame in the video track, and set an In point at this location.
Without an Out point in the Timeline, the edit duration will default to the source duration in the Viewer.
| 2. | In the Browser, open the plowing fields clip, and play it. Set an In point when the man plowing is fully in the frame. Set an Out point when the man is directly in front of the animal in the middle of the image.
NOTE This is another image where a camera shade was used to block the sun's glare from the lens. The final version of this film was output in widescreen format, and this shade is not visible in that format. 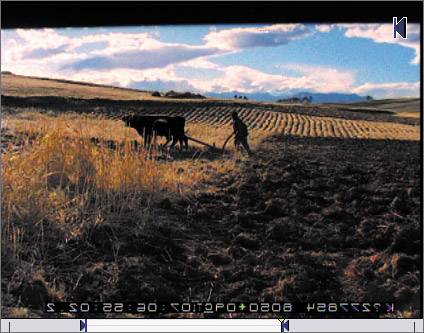
| 3. | Edit this clip as an Overwrite edit, and play the clip.
Although the clip covers this portion of the narration nicely, it might go a little too long. This is easily corrected by overwriting the tail of the clip when you make the next edit.
| 4. | Play this clip in the sequence again, and stop the playhead before the narrator says, "Trekking through the streets of Manhattan." Set an In point at this location.
TIP Editing is a subjective process. When editing to audio in these exercises, set the edit points based on what feels and looks right to you as an editor. | 5. | In the Browser, open the city street clip, and play it. Set an In point after the man in the white shirt lowers his arm, and set an Out point when the image goes blurry.
| 6. | Edit this clip as an Overwrite edit, and play the clip.
The marked source clip is edited into the Timeline at the In point. Again, when you listen to the narration, the clip seems to play a little too long.
| 7. | Play this clip in the Timeline again, and set a new In point just as the voice in the music track begins to sing. You may have to turn up the volume on your audio monitor to hear this clearly.
| 8. | In the Browser, open the ruin steps clip, and play it. Set an In point before the tilt up begins, and set an Out point where the tilt ends. Edit this clip as an Overwrite edit, and play the new clip in the sequence.
 |
NOTE You can also set an In point in the Timeline and enter a duration in the Canvas Timecode Duration field to determine the Out point.
Project Practice Continue setting In and Out points in the Timeline and editing the following clips to complete the video for this sequence. Use your own sense of timing and the narration that follows as a reference for where you set the marks for each clip. You can also review the Intro Finished sequence to see how that version was edited. The two clips with asterisks in the following list could easily be backtimed in order to make the Out point a priority. TIP Remember, you can set an In point in the Timeline and overwrite the end of a clip if you think that will improve the timing. And you can always press Cmd-Z to undo an edit. You will learn to trim and adjust these edits in the next two lessons.
canyon runner | "The first peoples of this great land. We Indians, we're always going home, no matter how far from the birthing grounds we've traveled." | amanda rushing | "We always go back…" | johnny runs | "By foot…" | truck on road | "By road…" | girl on plane | "By plane or by spirit, we migrate by heart." | walking in fields | "So as you walk out into the fields to plant or gather…" | tall buildings[*] | "Into steel and glass towers to trade…" | ice fishers | "To the ocean or woods to hunt…" | healer cu[**] | "Remember, we're all on this journey together, down a thousand roads." |
[*] Backtime this clip from where the two U.S. flags are framed in the center of the image.
[**] Backtime this clip just after the healer leaves the frame.
|