| Now that you've edited all the video clips into the V1 track, you can focus on other ways to improve the sequence. One way to do this is to add a sound effect to each video clip to give the audio track more depth. The FCP5 Book Files > Media folder contains some sound effects, but they have not been included in this project. You will have to import them into this project to use them in editing. You can import a single file or an entire folder at one time. You import a file in one of three ways: 1. | Ctrl-click in the Browser and choose Import > Files from the shortcut menu.
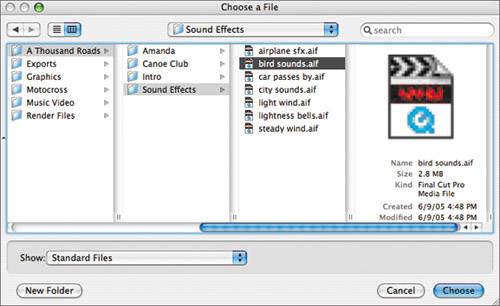
| 2. | When the Choose A File window opens, navigate to the FCP5 Book Files > Media > A Thousand Roads > Sound Effects folder. Click the bird sounds.aif clip once to select it.
An icon appears in the column to the right of the sound effect clip you selected. Depending on how this clip was created, it may display a QuickTime icon or the Final Cut Pro slate icon. Notice the information about the clip under the slate icon. The kind of file is listed as a Final Cut Pro Media File. You will learn more about different export options in a later lesson.
| 3. | Click Choose.
The new bird sounds.aif clip appears in the Browser.
| 4. | To import a few clips at a time, Ctrl-click in the Browser and choose Import > Files from the shortcut menu.
| 5. | In the Media > A Thousand Roads > Sound Effects folder, select light wind.aif, and then Cmd-click car passes by.aif. Click Choose.

The new files appear in alphabetical order in the Browser.
TIP You can select or deselect a file by using Cmd-click. You can also select a group of contiguous files by clicking the first file and then Shift-clicking the last file in the group. | 6. | This time, Ctrl-click in the Browser and choose Import > Folder. In the Choose A Folder window, navigate to the Media > A Thousand Roads folder, and select the Sound Effects folder.
When you choose this option, individual files are dimmed and cannot be selected.
| 7. | Click Choose.
The entire Sound Effects folder is imported into the project as a bin.
| 8. | Click the disclosure triangle to display the contents of the Sound Effects bin.

| 9. | To remove the redundant individual clips you imported in the earlier steps of this exercise, Cmd-click each one, and press Delete.
When you delete clips from a project, you are not deleting any media from your hard drive. You are only deleting that specific link in your project back to those clips. In this case, you still have the complete set of sound effects in the Sound Effects bin, which are the links you will use to edit this media.
|
TIP You can also use the drag-and-drop approach to import clips into a Final Cut Pro project. To do this, arrange your interface windows so you can see the Browser and a Finder window on your Desktop. Navigate to the location of the desired clip or folder in the Finder window. Drag the file or folder into the Browser and release it.
|