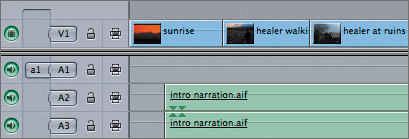
| For this exercise, you will add sound effects on the A1 track to cover the length of each video clip on V1. To begin, you will mark the duration of a video clip, as you did earlier in this lesson, and then edit a sound effect at that location. This is another example of marking in the Timeline, but this time you are using the existing video clips as a reference. NOTE You can continue working with the Intro Starting sequence, or you can duplicate the Intro Finished sequence in the Browser, which represents all the work done in this lesson up to this point.
1. | In the Timeline, make sure the Auto Select controls on all tracks are selected. Move the playhead over the first video clip, and press X to mark its duration.
| 2. | In the Browser, open the bird sounds.aif clip from the Sound Effects bin, and set an In point at the head of this clip.
TIP Don't forget to check the volume of each sound effect and adjust it to blend with the narration and music tracks. You'll learn more about adjusting audio levels and mixing audio in upcoming lessons. | 3. | In the Timeline, make sure the a1 source control is connected to the A1 destination control.
| 4. | Edit this clip as an Overwrite edit, and play the clip in the Timeline.
| 5. | Park the playhead over the second video clip, healer walking, and press X to mark this clip's duration.
| 6. | From the Sound Effects bin in the Browser, open the light wind.aif clip, and set an In point somewhere at the beginning of this clip.
| 7. | Edit this clip into the Timeline as an Overwrite edit.
| 8. | Move the playhead down in the sequence to the truck on road clip, and press X to mark this clip.
Toward the end of this clip, the truck comes around the bend. Having the sound match this action would make it more believable.
| 9. | Open the car passes by.aif clip, and find the place where the sound of the car passing by is the loudest. You can use the height of the waveform display as a guide. You may have to use the zoom slider, or press Shift-Z, to see this area.
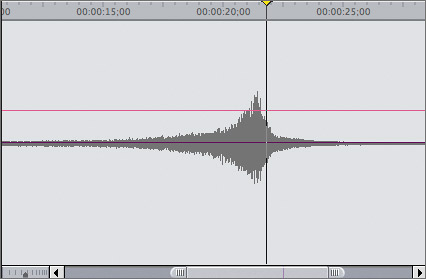
In this situation, setting an Out point as the car passes by in the sound effect might help to create a better match to the video than setting an In point.
| 10. | To align the end of the sound effect with the end of the clip in the Timeline, set an Out point just after the peak of the drive-by sound. Edit this clip as an Overwrite edit, and play the clip.
The sound of the car passing by is now closely aligned to the image in the Timeline. You can press Cmd-Z to undo this clip if you want to improve the timing.
|
Project Practice Continue adding sound effects to match the video clips in the Timeline. Don't forget to set the audio levels for the sound effects in the Viewer before editing them so they don't overpower the narration and music tracks. If you want a reference to the completed sound effects sequence, you can view the Intro with SFX sequence in the Sequences bin. TIP To change the audio level of a sound effects clip you've already edited, double-click the clip in the Timeline to open it into the Viewer. When you change the volume, it will only change the sequence clip in the Timeline, not the original clip in the Browser.
|