Importing CD Tracks

 < Day Day Up > 

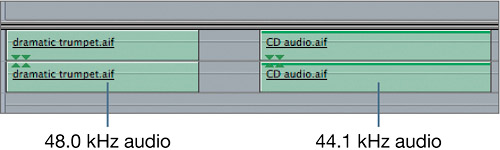
For these lessons, you've been using music tracks already contained in the project. As you edit your own material, you will most likely use music tracks from other sources, especially CDs. Standard CD audio is recorded at the 44.1 kilohertz (kHz) sampling rate, whereas high-quality video audio, including DV, XDCAM, HD, and so on, is recorded at 48.0 kHz. Although Final Cut Pro will play a CD track in the Timeline without rendering it, convert the CD tracks to 48.0 kHz so the CD tracks will match the audio tracks from your video source. In the image below, the audio clip on the right displays a green bar in the upper portion of each track indicating it doesn't match the sequence settings of 48.0 kHz.

NOTE

In digital audio, a sampling rate represents the number of times a sample from an audio source has been taken over a period of time to create a good representation of that sound. The more samples taken, the more accurately the audio is represented in digital form. Audio sample rates are measured in hertz and written as hertz or kilohertz, such as 48.0 kHz or 48000 Hz.


1.

In the Browser, press Cmd-B to create a new bin. Name the bin CD 48.

2.

With this bin selected, choose File > Batch Export.

An Export Queue window opens with the empty bin selected. This window is a portal for exporting or converting a group of clips at one time. Although you will cover other exporting options in later lessons, for now you will use this window to convert your own CD tracks to 48.0 kHz.

3.

Arrange your interface so you can see the Export Queue window and the Desktop. Insert your own CD into the computer. Open a Finder window, and drag several audio tracks from the CD into the Final Cut Pro Export Queue window and release them onto the CD 48 bin.

4.

With the CD 48 bin selected, click the Settings button.

A Batch window appears with different options.

5.

Click the Set Destination button, and select a location where you want to save the new music tracks. Click Choose.

6.

Click the Format pop-up, and from the menu choose AIFF as the file type.

7.

Click the Options button. When the Sound Settings window appears, change the Rate to 48.0 by either entering it in the Rate field or clicking the lower arrow to the right of the field and choosing 48.000 from the pop-up menu.

8.

Leave the other settings at their defaults and click OK. In the Export Queue window, click the Export button.

An Export Queue progress bar appears, indicating the CD tracks with the current settings are being exported to the destination you selected. When this process is complete, you can import those tracks into your project and edit them into your sequences.

Project Practice

As time allows, you can come back to this project file and apply the techniques you learned to two different sequences in the Practice Project bin, which is located in the Sequences bin. If you are working with Final Cut Pro Studio and have Soundtrack Pro, you can add additional sound effects to these sequences and mix those levels.

Save your project changes frequently.

     < Day Day Up > 


    Apple Pro Training Series. Final Cut Pro 5
    Apple Pro Training Series: Final Cut Pro 5
    ISBN: 0321334817
    EAN: 2147483647
    Year: 2005
    Pages: 235
    Authors: Diana Weynand

    flylib.com © 2008-2017.
    If you may any questions please contact us: flylib@qtcs.net