| One way to trim a clip in the Timeline is simply to drag its edit point left or right. Keep in mind that the clip in the Timeline is linked to the original clip in the Browser. Even though you are seeing only the marked portion of your clip in the Timeline, when you trim, you have access to all the frames from the original clip. Dragging an Edit Point Dragging edit points is a direct and easy way to trim in the Timeline. Depending on what clip you are trimming, the process may require a few additional steps to complete. 1. | In the Dad Sound Bites sequence, select the last clip, proud of kids, and drag the entire clip to the right a few seconds so that you have some room to experiment. If necessary, you can create additional blank Timeline space at the end of the sequence by pressing Option- (minus) or adjusting the Zoom control.
| 2. | Park the playhead in the middle of the clip after Jim says, "... really good so far also." This is where you want the new Out point to be.
| | | 3. | Click just the Out edit point to highlight it.
 Just the edge of the clip is selected, not the body of the clip. If the entire clip were selected, you would end up moving the whole clip, not trimming the Out point.
| 4. | Drag the Out point left. As you drag, look at the trim amount and new duration as they are being updated in the information box.
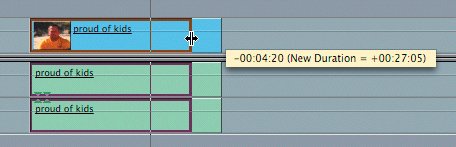 | 5. | Drag the Out point to the left until you see it snap to the playhead. Release the mouse and play the clip to see the new edit point.
| 6. | To trim the In point, play the clip from the head, and park the playhead just before Jim says, "So naturally." This is close to the In point, so you might want to zoom in on the Timeline by pressing Option-+.
| | | 7. | Click and hold the In point of the clip.
 In the Canvas, the end-of-clip filmstrip overlay on the left indicates that the current In point is at the very first frame of the media file. You can't trim any farther to the left.
| 8. | Drag the edit point to the right until it snaps to the playhead.
The new In frame is displayed in the Canvas.
| 9. | Press Shift-Z to see the entire sequence. Select the whole clip, not just the edit point, drag the clip you trimmed back to the end of the sequence, and play the new trimmed version of the clip.
|
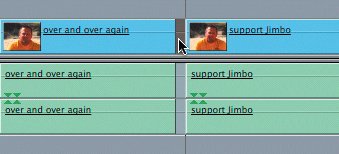
Dragging Edit Points Between Clips When you want to trim clips that are between other clips in the sequence, the dragging option has a different impact. For example, when two clips are side by side, Final Cut Express won't allow you to drag the edit point of one clip into its neighboring clip. You can drag away from the neighboring clip, but not into it. Generally, trimming a clip to be longer or shorter changes the overall length of the sequence. When you trim or shorten a clip by dragging an edit point, it leaves a gap in the sequence, and the sequence length remains unchanged. You can delete the gap as you did in the previous lesson, but there is a way to trim without leaving a gap in the sequence. You will work with that method in the next exercise. 1. | In the current sequence, play the support Jimbo clip, and stop the playhead after Jim says, "... only thing I wanted to do was support him."
If you can't see the clip, press Shift-Z to see the entire sequence, or drag the Zoom slider left.
| 2. | You won't be able to, but click the Out point of this clip and try to drag it to the right into the following clip.
Note You can't drag an edit point over another clip without a special trim tool. You will work with that tool later in this lesson. | 3. | Now drag it left until it snaps to the playhead, and release.
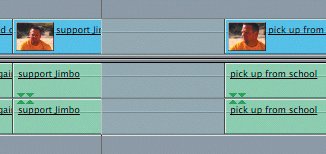 Dragging this clip's Out point to the left creates a gap in the Timeline.
| 4. | Delete this gap by selecting it and pressing Delete.
When you delete the gap, the following clips are pulled up the duration of the gap. This is called rippling because deleting the gap ripples the locations of the rest of the sequence clips.
| 5. | Repeat the process for the In point of this clip. Park the playhead just before Jim starts speaking, and drag the In point to that location.
| | | 6. | Select and delete the gap to ripple the remaining clips.
 | 7. | Play the trimmed clip.
Note When you drag a clip's edit point, you see the updated frame in the Canvas. But when you stop dragging and let go, the Canvas image reverts to wherever the playhead is parked in the Timeline. |
Project Tasks 1. | Continue dragging edit points to trim the length of this sequence.
| | | 2. | You can make your own editorial decisions, or you can trim to the following sound-bite suggestions: Drag the new In points to just before the beginning of the quote, and drag or trim the new Out points to just after the end of the quote.
Clip | Quote |
|---|
name and start | "My name's Jim Borland ... Jimbo's dad." | obvious to surf | "Where I grew up ... couldn't wait for the day." | over and over again | "Jimbo was about ... learning how to surf." | support Jimbo | Already edited. | pick up from school | "What I do ... we'll go to the beach." | proud of kids | Already edited. |
Note Not all current edit points will need trimming. | 3. | Press Cmd-S to save your work.
|
|