| Dragging edit points and deleting gaps is one way you can trim a clip in the Timeline. Another way is to drag the edit point and ripple the remaining edits in the sequence at the same time without having to delete. You do this by using the Ripple tool. The Ripple tool shares the fourth position in the Tool palette. 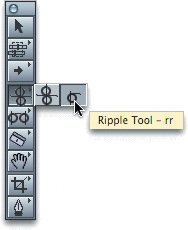 When you use the Ripple tool to trim an edit point, you can drag the edit point past a neighboring clip. Also, when you drag, all the clips that follow are automatically pushed down or pulled up the length of the trim, lengthening or shortening the sequence. In these exercises, you will make the same trim adjustments you made in the Dad Sound Bites sequence, but you will do them using the Ripple tool. Using the Ripple Tool Using the Ripple tool adjusts either the head or tail of a clip in a sequence in either a forward or backward direction. Any change you make with the Ripple tool will cause a change in the overall length of the sequence. 1. | In the Sequences bin in the Browser, double-click the Dad Sound Bites 2 sequence to open it in the Timeline.
Look at the Canvas Duration field. This sequence duplicate was created before any adjustments were made on the original. It is the same length as the first Dad Sound Bites sequence was before you started working on it.
| 2. | Park the playhead on the proud of kids clip, and press Option-+ to zoom in to that clip.
| 3. | In the Tool palette, click and hold the fourth tool. Slide over and stay on the single roller icon for a moment until the tool's name, Ripple, appears, and then let go. You can also press RR as the keyboard shortcut to select this tool.
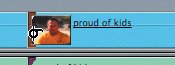
 | 4. | In the proud of kids clip, park the playhead after Jim says, "... good so far also."
| 5. | With the Ripple tool selected, don't click or drag but just move your pointer over the middle of this clip.
 The Ripple tool icon appears over a clip. In the middle of the clip, it has an X on it, indicating that you can't use it in this area. You can only use the tool on an edit point.
| | | 6. | Move the tool toward the clip's Out point. When you get close to the Out point, the X disappears, and the tail of the Ripple icon points toward the inside of the clip you will be trimming.
 | 7. | Drag this edit point left until it snaps to the playhead position.
| 8. | In this same clip, park the playhead just before Jim starts speaking, and zoom in to this location by pressing Option-+.
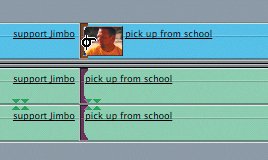
Note When you move the playhead in the Timeline ruler area, the default Selection tool appears. Final Cut Express knows you can't trim here, so it reverts to the Selection tool to allow you to do other things, such as moving the playhead. When you move the pointer back into a clip, it changes back to the currently selected tool. | 9. | Click the inside edge of the proud of kids clip to select its In point.
 When the edit point is correctly selected, just the right side, or In point of this clip, is highlighted. The horizontal tail of the Ripple tool icon points inward toward the clip it's adjusting. If you select the Out point of the previous clip, the tail of the Ripple tool will point toward that clip.
| 10. | Drag this edit point to the right until it snaps to the playhead.
As you drag, the yellow information box appears with just the trim amount. In the Canvas you see the fixed Out frame of the previous clip and the updated In frame of the current clip. There is no gap left over.
|
Trimming with Durations and Shortcuts Sometimes you may have a trim amount in mind. Perhaps it's one second or a few frames. Just as you typed a move duration in the Timeline to move a clip, you can also type a trim amount to trim a clip. For keyboard enthusiasts, there are also a few keyboard shortcuts you can use to trim your edit point. 1. | With the Ripple tool still selected, click the inner edge of the In point of the last clip in the sequence, proud of kids. Play the beginning of this clip. You will trim the In point so that it begins later, just before Jim says, "... I'm proud to ..." This is about a three-second duration.
| 2. | In the Timeline, type 3.00 (three seconds), or 3. (three period).
 A Ripple trim box appears in the center of the Timeline with the amount of the trim.
| 3. | Press Return to enter that trim amount.
That edit point is trimmed forward by that amount, and no gap is created.
|
In the pick up from school clip, Jim says, "Uhhh," before he begins speaking. Let's apply some keyboard shortcuts to trim away the "Uhhh." | | 4. | With the Ripple tool, click the In point of the pick up from school clip to select it.
 | 5. | To move the In point later, press the ] (right bracket) key. Each time you press it, the In point is trimmed by one frame.
Tip You can also press Shift-] to trim a default number of frames, such as 5, 10, or 20. To change this number, press Option-Q to open the User Preferences window and enter the desired Multi-Frame Trim Size on the Editing tab. 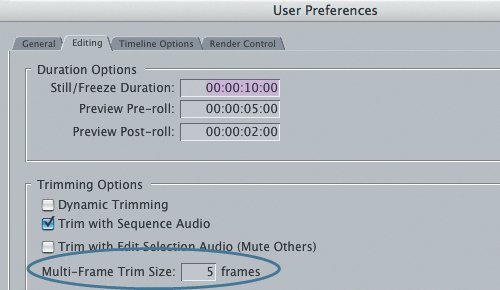 | 6. | Press Shift-] a few times to get closer to where Jim speaks.
| 7. | If you need to add a few frames back to the In point, press the [ (left bracket) key to trim the In point of this clip earlier by one frame. You can press it repeatedly or press Shift-[ to move the In point earlier by the default multi-frame trim amount.
Any change you make using these keyboard shortcuts ripples the following clips in the sequence. With such minor adjustments, it may be difficult to see the clips shifting, but they are. You can see the thumbnail image in the Timeline clip update every time you change the In point.
|
Project Tasks 1. | Practice selecting individual clip edit points with the Ripple tool and making the following trims.
Clip | In and Out Points |
|---|
name and start | "My name's Jim Borland ... Jimbo's dad." | obvious to surf | "Where I grew up ... couldn't wait for the day." | over and over again | "Jimbo was about ... learning how to surf." | support Jimbo | "Since Jimbo ... wanted to do was support him." | pick up from school | "What I do is... we'll go to the beach." (first one) | proud of kids | Already edited. |
Make sure you are selecting the inside edge of the clip's edit point you want to trim.
| 2. | Press Cmd-S to save your work.
|
|