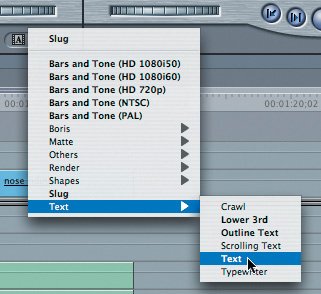
| Text is another video generator that generates clips from within Final Cut Express. Text in video can appear in different ways at different times throughout a story or sequence. For example, it can appear before the story begins to identify the name and date of the sequence, at the first frame of the sequence as a title, during the sequence to identify the person speaking, or at the end to credit the "stars" and of course you, the editor. Final Cut Express gives you lots of options to create or control text edits. Many of the font and style options will be familiar to you from other word-processing or graphics programs. Adding a Slate A simple way to approach your first text edit is to create a slate for your sequence. A slate is another piece of information you can add in the leader portion of your sequence, or prior to where the story clips begin. In film and television productions, slates are placed in front of the camera to identify the scene and take number before the actors begin delivering their lines. The Final Cut Express icon is modeled after such a slate. In editing, the slate that appears before the sequence begins is simply a list of information that describes certain aspects of the sequence, such as the sequence name, length, date recorded, and any other information you think might be helpful or required. Slates are generally simple in style and stand alone without other visuals. But you can spice them up to your liking. Let's begin creating a slate by setting up a basic text edit. 1. | In the Viewer, click the Generator pop-up menu button.
The most recent item selected, in this case Slug, appears at the top of the list for easy access.
| 2. | Choose Text, and choose Text from the submenu.
 In the Viewer, the words SAMPLE TEXT appear over the image area. This is a default text line. There are In and Out points in the scrubber bar that create a 10-second duration.
| 3. | Press Option-X to remove the marks, and look at the duration in the Duration field.
All generator items have two minutes of material in their total length, and all open with a 10-second marked duration. You can change the default duration in the User Preferences dialog box (Option-Q).
| | | 4. | Press Cmd-Z to add back the marked duration.
 |
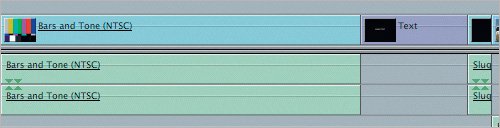
An important trick to working with text clips is to edit the clip into the sequence first. Once the clip is in the Timeline, you can open the clip into the Viewer and edit the text there. This allows you to view the clip in the Canvas as you make changes. Let's edit the text into the sequence. 5. | To insert the Text clip between the Bars and Tone and Slug clips, park the playhead at the beginning of the Slug clip in the sequence.
| 6. | Drag the Text clip into the Canvas and let it go in the Insert section of the Edit Overlay.
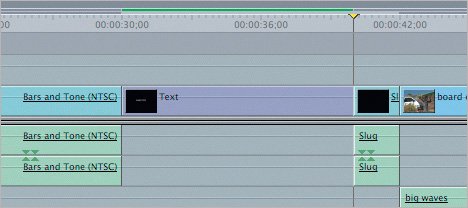 All text clips are video-only and are lavender in color, as opposed to the light blue video clips you have been seeing.
| 7. | Move the playhead to the center of the Text clip in the Timeline.
You see the same SAMPLE TEXT block in the Canvas that you see in the Viewer.
| 8. | In the Timeline, double-click the Text clip to open it in the Viewer.
Now the SAMPLE TEXT clip from the Timeline appears in the Viewer.
|
Controlling Text Options When you open the text video generator in the Viewer, a new tab, called Controls, appears in the Stereo tab position. This is where you make changes, or control the generator. When you work with text, many of the options are about text style and font selection. When you work with other generators, there will be different choices. 1. | In the Viewer, click the Controls tab.
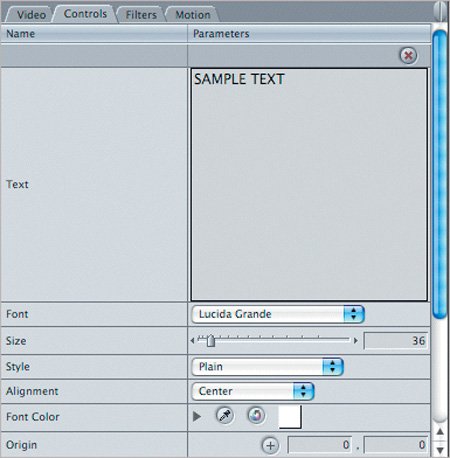 Look at some of the familiar text parameters, such as Font, Size, Style, and Alignment. Use the Viewer scroll bar to reveal other Text generator parameters.
| | | 2. | Click the SAMPLE TEXT block, and when it's highlighted, type all the following information, using the Return key to move to the next line.
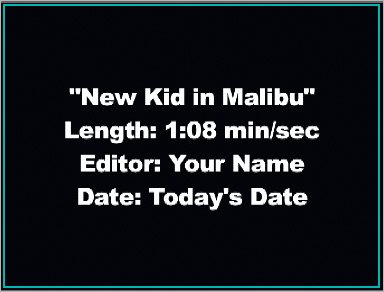
"New Kid in Malibu" Length: 1:08 min/sec Editor: Your Name Date: Today's Date 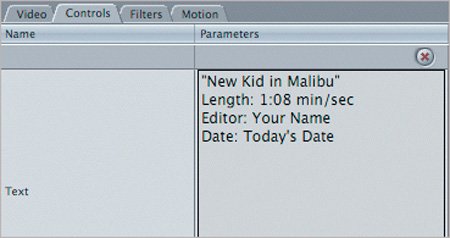 This text option allows you to enter multiple lines of text.
| 3. | Press Tab to apply this information.
With the playhead over the text clip in the Timeline, you see in the Canvas what you have just typed.
| 4. | Using the controls beneath the text box, format the text as follows:
 | | | 5. | In Font Color, click the color tile box.
 The system color picker opens as a Colors window. You can select from several color models at the top of the Colors window.
Tip When you make the text dark or black, you may need to change the color of the Canvas background from black to a lighter color to see the text more clearly. If necessary, choose View > Background and select a lighter color or one of the checkerboard options. | 6. | Click the third option, Color Palettes, and choose Apple from the List pop-up menu. Choose Yellow and click OK.
Note If you want to reset your text parameters to their default status, click the red X in the upper-right corner of the Controls tab as you did in the Filters and Motion tabs. Also, Cmd-Z will undo the most recent text change. | 7. | Adjust the Tracking, Leading, and Aspect sliders to see how they affect the text in the Canvas. If you want to return to your previous settings, press Cmd-Z.
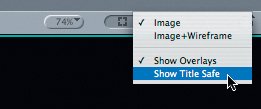
| | | 8. | To double-check that the text is within the title safe area, click the Title Safe overlay in the Canvas View pop-up menu. Turn Title Safe off when you finish viewing the text.
 The three clips you've created make up the leader portion of your sequence, before the story begins.
 |
|