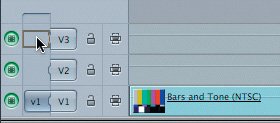
| The slate you just created stands alone as its own clip. It is not combined with any other clips. You may want the title of your show to have a similar look. But you can also place the sequence title over another clip, using that clip as the text background. When a text clip is placed over another clip in the Timeline, the text remains, but the area around the text drops away and reveals the clip beneath it. The reason this occurs is that the text clip has an alpha channel. All video clips have three channels of color information: red, blue, and green. Images are formed by the combination of these three colors. But some clips, such as text clips in Final Cut Express, have a fourth channel called an alpha channel. The alpha channel cuts a hole around the text information so that just the text can appear over a different background. Since there are surfing clips on V1 and all the dad about jimbo clips on V2, a good way to organize the titles within the body of this sequence is to place them all on the V3 track. When you place a title on the V3 track, that title will appear over any other clip on any track below it at that location. 1. | In the Timeline, Ctrl-click in the video track area, above the V1 and V2 tracks, and choose Add Track from the shortcut menu to add a V3 track.
| | | 2. | Move the playhead to the first frame of the board on head clip. Press I to mark an In point.
Note You will be directed to place all the text clips within the body of this sequence on the V3 track. You could place them in the V2 gaps, but placing them together on V3 is a better organizational approach. | 3. | Press the down arrow key to go to the next edit point and then press the left arrow key to move back one frame, so that you are on the last frame before the dad about jimbo clip begins. Press O to mark an Out point at this location.
You will place the title of the sequence over this portion of the board on head clip.
| 4. | In the Viewer, click the Video tab and then the Generator pop-up menu, and choose Text > Text.
| 5. | To patch v1 to the V3 track, drag the v1 source control up to the V3 destination level and release it.
 | | | 6. | To edit this clip into the Timeline, drag the SAMPLE TEXT clip from the Viewer into the Canvas and drop it into the Overwrite section of the Edit Overlay. To see the text, press the left arrow to move the playhead back one frame.
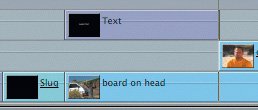 The Text clip appears on V3 above the board on head clip between the edit points. With the playhead parked on the Text clip, you see the default SAMPLE TEXT appear on top of the board on head clip in the Canvas.
| 7. | In the Timeline, double-click the new text clip to open it in the Viewer.
| 8. | In the Viewer, click the Controls tab.
| 9. | Type a title for this sequence, New Kid in Malibu, and press Tab.
 In the Canvas, text is automatically centered in the middle of the screen. If you add lines, they are added below, which is why in the previous exercise you had to raise the center point to include all the information.
| 10. | Change the font to Arial Black and the size to 48, and press Tab.
| | | 11. | To use the color of the surfboard as the font color, click the Select Color tool (eyedropper) in the Font Color parameter line, and then click the surfboard in the Canvas.
 Tip Remember, to see a sampling of different image colors, click the eyedropper and then drag in the image without letting go. As you drag over different colors, the text font color automatically changes. |
In the "Advanced Titling" appendix, you will learn to add motion effects to this text. For now, let's continue exploring other types of text clips. |