Section 13.1. Using Atlas with ASP.NET Web Parts
13.1. Using Atlas with ASP.NET Web PartsThis section will show how you can use Atlas with ASP.NET Web Parts to give users more control over the layout and content of an Atlas page. ASP.NET Web Parts are a set of controls that enable users to add, remove, and change elements on a page at runtime. Web Parts give you the ability in ASP.NET to create pages like the Google personalized home page (http://www.google.com/ig). Web Parts are enabled using client script to support drag and drop, expand and collapse, and similar features. However, a limitation of Web Parts as shipped with ASP.NET 2.0 is that most of their functionality is available only in Internet Explorer. Therefore, ASP.NET Web Parts are mostly used in intranet environments that can rely on working with Internet Explorer. Of course, many web users have Firefox and other browsers, so although Web Parts are a nice feature, they are not necessarily suitable for public web sites. Atlas makes up for this limitation. With Atlas, you can now use Web Parts that are equally functional in Internet Explorer and Firefox. If you are developing a public web site and need cross-browser support, Atlas Web Parts are a very appealing option. In this section, I will focus on showing you how to implement Web Parts using Atlas. I won't provide background information on Web Parts (which is a big subject), so if you want more information about the basics of Web Parts, you can try the documentation. A good place to start might be the ASP.NET Web Parts pages (http://msdn2.microsoft.com/en-US/library/e0s9t4ck.aspx). In the example that follows, we'll use Atlas Web Parts to package a calendar control and a wizard control, and we'll enable drag-and-drop functionality for both so users can arrange them to appear in a browser as they wish. These changes are persisted, so when a user has cookies activated and visits the page again, the two controls are at the same position the user previously chose. There are two ways to work with Atlas-specific Web Parts. One way is to remap the existing ASP.NET Web Parts tags (for example, <asp:WebPartZone>) to equivalent Atlas tags (for example, <atlas:WebPartZone>). You might do this if you have existing pages that use Web Parts and you want to extend the controls to use Atlas but do not want to build the site from scratch again. To remap the tags, you use a <tagMapping> element in the application Web.config file. This element redirects all tag references of a certain type to another type. The following snippet from a Web.config file shows how to remap two ASP.NET Web Parts tags (defined in the System.Web.UI.WebControls.WebParts.WebPartManager namespace), to the equivalent Atlas Web Parts (defined in the Microsoft.Web.UI.Controls.WebParts.WebPartManager namespace). <pages> <!-- Other page settings --> <tagMapping> <add tagType="System.Web.UI.WebControls.WebParts.WebPartManager" mappedTagType="Microsoft.Web.UI.Controls.WebParts.WebPartManager"/> <add tagType="System.Web.UI.WebControls.WebParts.WebPartZone" mappedTagType="Microsoft.Web.UI.Controls.WebParts.WebPartZone"/> </tagMapping> </pages> This markup remaps the default ASP.NET WebPartManager and WebPartZone types to their Atlas counterparts. (Generally, the type provided in the tagType attribute gets mapped to the type provided in the mappedTagType attribute.) This strategy maps all Web Part tags for the application. Another approach (and the one we'll use in this chapter) is to simply use the Atlas Web Parts control directly, rather than remapping the existing ASP.NET Web Parts tags. This enables you to use Atlas Web Parts on individual pages without affecting the application as a whole. To use Atlas Web Parts controls directly, you need to register the Microsoft.Web.UI.Controls.WebParts namespace. Put the following markup in the <system.web> element in the Web.config file: <pages> <!-- Other page settings --> <controls> <!-- Other control namespaces --> <add namespace="Microsoft.Web.UI.Controls.WebParts" assembly="Microsoft.Web.Atlas" tagPrefix="atlas" /> </controls> </pages> Now you can create an ASP.NET page with Atlas Web Parts. A ScriptManager control is required, as always. You must also add a WebPartManager control to enable Web Parts support: <atlas:WebPartManager runat="server" /> Web Part zones are areas on the page where Web Parts can appear, basically containers for Web Parts. You can drag Web Parts between zones, and you can hide and show zones to hide and show the Web Parts inside them. You create a zone with the WebPartZone control. Its <ZoneTemplate> subelement contains the contents of that Web Part. Here are two Web Part zones, each containing an ASP.NET control, a Calendar control, and a Wizard control: <atlas:WebPartZone HeaderText="Zone 1" runat="server"> <ZoneTemplate> <asp:Calendar runat="server"></asp:Calendar> </ZoneTemplate> </atlas:WebPartZone> <atlas:WebPartZone HeaderText="Zone 2" runat="server"> <ZoneTemplate> <asp:Wizard runat="server"> <WizardSteps> <asp:WizardStep runat="server" Title="Step 1" /> <asp:WizardStep runat="server" Title="Step 2" /> </WizardSteps> </asp:Wizard> </ZoneTemplate> </atlas:WebPartZone> To give your Web Part drag-and-drop functionality, you need to set the DisplayMode property of the WebPartManager control to DesignDisplayMode. The display mode cannot be set declaratively, but the following server-side C# code comes to the rescue: void Page_Init () { WebPartManager1.DisplayMode = Microsoft.Web.UI.Controls.WebParts.WebPartManager .DesignDisplayMode; }
Example 13-1 contains the complete code for this example. In Figure 13-1, you can see the result in Firefoxdragging and dropping a Web Part is now supported.
Example 13-1. Web Parts with Atlas
Figure 13-1. Atlas Web Parts support drag and drop in Mozilla browsers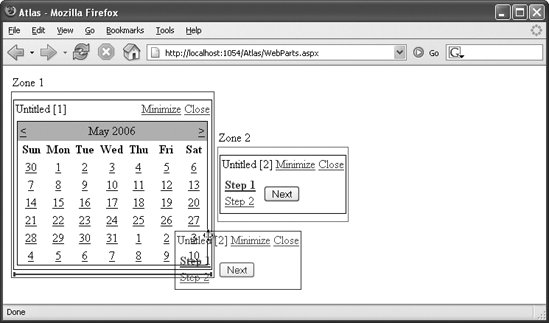 |
