Managing Slide Masters
Let's review the relationship one more time between slide masters and themes. A theme is a set of formatting specs. Themes are not applied directly to slides-they are applied to slide masters, which are then in turn applied to slides. The slide masters exist within the presentation file itself. You can change them by applying different themes, but they are essentially "built in" to the presentation file.
When you change to a different theme for all of the slides in the presentation, your slide master changes its appearance. You can tweak that appearance in Slide Master view. As long as all of the slides in the presentation use the same theme, you need only one slide master. However, if you apply a different theme to some of your slides, you need another master, because a master can have only one theme applied to it at a time. PowerPoint automatically creates the additional master(s) for you, and they are all available for editing in Slide Master view.
If you later reapply a single theme to all of the slides in the presentation, you do not need multiple masters anymore, so the unused one is automatically deleted. In addition to all this automatic creation and deletion of slide masters, you can also manually create and delete slide masters on your own. Any slide masters that you create manually are automatically preserved, even if they aren't always in use. You must manually delete them if you don't want them anymore.
In the following sections, you learn how to create and delete slide masters manually, and how to rename them. You also learn how to lock one of the automatically created slide masters so that PowerPoint does not delete it if it falls out of use.
Creating and Deleting Slide Masters
To create another slide master, click Insert Slide Master on the Slide Master tab. It appears below the existing slide master(s) in the left pane of Slide Master view. From there, just start customizing it. You can apply a theme to it, modify its layouts and placeholders, and all the usual things you can do to a slide master. Another way to create a new slide master is to duplicate an existing one. To do this, right-click the slide master and choose Duplicate Master.
To delete a slide master, select it in Slide Master view (make sure you select the slide master itself, not just one of its layouts) and press the Delete key. If any of that slide master's layouts were applied to any slides in the presentation, those slides automatically convert to the default slide master's equivalent layout. If no exact layout match is found, PowerPoint does its best: It uses its default Title and Content layout and includes any extra content as orphaned items.
Renaming a Slide Master
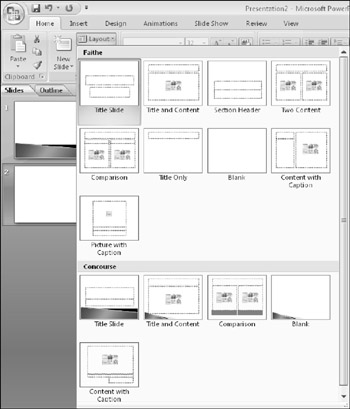
Slide master names appear as category headings on the Layout list as you are selecting layouts. For example, in Figure 5.22, the slide master names are Faithe and Concourse.

Figure 5.22: Slide master names form the category titles on the Layout list.
To rename a slide master, follow these steps:
-
In Slide Master view, right-click the slide master and choose Rename Master. The Rename Master dialog box opens.
-
Type a new name for the master, replacing the existing name.
-
Click Rename.
Preserving a Slide Master
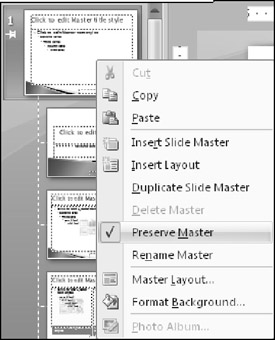
Unless you have created the slide master yourself, it is temporary. Slide masters come and go as needed, as you format slides with various themes. To lock a slide master so that it doesn't disappear when no slides are using it, right-click the slide master and choose Preserve Master. A check mark appears next to Preserve Master on its right-click menu, indicating it is saved. To unpreserve it, select the command again to toggle the check mark off. See Figure 5.23.

Figure 5.23: The Preserve Master command saves a slide master so that PowerPoint cannot automatically delete it.
EAN: 2147483647
Pages: 268