Chapter 23: Sharing and Collaborating
In many organizations, creating an important presentation is a collaborative project, with several people providing input on a draft. There are several ways to share a draft presentation with others; you can post a presentation to a server, distribute one via e-mail, or post a draft on a document management server. If you have access to a Microsoft Office SharePoint Server (MOSS), you can also create a Slide Library and make individual slides available for reuse.
In this chapter, you'll learn how to use PowerPoint's collaborative tools, such as comments, and how to share and distribute presentations and individual slides in a variety of ways.
Working with Comments
Comments are like sticky notes that you can attach to various spots in a presentation, just as you would attach notes to a paper copy. With comments, multiple reviewers can offer suggestions without changing the actual presentation.
Adding Comments
As you review a presentation, you can insert comments pertaining to a slide as a whole or to an individual object on that slide. To add a comment, follow these steps:
-
Display the slide on which you want to place the comment. If you want to attach the comment to a specific object, select it.
-
On the Review tab, click New Comment. A new comment appears. If you did not choose a specific object in step 1, the comment is placed in the top-left corner of the slide.
-
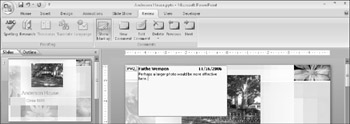
Type the comment into the box provided, as shown in Figure 23.1.

Figure 23.1: Type a comment in the box. -
Click away from the comment box to close it.
A small box with your initials and the comment number remain visible on the slide.
To view the comment at any time, click the box containing your initials. To edit the comment, double-click that box, or click it once and then click Edit Comment on the Review tab.
| Note | Comments are numbered in the order you add them to your presentation, not the slide order. If you add a comment to a slide earlier in your presentation, the numbers for comments later in the presentation do not change. Comments that you add to notes are considered to have been added to the slide itself. |
The only places you can't add comments are to the slide masters and layouts. If you want to mark something up for a master or layout, you need to build a slide from that master or layout, and then add the comment.
Printing Comments
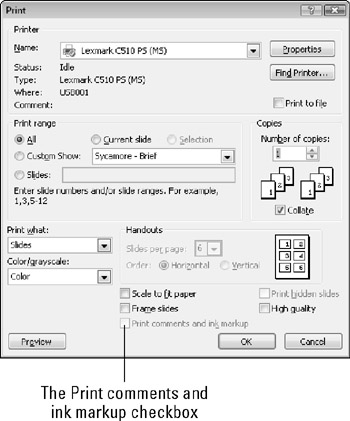
To print comments, mark the Print Comments and Ink Markup check box in the Print dialog box, as shown in Figure 23.2. The comments print on a separate page.

Figure 23.2: Mark the Print Comments and Ink Markup box to see the comments in print.
Reviewing and Deleting Comments
After everyone has had a chance to comment on a draft presentation, you will want to review those comments, and probably delete some or all of them.
| EXPERT TIP | You do not have to delete the comments to hide them. Instead, you can click the Show Markup button on the Review tab to toggle the comments on/off. Comments do not show in Slide Show view, though. |
To move from one comment to the next in the presentation, use the Previous and Next buttons on the Review tab. The comments appear open (so that you can read them) but they are uneditable. To edit a comment, double-click it.
To delete a comment, do any of the following:
-
To delete an individual comment, select its box and press the Delete key or click Delete on the Review tab.
-
To delete all of the comments on the current slide, click the down arrow below the Delete button on the Review tab and click Delete All Markup on the Current Slide.
-
To delete all of the comments in the entire presentation, click the down arrow beneath the Delete button and click Delete All Markup in This Presentation.
EAN: 2147483647
Pages: 268