Clip Art Search Methods
Now that you've seen the basic process for searching for a clip by keyword, let's look at some ways to fine-tune those results so that you can more easily find what you want.
Using Multiple Keywords
If you enter multiple keywords in the Search For text box of the Clip Art pane, only clips that contain all of the entered keywords appear in the search results. You can simply type the words separated by spaces; you do not have to use any special symbols or punctuation in order to use multiple keywords.
Specify Which Collections to Search
Clip art is stored in collections, which are logical groupings of artwork arranged by subject or location. There are three main collections:
-
Office Collections: These are the clips that came with Microsoft Office 2007.
-
My Collections: These include any clips that you have marked as favorites, as well as any uncategorized clips. They also include any clips that you have added through the Clip Organizer, any downloaded clips, and any clips shared from a network drive.
-
Web Collections: These are clip collections that are available online via Microsoft. This is by far the largest collection, but you must be connected to the Internet in order to access it. All of the clips from this collection appear with a little globe icon in the corner when you preview them in the task pane.
Within each of these large collections are multiple smaller collections (like subfolders within folders) that are based on subject. For example, Office Collections has sub-collections for Academic, Agriculture, Animals, and so on.
| Note | The physical location of the Office Collections clips is Program Files\Microsoft Office\MEDIA\CAGCAT10. However, users don't normally need to know this because PowerPoint manages the locations of the clip art automatically. |
When you search for clips that contain certain keywords using the Clip Art pane, you have the option to specify which collections you want to look in. If you are working on a PC that uses a dial-up connection, or that has sporadic or no Web access, you might want to exclude the Web Collections from the search to avoid the delay while PowerPoint looks for and fails to find the Internet connection. You can also exclude certain categories to avoid having too many results to wade through.
To narrow the list of collections in which to search, follow these steps:
-
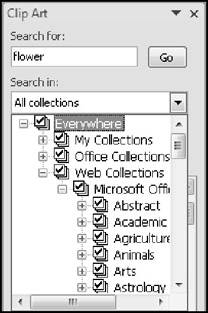
From the Clip Art pane, open the Search In drop-down list. A list of collections appears.
-
Deselect the check box for any collection that you want to exclude. You can also click the plus sign next to the collection to see its individual sub-collections, and then deselect the check box for one or more of these sub-collections, as shown in Figure 12.2.

Figure 12.2: Narrow the search for a clip to certain collections by deselecting the check boxes for unwanted collections. -
Continue the clip search as you normally would.
Specify Which Media File Types to Find
Besides true clip art (WMF and EMF files), you can also find movies, sounds, and pictures using the Clip Art pane. You can learn more about each of these media types in later chapters, but let's take a quick look here at how to include them in searches. To filter results by media type (or to enable additional media types), follow these steps:
-
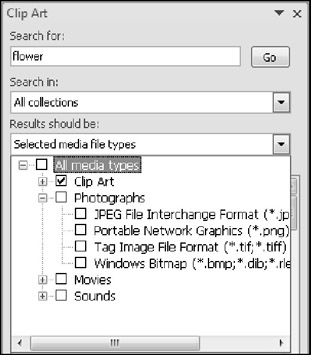
From the Clip Art pane, open the Results Should Be drop-down list. A list of media types appears.
-
Select or deselect check boxes for media types that you want to include or exclude, respectively. You can also click the plus sign next to a media type to see its individual subtypes, and then deselect the check box for one or more of these subtypes, as shown in Figure 12.3.

Figure 12.3: Narrow the search for a clip to certain file types by only selecting check boxes for the media types that you want.
| Note | Notice in Figure 12.3 that the Clip Art pane is wider than in Figure 12.2. It is widened to show that you can view more of the descriptions of each file type. To widen this pane, click-and-drag its left edge to the left. |
EAN: 2147483647
Pages: 268