Submitting an InfoPath Form
| < Day Day Up > |
| Submitting an InfoPath form is relevant only in form-filling mode. InfoPath 2003 provides three ways that you can provide submission functionality for form users:
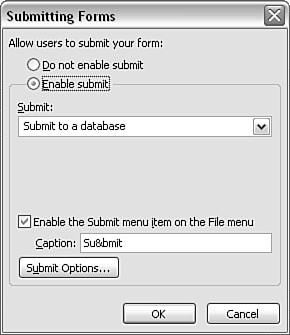
The target to which you submit a form can include a relational database such as SQL Server or Microsoft Access, or an XML Web service. Submitting Via the File MenuBy default, the user can submit a form by clicking on the File menu and selecting Submit. However, the form designer can enable or disable this means of submitting a form. To control whether the end user can submit a form, you must open the Submitting Forms window in design mode. To do so, follow these steps:
On the Submitting Forms window, you can allow or disallow the submission of forms created from the form template. The Enable Submit and Do Not Enable Submit option buttons are self-explanatory. Similarly, you can enable (the default) or disable the Submit option on the File menu. To disable the Submit option, uncheck the Enable the Submit Menu Item on the File Menu option. If the Submit option is disabled, the corresponding option on the File menu is grayed out when the form is previewed or opened in form-filling mode.
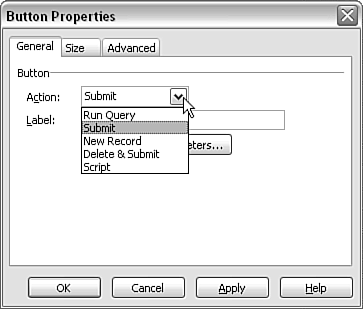
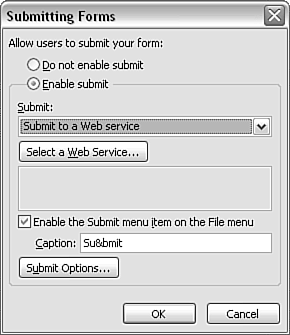
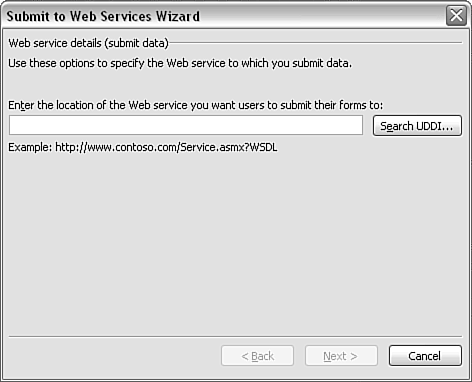
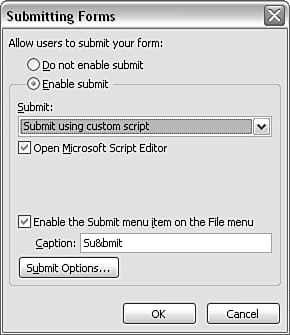
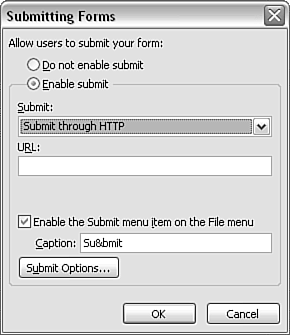
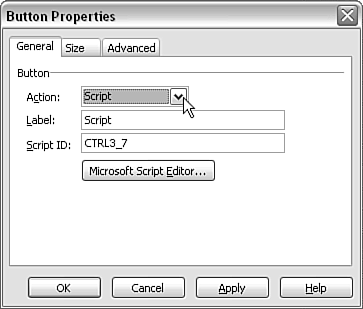
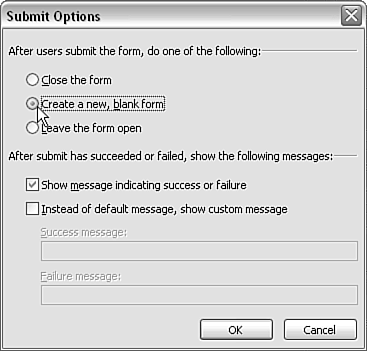
Other Submit DestinationsThe Submitting Forms window also lets you choose other submission destinations, including a Web service, a custom script, or HTTP. These additional destinations apply whether the Submit option on the File menu or the InfoPath Action is being used (described in the next section). Depending on which submission target you choose, additional options might be displayed on the Submitting Forms window. If you select the Submit to a Web Service option, the Select a Web Service button appears (see Figure 9.16). Figure 9.16. The Submit to a Web Service option in the Submitting Forms window. Clicking the Select a Web Service button opens the Submit to Web Services Wizard window (see Figure 9.17), where you can either type in the URL for a WSDL file or use the Search UDDI button to locate a suitable XML Web service. Clicking the Search UDDI button opens the Search Web Service window, which was discussed in Chapter 8, "Connecting to a Web Service." Figure 9.17. The Submit to Web Services Wizard window. Another option on the Submit drop-down menu in the Submitting Forms window is Submit Using Custom Script. If you choose that option, the Open Microsoft Script Editor check box appears, which is checked by default (see Figure 9.18). If you leave the check box checked, clicking the OK button on the Submitting Forms window causes the Microsoft Script Editor to open. Figure 9.18. The Submit Using Custom Script option. The final option in the Submit drop-down menu is Submit Through HTTP. When that option is selected, a URL text box appears, into which the URL for submission is entered (see Figure 9.19). Figure 9.19. The Submit Through HTTP option in the Submitting Forms window. Submitting Via InfoPath ActionThe control of submission via InfoPath action is also controlled via the Button Properties window (shown earlier in Figure 9.14). Select the Submit option in the drop-down menu, and then click OK. The Submitting Forms window opens with options as previously described. Submitting Via ScriptOne of the options on the Action drop-down menu of the General tab of the Button Properties window is Script. When this option is selected, the options offered on the General tab of the Button Properties window change (see Figure 9.20). Figure 9.20. Additional script options on the General tab of the Button Properties window. The value in the Label text box changes, by default, to Script . Depending on precisely what you want to do, you will likely want to change that to something more meaningful. The button form control is also allocated a Script ID, which is a name used to create the name of the relevant function in the script code in the Microsoft Script Editor. It is sensible to change the automatically generated script ID to something meaningful, like FormSubmit rather than, say, CTRL3_7 . That means that the JScript function name, assuming you are using JScript, automatically created in the Microsoft Script Editor is created as FormSubmit::OnClick rather than the less meaningful CTRL3_7::OnClick . The Microsoft Script Editor button opens the Microsoft Script Editor when clicked. Specifying the Behavior After Submitting a FormHaving looked at the available ways to submit a form, we also need to look briefly at how we can specify what happens after a form is submitted. Those options are as follows :
To make a choice about those options, you need to access the Submit Options window. On the Button Properties window, with Submit selected in the Action drop-down menu, click Define Action Parameters (the Submitting Forms window opens). On the Submitting Forms window, click the Submit Options button to open the Submit Options window (see Figure 9.21). Figure 9.21. The Submit Options window. In addition to these options offered by InfoPath, you can script alternative behavior after submitting a form. The bottom section of the Submit Options window allows the form designer to use form submission success/failure messages, and also allows for the creation of custom success/failure messages. |
| < Day Day Up > |
EAN: 2147483647
Pages: 206
