Master Pages
Most Websites reuse part of their content on every page — things like company logos and menus are often available on all pages. With ASP.NET 1.1, often just a single page is used where the content is replaced dynamically through user controls. With this concept for accessing different content, a URL parameter must be used, something like http://www.ineta.org/DesktopDefault.aspx?tabindex=3. Using different links to the pages would be more appealing: http://www.ineta.org/Events.aspx would be an easier to remember Web address. This is where master pages come into play.
With a master page the default content of a page (for example, the menus) is defined together with placeholders that are replaced by the Web pages using the master pages.
A master page has the file extension .master and uses the Master directive in the first line of the file, as shown here:
<%@ Master Language="C#" AutoEventWireup="true" CodeFile="MasterPage.master.cs" Inherits="MasterPage_master" %>
Only the master pages in the Website make use of <html>, <head>, <body>, and <form> HTML elements. The Web pages themselves contain only content that is embedded within the form element. The Web pages can embed their own content within the ContentPlaceHolder control. The master page can define default content for the ContentPlaceHolder if the Web page doesn't.
<html xmlns="http://www.w3.org/1999/xhtml> <head runat="server"> <title>Untitled Page</title> </head> <body> <form runat="server"> <div> <asp:contentplaceholder runat="server"> </asp:contentplaceholder> </div> </form> </body> </html>
To use the master page, you must apply the MasterPageFile attribute to the Page directive. To replace the content of a master page, use the Content control. The Content control associates the ContentPlaceHolder with the ContentPlaceHolderID.
<%Page Language="C#" MasterPageFile="~/MasterPage.master" AutoEventWireUp="true" CodeFile="Default.aspx" Inherits="default" Title="Untitled Page" %> <asp:Content ContentPlaceHolder Runat="Server"></asp:Content>
Instead of defining the master page with the Page directive, you can assign a default master page to all Web pages with the <pages> element in the Web configuration file web.config:
<configuration xmlns="http://schemas.microsoft.com/.NetConfiguration/v2.0"> <system.web> <pages masterPageFile="~/MasterPage.master" /> </system.web> </configuration> With the master page file configured within web.config, the ASP.NET pages need a Content element configuration in the file as shown earlier; otherwise, the masterPageFile attribute would have no use. If you use both the Page directive's MasterPageFile attribute and the entry in web.config, the setting of the Page directive overrides the setting from web.config. This way it is possible to define a default master page file (with web.config), but override the default setting for specific Web pages.
It is also possible to programmatically change the master page. By doing so, different master pages can be used for different devices or different browser types. The last place the master page can be changed is in the Page_PreInit handler method. In the following sample code, the MasterPageFile property of the Page class is set to IE.master if the browser sends the MSIE string with the browser name (what is done by Microsoft Internet Explorer) or to Default.master for all other browsers.
public partial class changeMaster : System.Web.UI.Page { void Page_Load(object sender, EventArgs e) { } void Page_PreInit(object sender, EventArgs e) { if (Request.UserAgent.Contains("MSIE") { this.MasterPageFile = "~/IE.master"; } else { this.MasterPageFile = "~/Default.master"; } } }
Now, try creating your own master page in the following Try It Out. The sample master page here will have a heading and a body, and the main part of the master page will be replaced by individual pages.
Try It Out – Create a Master Page
-
Open the Website named EventRegistrationWeb that you've created in the previous chapter.
-
Add a new Master Page item, as shown in Figure 19-3, and name it EventRegistration.master.
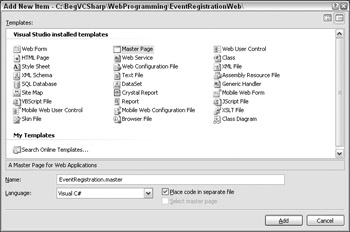
Figure 19-3 -
Remove the ContentPlaceHolder that was created automatically from the master page.
-
Insert a table in the page using the menu options Layout Insert Table. In the Insert Table dialog select the template header, footer, and side, as shown in Figure 19-4.
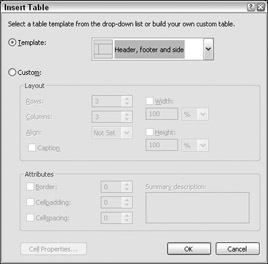
Figure 19-4 -
Add the text Registration Demo Web to the top of the master page, and a copyright notice to the bottom. You can place the text Registration Demo Web inside <H1> tags to make it larger. In addition, justify the text in the center.
-
In the second row add a ContentPlaceHolder to every column. Name the ContentPlaceHolder on the left side ContentPlaceHolderMenu and the one on the right side ContentPlaceHolderMain.
-
Add the text Default content of the Registration Demo Web Master to the ContentPlaceHolder on the right side.
-
Arrange the sizes of the page as shown in Figure 19-5.
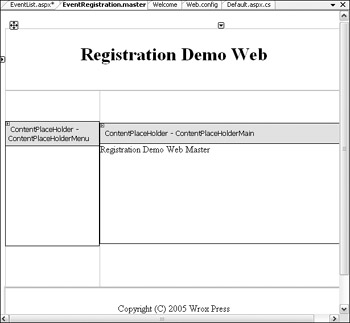
Figure 19-5
How It Works
As previously discussed, the master page contains the HTML, including the <FORM> tags that contain the content place holders where the content will be replaced by the pages that use the master page. The HTML table defines the layout of the page.
<%@ Master Language="C#" AutoEventWireup="true" CodeFile="EventRegistration.master.cs" Inherits="EventRegistration" %> <!DOCTYPE html PUBLIC "-//W3C//DTD XHTML 1.1//EN" "http://www.w3.org/TR/xhtml11/DTD/xhtml11.dtd"> <html xmlns="http://www.w3.org/1999/xhtml" > <head runat="server"> <title>Untitled Page</title> </head> <body> <form runat="server"> <div> <table border="0" cellpadding="0" cellspacing="0" style="width: 100%; height: 100%"> <tr> <td colspan="2" style="height: 75px"> <h1 style="text-align: center">Registration Demo Web</h1> </td> </tr> <tr> <td style="width: 166px;"> <asp:ContentPlaceHolder runat="server"> </asp:ContentPlaceHolder> </td> <td> <asp:ContentPlaceHolder runat="server"> Default content of the Registration Dem Web </asp:ContentPlaceHolder> </td> </tr> <tr> <td colspan="2" style="text-align: center" height="50"> Copyright (C) 2005 Wrox Press</td> </tr> </table> </div> </form> </body> </html>
After you have created the master page, you can use it from a Web page, as shown in the following Try It Out.
Try It Out – Use a Master Page
-
Add a new item of type Web Form to the Web application and give it the name EventList.aspx. Click the check box Select master page.
-
With the check box Select a master page checked, click the Next button to open the dialog Select a Master Page, as shown in Figure 19-6. Select the previously created master page EventRegistration.master (see Figure 19-7), and click the OK button.
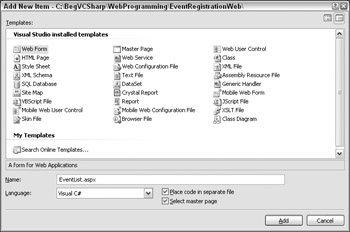
Figure 19-6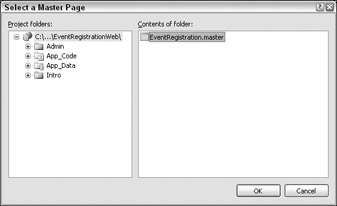
Figure 19-7 -
The source view of the file EventList.aspx shows just two Content controls after the Page directive that references the ContentPlaceHolder controls from the master page. Change the ID properties of the Content controls to ContentMenu and ContentMain.
<%@ Page Language="C#" MasterPageFile="~EventRegistration.master" AutoEventWireup="true" CodeFile="EventList.aspx.cs" Inherits="EventList" Title="Untitled Page" %> <asp:Content ContentPlaceHolder Runat="Server"><asp:Content> <asp:Content ContentPlaceHolder Runat="Server"><asp:Content>
-
Change to the design view in Visual Studio. This view shows you the content of the master page that cannot be changed from the page that includes the header and copyright information (see Figure 19-8).
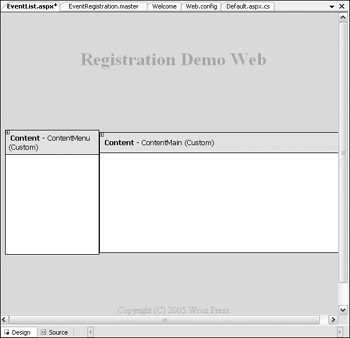
Figure 19-8 -
Add a table to the ContentMain control, where you add Calendar and ListBox controls. The content of the menu will be added later. When you open the source view you can see the table within the Content control.
-
View the page with the browser. The page includes the content from the Web page as well as the surroundings from the master page.
EAN: N/A
Pages: 278