5.8 PPP Connections
5.8 PPP Connections
So far, you have seen Internet connections based on a local area network (LAN) and a default gateway on that network. However, if you have a modem and telephone line to connect to the Internet, you cannot use the same host-to-network layer interfaces described in previous sections because your connection does not run over the Ethernet physical medium.
The most popular standard for single-machine Internet connectivity with a modem is PPP (Point-to-Point Protocol). Although PPP is a very flexible protocol, its main use is to connect one machine without a direct IP connection to second machine (a PPP server) that has one, with the second machine possibly asking the first for a username and password along the way.
When you dial up and register with a PPP server, the server gives you your own IP address and tells you about its IP address. After the connection initiates, the PPP software on your machine knows how to reach the server's IP address, and the server knows how to reach your machine's IP address. To reach the rest of the Internet, you set the default gateway to the server's IP address and let the server do the rest. Figure 5-2 shows the link between your local IP address and the server's IP address. As with the routers in LANs, you do not need to worry about the server's uplink IP address.
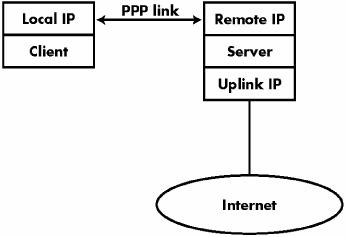
Figure 5-2: A typical PPP link.
Although it's nice to know how this process works, you are probably more interested in actually getting a connection to work. Specifically, you want to know the answers to these questions:
-
How do I get my modem to dial the server's number?
-
Where do I put my username and password?
-
How do I start and stop a network interface like ppp0 ?
The key to the whole mess is a pppd , a system daemon that acts as an intermediary between a serial port on your machine and a PPP network interface such as ppp0 . To set up everything, you need to do four things:
-
Verify that your serial port, modem, and login (username and password) work.
-
Create an options file in /etc/ppp/peers containing configuration options.
-
Create a chat script to make your modem dial out (and possibly log in).
-
Set up Password Authentication Protocol (PAP) or Challenge Handshake Authentication Protocol (CHAP) user authentication if necessary.
These four steps are explained in the following sections. If your distribution's dial-up configuration tool works for you, it may not be worth your while to read through these sections. However, if you don't read through them, at least run ifconfig when you're connected to see what the PPP interface name is, because you may need it later in the chapter for Network Address Translation (NAT) or firewalling.
5.8.1 Testing Your Serial Port and Modem
Before you start with the full pppd setup, you should use minicom to make sure that your modem works and that you can initiate a PPP connection. Modems talk to your computer through serial port devices, so the first thing you need to do is determine the serial port that your modem is connected to.
| Note | Don't try to use a Winmodem with Linux. See Section 17.2.4. |
As mentioned in Section 2.3.2, Linux serial port devices are at /dev/ttyS* . If you're having problems, it's best to check your boot messages as described in Section 4.1 to see if the modem setup looks right and to verify that you're using the correct serial port device. In addition, you can run cat /proc/ioports for more port statistics. Most modern hardware and kernels actually recognize the hardware configuration correctly, but if you have extra serial ports on different hardware interrupt numbers (IRQs), you may need to run setserial to specify the hardware parameters that the serial port uses. For example:
setserial /dev/ttyS3 irq 5
See the setserial(8) manual page for more options and a good overall explanation of serial ports.
Now you can get down to the business of checking the connection to the dial-up server with these steps:
-
Configure the baud rate, serial port, and other minicom settings with this command:
minicom -s
-
After choosing your settings, exit the configuration menu. minicom then attempts to connect to the serial port.
-
Upon success, you should be able to enter AT commands. Test it by typing AT and then pressing ENTER. You should get OK as a response. If you're having trouble, skip to step 7 and then back to step 1.
-
Reset your modem (that is, clear its volatile data) and dial your ISP's number by typing these two modem commands:
atz atdt number
-
Your modem should connect with a CONNECT message. Wait five or ten seconds after you see the CONNECT message. You're looking for "garbage" like this:
~}#!}!}!} }.}%}&} }
If you get this junk immediately after you see the CONNECT message, you've got a PPP connection, and furthermore, you probably need to use the PAP or CHAP authentication system when dialing up. Make a note of this and skip to the last step.
-
If you get something like Username: instead, type in your username (and password, if necessary). After logging in, keep going (you might need to type ppp or something similar) until you get the "garbage" mentioned in the previous step. In this case, you probably do not need to use PAP or CHAP.
-
Exit minicom by pressing CONTROL-A, then x. If minicom hangs when you're trying to exit, you can wait a little while to see if it times out, or you can be impatient, open another window, and use kill -KILL on the minicom process.
When interacting with the modem and remote server, take careful notes of all the settings you used, what you had to type, and the responses you got back. You'll need this information to write a chat script.
5.8.2 Starting pppd with Options Files
Now that you know how to log in to your ISP's server manually, you can create a configuration file containing the same connection settings you used with minicom -s . This allows you to make pppd dial the telephone number automatically.
Pick a name for the ISP and create an options file called /etc/ppp/peers/ name , with the following lines:
ttyS1 115200 crtscts connect '/usr/sbin/chat -v -f /etc/ppp/chat- name ' noauth defaultroute mru 1500
The first line specifies the modem device, the CPU-to-modem speed, and the hardware flow control. You will read about these options in Section 5.8.5. Don't bother to tweak anything yet; for now, just make sure that your pppd can start properly.
Now make a chat file named /etc/ppp/chat- name . This chat file determines the connection commands sent through the serial line and the responses that you expect from your ISP. For now, just fill it with the following lines, where number is your ISP's telephone number:
ABORT "NO CARRIER" ABORT BUSY "" ATZ OK ATDTnumber CONNECT
Try to establish a connection by starting pppd with this command:
pppd call name
Monitor the progress by looking at your system log. The pppd syslog facility name is daemon, so the log information is probably in /var/log/daemon.log or something similar. However, the chat program used for initializing the modem connection may use a different facility, such as local2.
You should get messages like this in your log file:
Jul 29 18:40:46 mikado pppd[634]: pppd 2.4.1 started by root, uid 0 Jul 29 18:40:47 mikado chat[635]: [chat messages] Jul 29 18:40:47 mikado pppd[634]: Connect script failed Jul 29 18:40:48 mikado pppd[634]: Exit.
Take a careful look at the chat messages. They should tell you if the modem is dialing up, and if it gets an answer and connection from the remote server.
Even if the preceding connection settings work so far, expect the configuration to fail because you haven't supplied a username and password. Watch the failure in the log carefully , because it tells you how to proceed. For example, if the log file says Connect script failed as in the preceding example, then you have a problem with the dial-up portion (in addition to not having supplied a username and password).
In particular, look out for these types of failures:
-
I/O errors happen when your serial port and modem are not set up correctly. Double-check the first line of the options file to make sure it matches the settings that you verified earlier with minicom .
-
If the remote system uses PAP or CHAP, expect an authentication error. Skip to Section 5.8.4 to see how to configure PAP and CHAP.
-
Timeouts generally go along with incomplete chat scripts. Proceed to the next section to see how to finish your script.
-
Bad chat output, such as NO CARRIER and BUSY , are signs of telephone line problems. Double-check the ISP's telephone number.
To stop a PPP daemon after it finishes its chat sequence, use the following command, substituting the appropriate network interface name if yours is not ppp0 :
kill `cat /var/run/ppp0.pid`
5.8.3 Chat Scripts
A chat script is a file containing commands that go out through the serial line and responses that you expect to receive from the serial line (the responses come from the modem or ISP, depending on the current stage of the dial-up process). Recall this chat script line from the previous section:
ATDTnumber CONNECT
This means that the chat program should dial with the ATDT number modem command and expect a response of CONNECT . After receiving a CONNECT response, chat moves to the next thing in the chat file. After stepping through the entire file, and assuming that everything goes as anticipated, chat returns success and pppd proceeds with a PPP connection.
The details of your chat script depend on your ISP, and you should be armed with the information you got in Section 5.8.1 before trying to complete your script. However, here is a script that works for most service providers that use Cisco equipment (where username is your username and password is your password):
ABORT "NO CARRIER" ABORT BUSY "" ATZ OK ATDT number CONNECT "" ername: username ssword: \q password > ppp
The ABORT keywords and strings at the top of the script cause chat to exit with an error if it encounters one of those strings. In addition, \q string tells chat not to send string to syslogd . In this case, it tells chat not to send password to syslogd when making a record of the connection.
Remember that if you use PAP or CHAP, your chat script likely should not contain any username or password information. However, if your chat script does contain username and password details (like the preceding script), you should be mostly done after you finish the script ” try to verify the connection with ifconfig -a , and try to access the Internet. If everything works, skip to Section 5.8.5 for information on how to tweak your options file.
| Note | For more information on chat , see the chat(8) manual page. |
5.8.4 PAP and CHAP
Many dial-up ISPs require that logins use PAP (Password Authentication Protocol) or CHAP (Challenge Handshake Authentication Protocol). If your ISP has such a requirement, get started by adding the following entry for your username to the end of the /etc/ppp/peers/ name options file from Section 5.8.2:
name username
| Warning | Don't put require-pap in your options file. This option is primarily for running a PPP gateway; it requires the remote system to authenticate with your system. |
PAP
If your ISP uses a PAP server, edit /etc/ppp/pap-secrets . The lines in that file have this format:
your_hostname remote_hostname password ip_address
The references to hostnames are primarily for use by PPP servers. For a simple client machine, you can put this in pap-secrets :
username * password *
The * means to accept any remote hostname. Don't bother with the IP address, either, because the server should give you one.
The preceding instructions will work if you have only one ISP. However, if you have multiple ISPs, do the following for each:
-
Pick a name for the ISP ( isp_name ).
-
Add the following line to the ISP's options file in /etc/ppp/peers :
remotename isp_name
-
Add the following to your pap-secrets file:
username isp_name password *
CHAP
If you run into a CHAP server, proceed as you would with a PAP server and multiple ISPs, but enter the username and password into /etc/ppp/chap-secrets in the two-line format that follows :
username isp_name your_password isp_name username their_password
5.8.5 Options Files
The options files in /etc/ppp/peers contain valid pppd command-line options. Therefore, you could run pppd at the shell prompt with these options as command-line arguments, and indeed, some distributions (like Red Hat Linux) use scripts to set up big pppd invocations, completely bypassing /etc/ppp/peers . However, it's far more convenient to use options files because they enable you to invoke pppd call file to activate the connection.
| Note | In addition to the per-connection file in /etc/ppp/peers , you need a /etc/ppp/options file for global settings that apply to all pppd processes. This file must exist, even if it's empty. |
As mentioned earlier, the first two options in the options file are the serial device (with or without /dev/ at the front) and the serial port speed. For most serial ports and modems, 115200 is an appropriate speed, but you may wish to lower it to 57600 or lower for really slow systems. Recall that the following was the first options line in Section 5.8.2:
ttyS1 115200 crtscts
All other pppd options follow the serial port and baud rate. Here are some of the most important pppd options:
-
crtscts Enables RTS/CTS hardware flow control (popular with PC hardware).
-
defaultroute Sets the kernel's default route to the machine on the other side of the PPP connection. Don't forget this option; otherwise , you won't be able to reach anything on the Internet beyond the host on the other end of the PPP connection, which usually isn't very useful. If you happen to forget this when testing, you can manually add a route with the route command (see Section 5.11).
-
noauth Specifies that the remote machine should not send you a username and password; this is another option that you don't want to forget.
-
connect command Initializes the serial port with the specified command , usually a chat invocation like this:
connect '/usr/sbin/chat -v -f /etc/ppp/chat- name '
-
nodetach Run pppd in non-daemon mode; this prevents the shell prompt from returning immediately after you run pppd from the command line. This is handy for debugging, because you can press CONTROL-C to interrupt a connection.
-
mru size The maximum receive unit option tells the remote server not to send any chunks of data larger than size . The default is 1500 bytes; 3000 works for faster connections. Do not set this (or mtu ) to a number lower than 1300, because many applications prefer that their data be sent in larger chunks.
-
mtu size The maximum transmission unit option requests that your machine not send (transmit) any chunks of data larger than size to the remote server. The default is 1500 bytes. The quality of your telephone line or switch often determines how high you may set size .
-
name name Forces pppd to use name as the username (or local system name) for PAP or CHAP authentication.
-
remotename name Forces pppd to use name as the remote system name for PAP or CHAP authentication.
-
debug Activates verbose syslog debugging.
| Note | If your connection frequently hangs or drops , and the ARQ light on your modem blinks often, you probably have a poor switch or telephone line. If you hear any "static" when you pick up your telephone ( especially before making a call), your telephone company may be overloading your local phone switch. See if they will put you on a better switch. It's also possible that there's a problem between your phone jack and the phone network box in your building. |
The pppd(8) manual page has many more options. Keep in mind that most options are only relevant when you're running a PPP server, not a client. To be entirely truthful , there is no technical difference between a PPP server and a PPP client. They are simply peers that know how to contact each other. However, when one of the peers acts as a gateway to the rest of the Internet, you often say that this peer is the server.
5.8.6 PPP Directory Permissions
The /etc/ppp directory should be mode 700; that is, the superuser should have read-write-execute access, and no other users should have access.
However, any user can run pppd call name if that user has read access to the chat script and pppd is setuid root. Some distributions do not trust pppd and do not have the setuid bit set by default. As with any program, the setuid bit is a certainly a matter of concern if you don't trust your own users, but it's not so critical if you're the only user on the system.
There is no standard for which user should start PPP (or even how to set up the connection). PPP has always been somewhat clumsy to operate because the Internet grew up around networks that were always active. Broadband connections solve this problem, though not everyone has access to them (or wants them).
EAN: 2147483647
Pages: 189