GridView Control Fundamentals
GridView Control FundamentalsIn this section, you learn how to take advantage of all the basic features of the GridView control. In particular, you learn how to display, select, sort, page, and edit database data with a GridView control. We also discuss GridView formatting options. Displaying DataThe GridView renders its data items in an HTML table. Each data item is rendered in a distinct HTML table row. For example, the page in Listing 11.1 demonstrates how you can use the GridView to display the contents of the Movies database table (see Figure 11.1). Figure 11.1. Displaying data with the GridView control.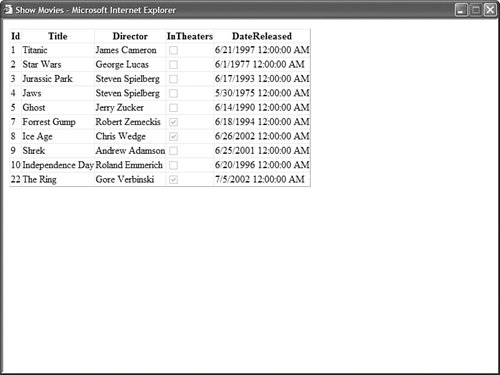 Listing 11.1. ShowMovies.aspx
In Listing 11.1, the GridView control is bound to a SqlDataSource control, which represents the Movies database table. The GridView is associated with its data source through its DataSourceID property. Notice that the GridView control automatically renders a check box for any Boolean fields. In the case of Listing 11.1, the GridView renders a check box for the InTheaters database column. For all other types of fields, the GridView simply renders the contents of the field. Web Standards Note The GridView control was designed to meet XHTML and accessibility guidelines. For example, the control uses the <th> tag to render its headers. Furthermore, each header tag includes a scope="col" attribute. Visual Web Developer Note You can add a GridView and SqlDataSource control to a page quickly by dragging a database table from the Database Explorer window onto a page in Design view. When you drag a database table onto the page, a SqlDataSource is automatically created, which retrieves all the rows and all the columns from a database table. The GridView control also supports programmatic databinding. In Listing 11.2, the GridView control is used to display a list of shopping list items represented by a Generic List collection. Listing 11.2. ShowShoppingList.aspx
Notice that the GridView is bound to the shopping list in the Page_Load() method. Its DataSource property points to the List collection, and its DataBind() method is called to load the items from the List collection and display them. Selecting DataYou can enable a user to select a particular row in a GridView control. This is useful when you want to build single-page Master/Details forms. For example, the page in Listing 11.3 contains two GridView controls. The first GridView displays a list of movie categories. When you select a category, the second GridView displays a list of matching movies (see Figure 11.2). Figure 11.2. Selecting a GridView row.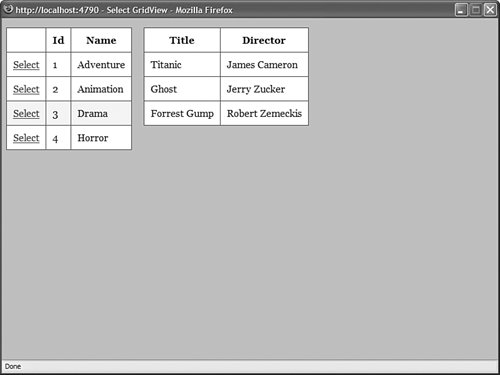 Listing 11.3. SelectGridView.aspx
Notice that the first GridView has its AutoGenerateSelectButton property enabled. When this property has the value true, a Select link is displayed next to each row. You can determine which row is selected in a GridView control by using any of the following properties:
In most cases, you use the SelectedValue property to determine the value associated with a particular row. The SelectedValue property returns the data key associated with a row. The following section discusses data keys. Note If you want to customize the appearance of the Select link, then you can use a CommandField control instead of using the AutoGenerateSelectButton property. The CommandField control is discussed later in this chapter in the section entitled "Using Fields with the GridView Control." Using Data KeysYou associate a value with each row in a GridView by providing a value for the GridView control's DataKeyNames property. You can assign the name of a single database column to this property or you can assign a comma-separated list of column names to this property. For example, the Employees database table uses two columnsthe employee first and last nameas a primary key. The page in Listing 11.4 displays employee details when you select a particular employee (see Figure 11.3). Figure 11.3. Displaying employee details.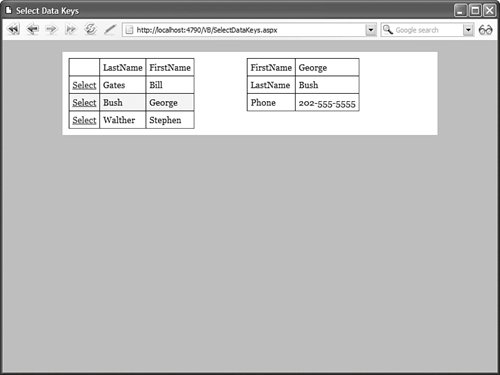 Listing 11.4. SelectDataKeys.aspx
In Listing 11.4, notice that the SelectedDataKey property is used to retrieve the primary key of the selected employee. The SelectedDataKey property is used in both of the ControlParameters contained in the second SqlDataSource control. If you use SelectedValue instead of SelectedDataKey, then you can return only the value of the first data key and not both values. A GridView stores data keys in a collection called the DataKeys collection. This collection is exposed by the GridView control's DataKeys property. You can retrieve the data key associated with any row by using a statement that looks like this: DIM key As Object = Gridview1.DataKeys(6).Value This statement returns the value of the data key associated with the seventh row in the GridView (remember that the rows collection is zero based). If you have assigned multiple data keys to each row, then you can use a statement that looks like this: DIM key As Object = GridView1.DataKeys(6).Values("LastName") This statement retrieves the value of the LastName key for the seventh row in the GridView. Sorting DataYou can sort the rows rendered by a GridView control by enabling the AllowSorting property. For example, the page in Listing 11.5 illustrates how you can sort the contents of the Movies database table. Listing 11.5. SortGrid.aspx
When AllowSorting has the value true, column headers are rendered as links. When you click a column header, you can sort the rows contained in the GridView in the order of the selected column. Note When using explicitly specified fields with a GridView, such as BoundFields, you need to specify values for the fields's SortExpression properties. Otherwise, nothing happens when you click a header. Notice that the GridView supports ascending and descending sorts. In other words, if you click a column header more than once, the rows toggle between being sorted in ascending and descending order. Sorting with AJAXBy default, whenever you click a column header to sort the rows contained in a GridView, the page containing the GridView is posted back to the server. When sorting records with the GridView control, you can avoid posting the entire page back to the server by taking advantage of AJAX (Asynchronous JavaScript and XML). You enable AJAX by including the EnableSortingAndPagingCallbacks property when declaring the GridView. The page in Listing 11.6 illustrates how you can take advantage of AJAX when sorting records. Listing 11.6. AjaxSorting.aspx
The page in Listing 11.6 displays the current time at the top of the page. Notice that the time is not updated when you sort the records in the GridView. The entire page is not posted back to the server; only the content of the GridView control is updated. Warning When using AJAX with the GridView control, you cannot use TemplateFields. Furthermore, you cannot display a Select button when AJAX is enabled. Customizing the Sorting InterfaceYou can customize the appearance of the sort links by handling the GridView control's RowDataBound event. This event is raised for each row rendered by the GridView after the GridView is bound to its data source. For example, the page in Listing 11.7 displays an image that represents whether a column is sorted in ascending or descending order (see Figure 11.4). Listing 11.7. ImageSorting.aspx
Figure 11.4. Displaying an image when sorting.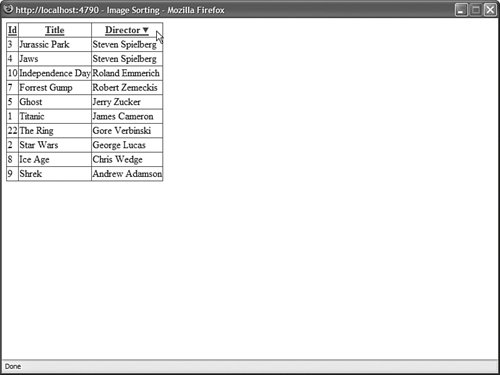 In Listing 11.7, the image is added to the header row in the grdMovies_RowDataBound() method. The current row's RowType property is checked to verify that the row is a header row. Next, an HTML <img> tag is added to the LinkButton that matches the column that is currently selected for sorting. If you need to completely customize the appearance of the sorting user interface, then you can call the GridView control's Sort() method programmatically. This approach is illustrated in the page in Listing 11.8 (see Figure 11.5). Listing 11.8. CustomSorting.aspx
Figure 11.5. Displaying a custom sorting interface.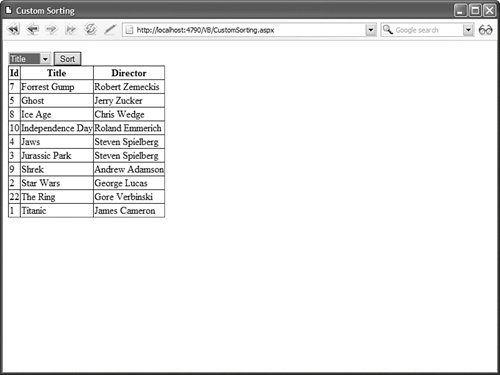 The page in Listing 11.8 includes a DropDownList control, which you can use to sort the contents of the GridView. When a list item is selected from the DropDownList control and the Sort button is clicked, the btnSort_Click() method executes. This method calls the Sort() method of the GridView control to sort the contents of the GridView. Paging Through DataWhen working with a large number of database rows, it is useful to be able to display the rows in different pages. You can enable paging with the GridView control by enabling its AllowPaging property. For example, the page in Listing 11.9 enables you to page through the records in the Movies database table (see Figure 11.6). Listing 11.9. PageGrid.aspx
Figure 11.6. Paging through records in a GridView control.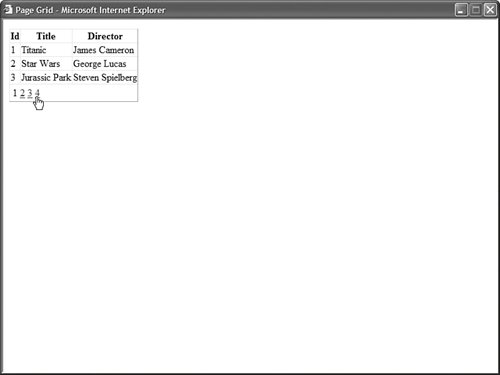 The GridView in Listing 11.9 displays three database records per page. You can modify the number of records displayed per page by modifying the GridView control's PageSize property. (If you don't specify a value for PageSize, then the GridView defaults to displaying 10 records per page.) Warning This section describes how you can enable user interface paging with the GridView control. When you use user interface paging, all the database records are loaded into memory and divided into separate pages. For example, when paging through a database table that contains three billion database records, all three billion records are loaded into memory even when you display only three records in a single page. You should not use user interface paging when working with large sets of data. Instead, use the ObjectDataSource control's support for data source paging. This option is discussed in Chapter 15, "Using the ObjectDataSource Control." Paging with AJAXThe default behavior of the GridView control is to post back to the server each and every time you navigate to a new page of records. However, there is an alternative. You can take advantage of AJAX (Asynchronous JavaScript and XML) when paging through records with the GridView control. The page in Listing 11.10 illustrates how you can use AJAX with the GridView control. Listing 11.10. AjaxPaging.aspx
Notice that the GridView in Listing 11.10 includes an EnableSortingAndPagingCallbacks property that is assigned the value true. This property enables AJAX. The page in Listing 11.10 displays the current time at the top of the page. When you page through the records rendered by the GridView control, notice that the time does not change. Only the contents of the GridView control are modified. Warning When using AJAX with the GridView control, you cannot use TemplateFields. Furthermore, you cannot display a Select button when AJAX is enabled. Customizing the Paging InterfaceBy default, when paging is enabled, the GridView renders a list of page numbers at the bottom of the grid. You can modify the user interface for paging through records by modifying the GridView control's PagerSettings property. For example, the page in Listing 11.11 contains a GridView that renders First, Previous, Next, and Last links at both the top and bottom of the GridView (see Figure 11.7). Listing 11.11. PageGridPreviousNext.aspx
Figure 11.7. Modifying pager settings.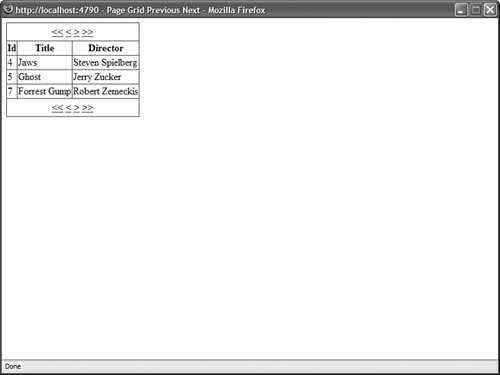 The PagerSettings class supports the following properties:
The PageButtonCount requires more explanation. Imagine that you are displaying the contents of a database table that contains 3 billion records and you are displaying two records per page. In that case, you would need to render an overwhelming number of page numbers. The PageButtonCount property enables you to limit the number of page numbers displayed at once. When PageButtonCount has a value less than the number of page numbers, the GridView renders ellipsis, which enables a user to move between ranges of page numbers. The GridView control includes a PagerTemplate, which enables you to completely customize the appearance of the paging user interface. For example, the page in Listing 11.12 uses a Menu control in a PagerTemplate to display a list of page numbers. The PagerTemplate also includes two LinkButton controls, which represent a Previous and Next link (see Figure 11.8). Listing 11.12. PageTemplateGrid.aspx
Figure 11.8. Using a template for the paging interface.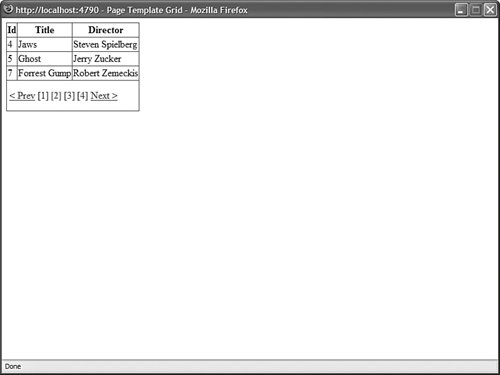 The GridView in Listing 11.12 includes a PagerTemplate that contains a Menu control. When the GridView is bound to its data source, the grdMovies_DataBound() method executes and creates menu items that correspond to each page in the GridView. When you click a menu item, the page index of the GridView is updated. To customize the PagerTemplate, you can add button controls to the template such as the Button, ImageButton, or LinkButton controls. Set the CommandName property of the button control to the value Page and the CommandArgument property to one of the following values:
Editing DataThe GridView control also enables you to edit database data. The amazing thing is that you can use the GridView to edit the contents of a database table row without writing a single line of code. The page in Listing 11.13 illustrates how you can update and delete records in the Movies database table by using the GridView control (see Figure 11.9). Figure 11.9. Editing records with the GridView.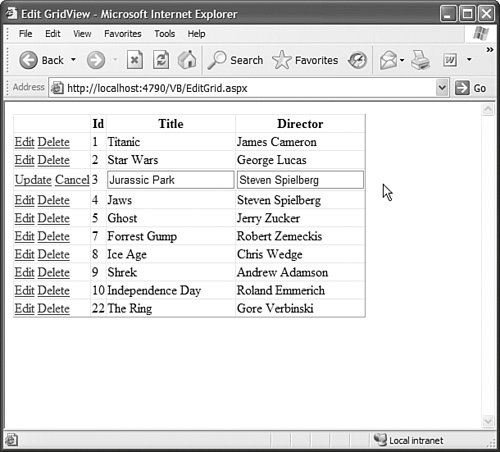 Listing 11.13. EditGrid.aspx
In Listing 11.13, notice that the GridView control has both its AutoGenerateEditButton and AutoGenerateDeleteButton properties enabled. When these properties are enabled, Edit and Delete links are automatically rendered next to each row in the GridView. Note You can take advantage of the <%@ Page %> directive's MaintainScrollPositionOnPostback attribute to scroll a page back automatically to the same position whenever the page is posted back to the server. For example, if you add this attribute and click an Edit link rendered by a GridView, the page automatically scrolls to the record being edited. This attribute works with Internet Explorer 6+, Firefox 1+, and Opera 8+. When you click an Edit link, you can edit a particular database row. The GridView automatically renders a check box for any Boolean columns and a text field for any other type of column. Note The GridView control does not support inserting new records into a database table. If you need to insert new records, use either the DetailsView or FormView control. Furthermore, notice that the GridView control includes a DataKeyNames property. When editing and deleting rows with the GridView, you need to assign the name of the primary key field from the database table being modified to this property. In Listing 11.13, the Movies ID column is assigned to the DataKeyNames property. Finally, notice that the SqlDataSource control associated with the GridView control includes a SelectCommand, UpdateCommand, and DeleteCommand property. These properties contain the SQL statements that are executed when you display, insert, and delete records with the GridView control. The SQL statements contained in both the UpdateCommand and DeleteCommand include parameters. For example, the UpdateCommand looks like this: UPDATE Movies SET Title=@Title, Director=@Director WHERE Id=@Id The @Title and @Director parameters represent the new values for these columns that a user enters when updating a record with the GridView control. The @Id parameter represents the primary key column from the database table. Handling Concurrency IssuesThe GridView control can track both the original and modified value of each database column. The GridView control tracks the original and updated values of a column so that you can handle concurrency conflicts. Imagine that you are building a massive order entry system. Your company has hundreds of employees modifying orders with a page that contains a GridView control. If two employees open the same customer record at the same time, then one employee might overwrite changes made by the other employee. You can prevent this type of concurrency conflict by using the page in Listing 11.14. Listing 11.14. Concurrency.aspx
In Listing 11.14, the SqlDataSource control includes both a ConflictDetection and OldValuesParameterFormatString property. These two properties cause the SqlDataSource control to track both the original and modified versions of each column. The ConflictDetection property can have one of the following two values:
By default, the ConflictDetection property has the value OverwriteChanges, which causes the SqlDataSource control to overwrite the previous value of a column with its new value. When ConflictDetection is set to the value CompareAllValues, the SqlDataSource tracks both the original and modified version of each column. The OldValuesParameterFormatString property is used to provide a distinguishing name for the original value of a column. For example, the value of the SqlDataSource control's UpdateCommand looks like this: UPDATE Movies SET Title=@Title, Director=@Director WHERE Id=@original_Id AND Title=@original_Title AND Director=@original_Director The @original_Id, @original_Title, and @original_Director parameters represent the original values of these columns. If the value of the Title or Director columns has changed in the underlying database, then the record is not updated. In other words, if someone else beats you to the record change, then your modifications are ignored. Displaying Empty DataThe GridView includes two properties that enable you to display content when no results are returned from the GridView control's data source. You can use either the EmptyDataText property or the EmptyDataTemplate property to handle empty data. For example, the page in Listing 11.15 contains a movie search form. If you enter a search string that does not match the start of any movie title, then the contents of the EmptyDataText property are displayed (see Figure 11.10). Figure 11.10. Displaying a message when no records match.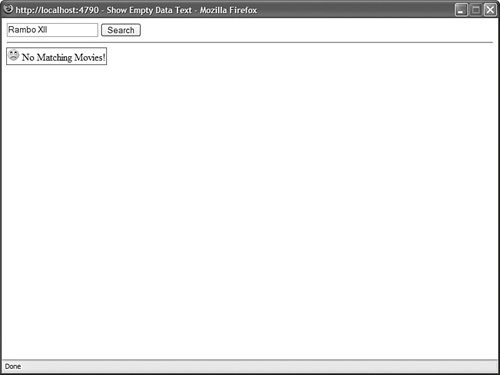 Listing 11.15. ShowEmptyDataText.aspx
If you use the search form in Listing 11.15 to search for a movie that doesn't exist, then an icon of a frowning face and the text No Matching Movies! is displayed. Notice that the initial value of the GridView control's Visible property is set to False. The GridView is displayed only after you click the button. If you did not add this additional logic, then the EmptyDataText message would be displayed when the page is first opened. As an alternative to using the EmptyDataText property, you can use an EmptyDataTemplate to display content when a data source does not return any results. For example, the page in Listing 11.16 prompts you to enter a new movie when no matching movies are found (see Figure 11.11). Figure 11.11. Displaying a template when no records match.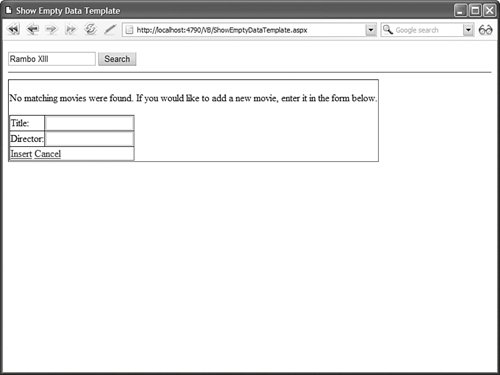 Listing 11.16. ShowEmptyDataTemplate.aspx
The EmptyDataTemplate in Listing 11.16 contains some text and a DetailsView control that you can use to insert a new movie into the Movies database table. You can add any HTML content or ASP.NET controls to an EmptyDataTemplate that you need. Formatting the GridView ControlThe GridView control includes a rich set of formatting properties that you can use to modify its appearance. I recommend that you don't use most of these properties because using these properties results in bloated pages. Instead, I recommend that you use Cascading Style Sheets to format the GridView control. The GridView control includes a CssClass property. The control also exposes several Style objects that include the CssClass property:
For example, the page in Listing 11.17 contains a GridView that is formatted with Cascading Style Sheet rules (see Figure 11.12). Figure 11.12. A GridView control formatted with CSS.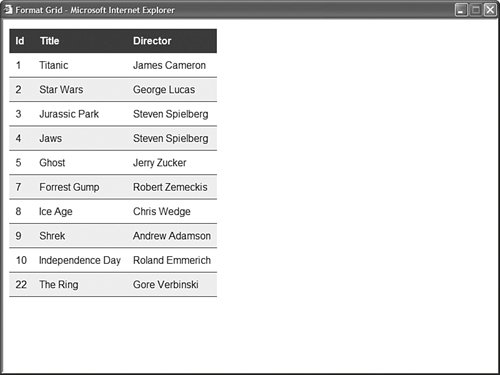 Listing 11.17. FormatGrid.aspx
In Listing 11.17, the column header text is left aligned. Also notice that banding is added to the table rendered by the GridView. Alternating rows are rendered with a gray background. The GridView control has a few formatting properties that you might need to use even when formatting a GridView with Cascading Style Sheets. For example, in Listing 11.17, the GridLines property was assigned the value None to suppress the default rendering of borders around each table cell. Here is a list of these properties.
Using View State with the GridView ControlBy default, the GridView control stores the values of all the columns contained in all the rows that it renders in ViewState. In other words, all the rows that the GridView retrieves from its data source are stuffed in a hidden form field. The advantage of using ViewState is that the GridView does not need to query the database for the same set of records every time a page containing the GridView is displayed. The records are retrieved from the database only when the page first loads. The disadvantage of using ViewState is that it means that a lot of information might need to be pushed over the wire to a user's browser. All ViewState information is stored in a hidden form field. When a large number of rows are displayed, this hidden form field can become enormous. When ViewState becomes too large, it can significantly impact a page's performance. You can disable ViewState by assigning the value False to the GridView control's EnableViewState property. Even if you disable ViewState, you can still display, sort, page, and edit database records with the GridView control (The GridView uses ControlState to track vital state information.) When displaying a large number of records, you should turn ViewState off. You can view the amount of ViewState that a GridView is using by enabling tracing for the page that contains the GridView. Add the trace="True" attribute to the Page directive like this: <%@ Page Trace="true" %> When tracing is enabled, a Control Tree section is appended to the end of a page when the page is rendered in a browser. The Control Tree section displays the ViewState size used by each control contained in the page. |