Chapter 6: Modules
Other Host Tools
In addition to the portal-specific settings you've just learned about, SuperUsers have access to many other powerful tools and configuration options. These are not visible to the Portal Administrator and affect your entire DotNetNuke installation and, therefore, all portals. The level of sophistication of these configurable items is quite deep and will challenge you to think about how best to customize your installation to achieve your unique objectives.
Module Definitions
The Module Definitions page serves as the administration area for all of the modules installed in DotNetNuke. This page enables you to edit or delete existing module definitions and to add new modules. DotNetNuke comes with a number of basic modules (identified in Chapter 3) preinstalled. Figure 5-16 shows the Module Definitions page for a default installation. Each module in the list is shown with a name, description, and a true/false option indicating whether it is marked as "premium."
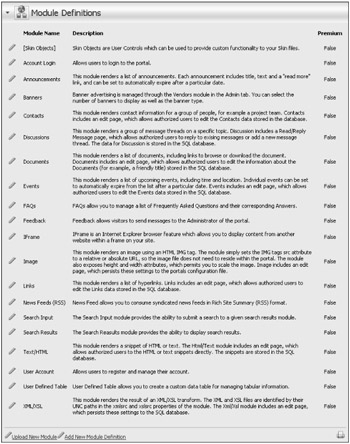
Figure 5-16
What Is a Premium Module?
A module that has been marked "premium" is not freely available to all Portal Administrators. Non-premium modules automatically show up in the selector on every Portal Administrator's Control Panel, but premium modules require Host configuration on a per-portal basis. The Premium module setting enables you to hide special-purpose modules installed or developed for one client from those installed or developed for another. It also enables you to segment your product offerings, providing extra functionality at a "premium" rate.
Editing Module Definitions
To edit a module definition (for example, if you want to mark an existing module as premium), click the pencil icon next to the module you want to edit (for example, Announcements).
Each module definition is comprised of three sections: the module description (see Figure 5-17), the module definitions, and the module controls (see Figure 5-18).
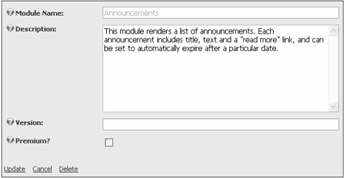
Figure 5-17
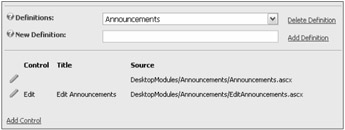
Figure 5-18
The module description settings (shown in Figure 5-17) hold the basic properties of the module. The Module Name is used in the drop-down list of modules available to Portal Administrators on the Control Panel. The Description is displayed on pages that describe the modules (for example, Module Definitions page). The Version is used by module developers when issuing updates of their modules. The Premium setting determines if a module is available to all portals or only those specifically given access.
A module can have any number of definitions. A definition directly matches to a single component of a module. For this reason, most modules usually have only one definition — they only add one component to the page. The Announcements module, for example, has only one component and it is called Announcements, as previously shown in Figure 5-18.
Some modules may add many components to a page, with each component providing differing functionality but part of a logical group. For example, a blogging module might contain a calendar, a list of blog entries, and a search module. These would be configured as three different definitions, but would still belong under the same Module Name (for example, myblog).
You can add definitions by typing in their name and clicking Add Definition (see Figure 5-18). Alternatively, you can select an existing definition from the drop-down list and click Delete Definition (see Figure 5-18).
Each definition may have a number of a controls associated with it. The controls directly map to ASP.NET user controls and each is marked with a name known as a key, which allows DotNetNuke to determine which control to load at runtime.
As previously shown in Figure 5-18, the Announcements module has only two controls: the user control that displays the announcements (announcements.ascx), and the edit announcement page (editannouncements.ascx). Complex modules may have a dozen or more configured controls.
The Control section enables you to add new controls by clicking the Add Control link; edit an existing control by clicking the pencil icon; or delete a control by editing it first and then clicking Delete on the Edit page.
Installing a New Module
There are two methods for installing new modules into your DotNetNuke environment. The first is an automated install. The second is manually adding the module definition. Chapter 17 contains a thorough examination of the packaging and installation of modules and other DotNetNuke add-ons, but the module installation processes are summarized here for the sake of continuity.
| Note | Developers generally use the manual method during the process of creating new modules. Hosts that are not involved in module development will probably never use it. |
Performing an automated install involves uploading a zip file containing the module (often referred to as a "module package" or "module install"). These zip files are generally available from independent developers and companies that create them.
DotNetNuke 3.0 was packaged with two sample modules that were not installed by default — Survey and Users Online — deferring their installation as a user exercise. As popular modules, they are now part of the default installation in DotNetNuke 4.0, so the following example reinstalls the Survey module. However, the process is the same for any module you may want to install.
| Important | Many free modules and other resources are available at www.dotnetnuke.com. These include robust forum, blog, and file repository modules; alternative editor providers, media players, and maps; and much more. |
Download a module zip file from www.dotnetnuke.com. The names of these files typically follow a format similar to modulename_xx.xx.xx_Install.zip or modulename_xx.xx.xx_Source.zip, indicating the name of the module, version, and content of the file. This format indicates whether the file also contains the source code for the module in addition to the files required for installation.
Click the Upload New Module button at the bottom of the Module Definitions page (previously shown in Figure 5-16) or on its action menu. The File Upload page opens (see Figure 5-19), with no options for selecting a target directory. This is because a module's install locations are not configurable. Modules are installed into a folder beneath the \DesktopModules directory as defined in the manifest file, supplied as part of the module package.
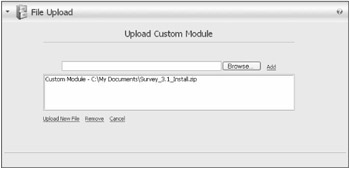
Figure 5-19
Click the Browse button and locate the module's zip file (for example, Survey_3.01.00_Install.zip). For the purposes of this example, any module zip file will do. After you make the selection, click the Add button. The filename is added to a list of files that enable you to upload multiple modules simultaneously. When you are satisfied with the list of files to upload, click the Upload New File button.
After the module is installed (or uploaded), a detailed log is displayed showing what happened during the install (see Figure 5-20). If any portion of the installation process fails, error messages appear in this log highlighted in red. If your module has a red error message, contact the module provider for technical support.
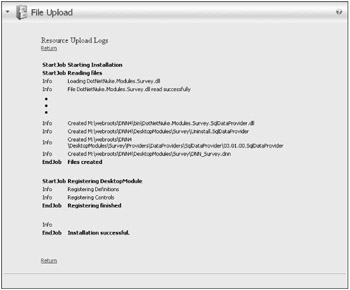
Figure 5-20
If there are no red error messages in the log, your module has been successfully installed and is now available to use within your installation.
Manually Installing a New Module
As previously mentioned, installing a new module manually is usually reserved for developers creating new modules. To install a new module manually, click the Add New Module Definition button at the bottom of the Module Definitions page (shown previously in Figure 5-16) or on its action menu.
The Add New Module Definition page opens and you can create your own module definitions using the same method as editing module definitions (described earlier in this chapter).
File Manager
The File Manager works for SuperUsers in the same way as it does for Portal Administrators, with a couple of minor exceptions. If you need a refresher on its basic operation, consult Chapter 4.
You learned previously that the Host can provide resources to all portals (for example, templates, skins, and so on) by making them available through the Host Root folder (that is, \Portals\_default). Where Admin ð File Manager provides access to each Portal Root, Host ð File Manager provides access to the Host Root (see Figure 5-21).
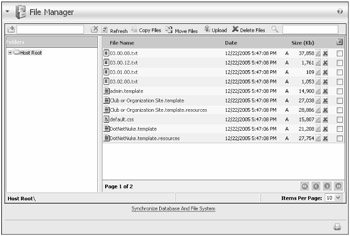
Figure 5-21
There is no additional control for applying permissions, because Host Root permissions are not configurable. Only SuperUsers can add, change, modify, or delete files in the Host Root.
Vendors
Like the File Manager, the Host Vendor page works for SuperUsers in the same way as it does for Portal Administrators. If you need a refresher on its basic operation, consult Chapter 4.
The only difference between the Host Vendor page and the Portal Administrator Vendor page is the underlying vendor list. You maintain a vendor list separate from the individual portals, which is visible by all of them through banners. This is a particularly useful feature for Hosts that maintain multiple portals of their own (rather than belonging to clients). One list of vendors can be maintained and used to serve advertising and/or affiliate relationships with multiple portals. In the Banner module, a Portal Administrator can choose to display banners from either source (Host or Site)
SQL
The Host SQL page (see Figure 5-22) is a handy utility for inquiry or remote maintenance. It provides for the processing of simple queries and returns results in a tabular format. It is also capable of executing compound queries and update queries when you select the Run As Script check box.
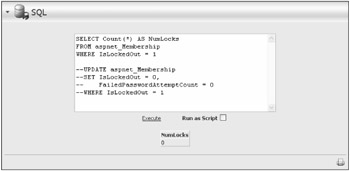
Figure 5-22
Figure 5-22 illustrates a couple of handy queries for managing user accounts locked out by the MemberRole Provider due to invalid password attempts. Although this can be accomplished on a user basis on each portal's User page (or by waiting 10 minutes), the query method can unlock all users in all portals with one query and is a convenient example.
Schedule
Starting in DotNetNuke 2.0, two pieces of functionality were introduced that required recurring operations to be processed regularly — Users Online and Site Log — emulating batch processing. Ultimately, there are many applications for the services of a batch processor, and the Scheduler serves that function in DotNetNuke. Figure 5-23 illustrates the items available on the Schedule page and their default settings at the time of installation.
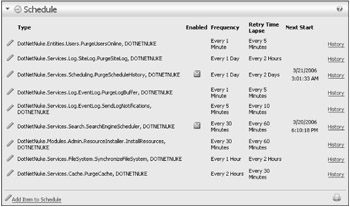
Figure 5-23
| Important | Carefully assess the items in the default schedule list, their settings, and enabled/ disabled status to ensure that they meet your specific operating requirements. |
The Schedule page provides you with access to edit the settings of each item, or to add a new item by clicking the Add Item to Schedule button or selecting the Action menu item. It also provides appropriate at-a-glance information such as the enabled/disabled status, recurring frequency, and next scheduled execution time, as well as access to a detailed history report.
Schedule Item Details
Click the pencil icon next to an item to open the Edit Schedule page (see Figure 5-24). Table 5-9 explains each of the schedule item settings in detail. Setting changes made on the Edit Schedule page take effect immediately.
| Setting | Description |
|---|---|
| Full Class Name and Assembly | This entry field should contain the full class name followed by the assembly name (such as "DotNetNuke.Entities.Users .PurgeUsersOnline, DOTNETNUKE"). Assemblies may belong to modules, skin objects, or other components you have installed that leverage the Scheduler's programming interface as long as they inherit from DotNetNuke.Scheduling .SchedulerCllient. Installing a component (or module) may actually create a Scheduler item for you rather than relying on you to create it yourself. Read the instructions carefully for any modules or components that you install. |
| Schedule Enabled | Enable or disable the schedule item. If disabled (unchecked), the Scheduler ignores the item when processing. |
| Time Lapse | Set the desired frequency for running this item (that is, every x minutes/hours/days). |
| Retry Frequency | If the task fails when it runs according to the specified frequency, it is retried according to this setting until the next regularly scheduled start. |
| Retain Schedule History | Each time a scheduled item is run, its success/fail status and a number of other useful information items are logged. This value determines the number of log records that are retained in this history. Older items are truncated from the log. |
| Run on Event | Enable a job to run on an event rather than on a schedule. The only event currently supported is APPLICATION_START because events triggered on APPLICATION_END are not guaranteed to run in ASP.NET. |
| Catch Up Enabled | If the Scheduler is unable to run when the scheduled start time of an item passes, the item is not run. This condition could be caused by any number of things, including a server reboot or recycling of the ASP.NET worker process. This setting indicates whether, at the next scheduled start time, an item should run only once according to the schedule or play "catch up" and run once for each scheduled start that was missed. Under normal circumstances this setting isn't necessary, but it is available for custom schedule items that require it. |
| Object Dependencies | When the Scheduler Mode is set to the Timer Method in the Host Settings, it executes as a multithreaded process. This requires some method of protection against possible deadlock conditions for simultaneously running threads. |
| This field provides for the specification of one or more comma-separated string values, which serve as semaphores to avoid deadlock. For example, if one scheduled item performs a select on the Users table and another item performs a massive update on the Users table, you might want to prevent these two items from running at the same time. So both items should have an object dependency on the same string value (for example, "LockUsersTable"). The dependency suppresses the start of any other items until the currently running item has finished. | |
| Run on Servers | When you're running in a web farm environment, it may be necessary to limit the instances of any given scheduled process. If this comma-delimited field is empty, the scheduled process runs on any server that invokes it. However, if the field is not empty, a server only runs the process if it finds a match on its server name. Using this method a web farm can be configured to prevent multiple web servers from attempting the same database operation at the same time. Redundancy can be preserved by configuring the same processes to run on different web servers on complimentary schedules. |
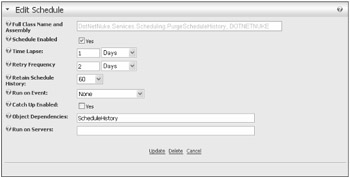
Figure 5-24
Schedule History
Click the History link next to an item to display the Schedule History page (see Figure 5-25). This page simply displays a log of results from previous runs of the scheduled item. The size of this log (number of items) is set in the Item Settings.
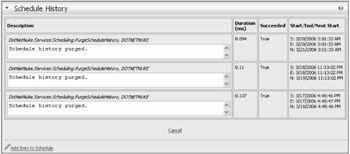
Figure 5-25
Schedule Status
You reach the Schedule Status page by selecting View Schedule Status from the action menu on any of the schedule-related pages (see Figure 5-26).

Figure 5-26
The Schedule Status page provides a detailed view of the current state of the Scheduler and running or pending items (see Figure 5-27). Refreshing the page quickly illustrates that DotNetNuke is busily working in the background to process your scheduled items.
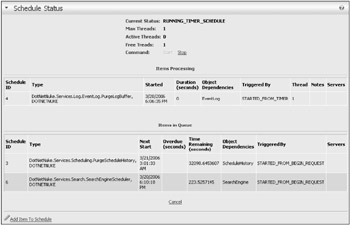
Figure 5-27
There are two display areas on this page: Items Processing and Items In Queue. If you refresh while watching the Time Remaining run down to 0 for a specific item, you may catch it actually in execution, which is when it displays in the Items Processing area.
Command buttons at the top of this page enable you to stop/start the Scheduler if necessary. This suspends the execution of the jobs although the timers continue to run. Note that these buttons are not enabled if the Scheduler is running under the Request Method (previously described in Table 5-6).
Configuration
The Scheduler has a couple of useful settings that can be manipulated in the application's web.config file. To locate these settings, look for the section that resembles Listing 5-2. The effects of these settings are summarized in Table 5-10.
| Setting | Description |
|---|---|
| debug | When this is set to "true", a lot of log file entries are generated that help in debugging Scheduler-related development (that is, developing your own Scheduler items). Debugging multithreaded applications is always a challenge. This is one setting that can help you figure out why a task is or isn't getting run. |
| maxThreads | Specifies the maximum number of threads to use for the Scheduler (when in Timer Method mode). "-1" is the default, which means "leave it up to the Scheduler to figure out." If you specify a value greater than 0, the Scheduler uses that number as the maximum number of thread pools to use. |
Listing 5-2: Schedule Provider Section of web.config
<add name="DNNScheduler" type="DotNetNuke.Services.Scheduling.DNNScheduling.DNNScheduler, DotNetNuke.DNNScheduler" providerPath="~\Providers\SchedulingProviders\DNNScheduler\" debug="false" maxThreads="-1"/>
Considerations
One limitation of the Timer Method mode of the Scheduler is that it cannot run 24/7 without help from an external program, the ASP.NET worker process. This is a constraint of ASP.NET, not of DotNetNuke. The web site's worker process periodically recycles according to settings in IIS or machine.config. Some hosts may have settings that recycle the worker process every 30 minutes (forced), whereas others may have more complicated settings, such as recycling the worker process after 3000 web site hits, or after 20 minutes of inactivity. It is this recycling of the worker process that shuts down the Scheduler until the worker process is started again (that is, by someone hitting the web site, which in turn starts up the worker process, starting up the Scheduler as well).
This functionality is actually a major benefit to web applications as a whole, in a hosted environment, because it keeps runaway applications from taking down the server. But it isn't without its drawbacks.
The bottom line is that the Scheduler will run 24/7 in the Timer Method mode as long as someone is visiting your web site frequently enough to keep the worker process active. It is during periods of inactivity that the worker process could possibly shut down. It is for this reason that you should carefully plan the types of tasks you schedule. Make sure that the tasks you schedule are not time critical — that is, don't have to run "every night at midnight" and so on. A more suitable task is one that runs "once per day" or "once every few minutes," and doesn't mind if it's not run during periods of inactivity.
The Request Method does not have the same dependency on the ASP.NET worker process. However, it is entirely dependent upon the timing of visitors to your web site. During periods of inactivity on your web site, scheduled jobs do not run.
Languages
In Chapter 4, you learned that Portal Administrators have some limited control over the supported languages and localized strings in their portal. The Host has access to a number of other features and configuration options. Selecting Host ð Languages opens the Languages administration page as shown in Figure 5-28.
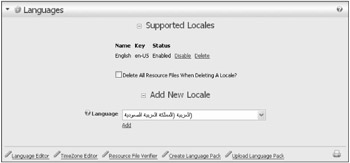
Figure 5-28
Background
Software applications are frequently used in many different countries, each with its own unique language and culture. This is certainly the case with DotNetNuke, which has users around the globe. In an effort to better support users from other countries and cultures, DotNetNuke implements a localization framework to allow the portal to better handle its users' needs. Not only do other cultures have different languages, but they also may be in different time zones, have different currencies, and express times and dates in a different format. Any localization framework has to take all these factors into account to be effective.
In developing the localization framework, the DotNetNuke developers examined many different implementations and ultimately chose a solution that closely followed the ASP.NET 2.0 framework. Although the underlying architecture may differ slightly, DotNetNuke uses the same resource file format and file locations, which thereby simplified the migration path to ASP.NET 2.0.
The Languages page is the primary stepping-off point when configuring language support. These settings determine the languages available to each portal and the default localized strings. Additionally, the Host controls the definitions of time zones within the associated portals.
To define localized strings, you must first create a locale. A locale identifies the culture associated with a group of localized strings. The culture is identified by a friendly name and a key value that corresponds to specific culture. The .NET Framework documentation defines the culture as follows:
-
The culture names follow the RFC 1766 standard in the format "<languagecode2>- <country/regioncode2>", where <languagecode2> is a lowercase two-letter code derived from ISO 639-1 and <country/regioncode2> is an uppercase two-letter code derived from ISO 3166. For example, U.S. English is "en-US".
To define a locale for your installation, select one from the drop-down list of .NET-recognized locales and click the Add link. This creates a new entry in the Locales.xml file and creates a localized copy of the TimeZones.xml file. After you have created a new locale definition, you are ready to create localized resource strings.
Select the Language Editor link on the Languages administration screen. This opens the Language Editor (see Figure 5-29). It's the same editor available to Portal Administrators and was covered in Chapter 4. The only difference is that any localized resources created by the Host become the default resource strings for all portals.
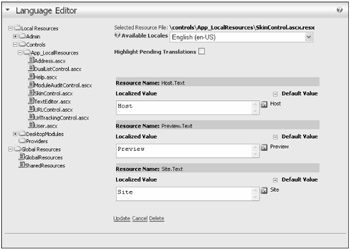
Figure 5-29
| Note | If the Portal Administrator edits a resource file, it will override all resources loaded from the default resource file. Even if the Host subsequently makes changes to the same set of resource strings, these changes will not be reflected in the portal, which has its own copy of the original resources. |
The standard portal installation includes more than 115 resource files for each locale. After a new locale is added by the host, DotNetNuke must create corresponding localized resource files for it. The portal only creates the new resource file when the Language Editor is used to edit the localized strings. If the resource for the new locale is never edited, the default locale (English en-US) is used when displaying localizing content.
So, with 100-plus files to edit, you must be asking yourself, "How do I ensure I have created localized versions of each resource file?" That is where the Resource File Verifier (see Figure 5-30) comes in, which you reach by link from the Languages page.

Figure 5-30
Click the Verify Resource Files link to examine the portal for any old or missing resource files. After the portal has examined the available resource files, you get a list of missing resource files, resource files with missing entries, files with obsolete entries, and files that have entries created prior to any changes to the default resources (as shown previously in Figure 5-29).
| Note | The test for determining "Files Older than System Default" is based on file modification dates. Therefore, if you change multiple resources in the system default file and then change just one resource string in the localized file, this check will not be able to detect that other resource strings may still need to be updated. |
The Resource File Verifier examines each locale and reports the results as shown in Figure 5-31. Use this report to identify resources that still need to be localized or that may not be up-to-date.
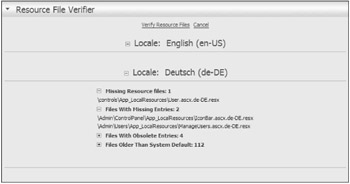
Figure 5-31
Using the Verifier makes managing localized resources much easier, but ultimately it is still up to you to handle localization. If this still seems like too much work, DotNetNuke provides a shortcut. Instead of localizing resources yourself, you can load resource packs that were created by someone else. See Chapter 17 for more information about how to create and load resource packs.
Globalization
Globalizing an application requires more than just having content appear in a specific language. Another aspect of globalizing an application requires that the application understand the time zone of the current user. If the server logs show that a critical event happened at 1:00 AM, what does that really mean? If you are in Germany and the web server is in Texas, what time did the event happen? To solve this problem, DotNetNuke stores all time in Universal Time Coordinated (UTC) format. Each user can associate a TimeZone with his or her profile. This setting is used to localize the time for the current user.
The TimeZone Editor shown in Figure 5-32 is accessible from the Language Administration screen and allows the Host to edit the available TimeZone definitions. Like all other resources, the TimeZone definitions are localized, so when you're creating new locales, remember to edit their TimeZones, too.
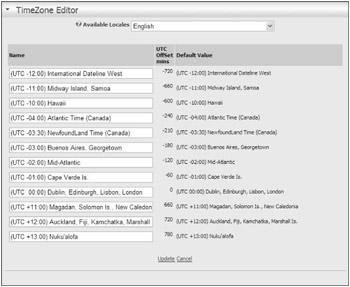
Figure 5-32
Search Admin
The Search Admin page enables you to configure certain aspects of the search engine features. It's important to remember that you are configuring the search for the entire installation, not just for any specific portal. There are just a few options, as shown in Figure 5-33.

Figure 5-33
Specifying the Maximum and Minimum Word Length settings helps prevent you from indexing unreasonable terms. The internal default values are currently 50 and 4, respectively. If you deselect Include Common Words, the search engine won't bother indexing words that exist in the SearchCommonWords database table. That table has the capability to create common word entries for each locale (for multilanguage customization), although only the English language common words are included by default. Likewise, you can choose to Include Numbers or to ignore them when content is indexed.
Clicking the Update button saves your preferences. Clicking Re-Index Content causes the search engine to empty its tables and re-index the full content of all portals in the installation.
Keeping It Current
When you learned about the Scheduler, you may have noticed a scheduled item for the search engine:
DotNetNuke.Services.Search.SearchEngineScheduler
If you want your portal's content to be current, it is essential that this job be configured to run periodically. As Portal Administrators add content to their web sites, it is not immediately available through site search. It does not become available until the new content is indexed the next time this job runs or until a SuperUser clicks the button to re-index content.
| Important | The engine that drives search also drives RSS syndication. Updated content is not reflected in syndication until the next time the search index is run. |
Background
Prior to DotNetNuke version 2.0, site search functionality was built using complex (and convoluted) database queries and was limited to use with the built-in modules provided by DotNetNuke. To make search work with a third-party module, you had to manually change the database queries or find an alternative search implementation. And its usage was fairly crude by today's standards, without any configuration options or advanced search features.
In version 2.0, the previous implementation became totally obsolete with the introduction of the Data Abstraction Layer and Data Providers. And so the design of a new search engine began in earnest. Before this effort progressed much beyond the design stage, the team development target shifted from version 2.2 to version 3.0, so DotNetNuke version 2 never did get a replacement for its lost search functionality.
Starting in DotNetNuke 3.0, the search engine is fully integrated into the core application and modules are able to hook into this powerful functionality easily. This means that any third-party module can participate in full site search and/or content syndication, simply by implementing the search API as documented in Chapter 8. Currently, the core framework provides a search input module that performs full site search and a default search results page.
Lists
DotNetNuke includes a common utility that enables you to manage the content of lists (where appropriate) and to augment the lists to customize your installation. Select Host ð Lists to open the Lists page (see Figure 5-34).
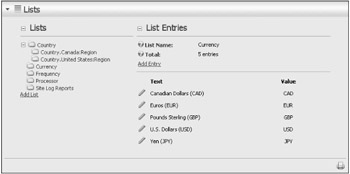
Figure 5-34
The list manager is fairly straightforward, providing an index of the lists it is currently tracking as well as a summary of the entries and the capability to add new entries or edit existing ones.
Not all lists are ones you should edit without an understanding of the potential impacts. For example, if you were to remove an entry from the Site Log reports list, it would prevent Portal Administrators from ever running that report on their portal. You might consider this a good thing if it was necessary to remove a report that was adversely affecting performance. However, adding a new item to that list would result in application errors because the Site Log report would not know how to process them.
One of the first customizations you might make to your installation's lists would be to add a new Country sublist, as illustrated in Figure 5-35.
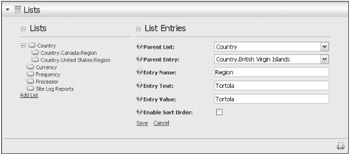
Figure 5-35
This example adds region entries for the British Virgin Islands so that when users register from there, they are required to specify their island of residence. DotNetNuke is preconfigured for Canada and the United States, but you can customize your installation for any regional list that you require.
Skins
As mentioned earlier in this chapter, the only difference between working with skins from the Admin menu and working with skins from the Host menu is the target location of the upload, which determines availability to other Portal Administrators. For additional information on skins and skinning, see Chapters 4 and 16, respectively.
Summary
In this chapter, you learned just about everything there is to know about administering a collection of portals, their environment, and runtime features as the Host (or SuperUser) of a DotNetNuke installation. Key Host functions that you should understand include the following:
-
Host Settings
-
Portals
-
Module Definitions
-
File Managers
-
Vendors
-
SQL
-
Schedule
-
Languages
-
Search Admin
-
Lists
-
SuperUsers Accounts
-
Skins
You've learned which Portal Administrator—level functions contain Host configurable settings. These functions include the following:
-
Site Settings
-
Skins
-
Log Viewer
You learned about the location and relevance of the Host Root directory (\Portals\_default) versus the Portal Root directory (\Portals\<portalid>), and know that Host default settings are used to create new portals, but that (in most cases) changing them has no effect on existing portals.
Your SuperUser powers are now fully enabled and you are prepared to assume leadership of your own DotNetNuke "Justice League" (cape and superhero sidekick not included).
EAN: 2147483647
Pages: 182
- Step 1.1 Install OpenSSH to Replace the Remote Access Protocols with Encrypted Versions
- Step 2.1 Use the OpenSSH Tool Suite to Replace Clear-Text Programs
- Step 3.1 Use PuTTY as a Graphical Replacement for telnet and rlogin
- Step 3.3 Use WinSCP as a Graphical Replacement for FTP and RCP
- Step 5.1 General Troubleshooting