Installing DotNetNuke 4.x
Upgrading to DotNetNuke 3.x
The upgrade process for DotNetNuke is very similar to the installation process. It contains an automated process but with fewer steps because the infrastructure is already in place. Here's what to do:
-
Back up your site. Before upgrading a site, it is recommended that you back up your entire site. This includes a backup of all site files and a full database backup. At a minimum, you must back up your web.config file.
-
Download the software. As described earlier in this chapter, obtain the latest release of the software from the official DotNetNuke site (www.dotnetnuke.com). Refer to the "Select a Version" section earlier in this chapter for information about which package to choose.
-
Unzip the package. After you have backed up your web.config file, you can extract the new version of DotNetNuke over your existing version.
-
Configure web.config for upgrade. As mentioned earlier, the installation package no longer includes a copy of web.config. The package does not contain this file because it contains password hash keys used for database encryption. If these keys had been changed in your existing install and were to be accidentally replaced, your users would no longer be able to log in to your site.
The hash keys are found in the web.config file as shown in Listing 2-3.
Listing 2-3: Password Hash Keys

<add key="MachineValidationKey" value="B5EC9DAA0CFACE70BACD2462588555EEC85B6734" /> <add key="MachineDecryptionKey" value="1FA6DB6E75EEC04AB58B7AC080AF471BF55EEC5D46BE95B9" /> <add key="MachineValidationMode" value="SHA1" />

The exact steps for configuring your upgraded site are as follows:
-
Make a backup copy of your existing web.config file (for example, web.config.resources).
-
Rename release.config to web.config.
-
Replace the values for the following in your new web.config, with the values in your backup:
SiteSqlServer MachineValidationKey MachineDecryptionKey
InstallationDate (This may not be present in web.config, so add the key that is in web.backup.resources to web.config.)
Note web.backup.resources is the recommended name for a backup of web.config.
-
Make any other changes to web.config that you made to support additional providers, and so on.
-
-
Perform the upgrade. First, verify that you have done the following:
-
Backed up your entire site and database (or at least your web.config file).
-
Obtained the most suitable package from www.dotnetnuke.com.
-
Unzipped the package over the top of your existing installation.
-
Renamed your web.config file (for example, to web.config.resources).
-
Renamed release.config to web.config.
-
Copied the password hash keys (and any other setting you customized) from your old web.config file to your new web.config file.
When you have completed all of those steps, open your web browser and navigate to http://localhost/dotnetnuke/ for a local upgrade or http://www.mydomain.com/ for a remote upgrade.
The AutoUpgrade function detects if the database requires an upgrade. If the AutoUpgrade setting (discussed earlier) is set to false, a "Site Unavailable" page like the one you saw in Figure 2-13 will appear. The administrator can then trigger the install by navigating to one of the following URLs:
-
Local install: http://localhost/dotnetnuke/Install/Install.aspx?mode=Install
-
Remote install: http://www.mydomain.com/Install/Install.aspx?mode=Install
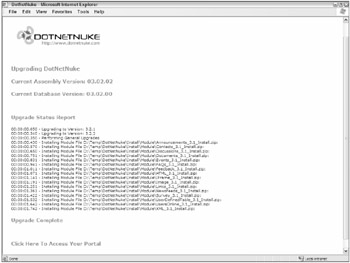
If the AutoUpgrade is set to true, the installation process begins automatically as shown in Figure 2-15.
-

Figure 2-15
The upgrade process logs significant events on the page. Take a look at the steps performed:
-
The installer reports the new version of DotNetNuke to be installed (Version: 3.2.2).
-
The installer reports the current version of DotNetNuke installed (Version 3.2.0).
-
The installer reports that the incremental-version upgrade SQL scripts were executed (Upgrading to version: 3.2.1, Upgrading to version: 3.2.2, and so on).
-
The installer reports that general upgrades were performed.
-
The installer reports all modules that are installed as part of the package (these may be upgrades of existing modules).
When the upgrade is complete, follow the Click Here To Access Your Portal link to visit your upgraded DotNetNuke site.
EAN: 2147483647
Pages: 182