Upgrading to DotNetNuke 4.x
Installing DotNetNuke 4.x
DotNetNuke 4.0 is the first version of DotNetNuke to be targeted at ASP.NET 2.0. (Version 3.2 will run on ASP.NET 2, but it requires Visual Studio 2003 and .NET 1.1 for any development work.)
To further support ASP.NET 2.0, a new installation package — the DotNetNuke Starter Kit — has been added for DotNetNuke 4.0. A starter kit is a new project type for Visual Studio 2005 and Visual Web Developer Express. Essentially, it adds a new project type to your selected development environment and enables you to choose New DotNetNuke Site from the New Project menu.
Prerequisites
Table 2-2 lists the software prerequisites for DotNetNuke v4.x.
| Software | Description |
|---|---|
| Web Server | Microsoft Internet Information Server 5 or greater (contained in Windows 2000 Server, Windows XP Professional, and Windows 2003 Server) |
| Microsoft .NET Runtime | ASP.NET 2.0 or later |
| Database | Microsoft SQL Server 2000 or greater |
| Development Environment | Optional: If you plan to use the Starter Kit (not mandatory), you need either Visual Studio 2005 or Visual Web Developer. |
DotNetNuke 4.x has an additional prerequisite that is not supported by all third-party web hosts: you must be able to specify at least Read, Write, and Modify permissions on the root installation folder. Before signing up for a third-party hosting plan, ensure that you will be able to assign these permissions.
Downloading the Software
The first step in the installation process is to obtain the DotNetNuke software. The latest version of the software can be downloaded at the official DotNetNuke web site, www.dotnetnuke.com. As noted earlier, you must be a registered user to reach the download page.
DotNetNuke 4.x is available in Source, Install, or Starter Kit packages:
-
Starter Kit package (DotNetNuke_X.Y.Z_StarterKit.vsi): Contains a Project Template (based on the Install package), a Module Item Template (in both Visual Basic.NET and C#), and a Skin Item Template. The supporting class libraries, providers, and HttpModules are provided as precompiled assemblies (DLLs).
-
Install package (DotNetNuke_X.Y.Z_Install.zip): Contains only the files necessary to run the application. Use this package if you don't expect to do any modifications to core files.
-
Source package (DotNetNuke_X.Y.Z_Source.zip): Contains all the files related to the core DotNetNuke project, including all Visual Basic source files. Use this package if you expect to modify core files or want to view the associated source.
In deciding which package to use, determine what your development environment will be because Visual Web Developer Express (VWD) does not support any project type other than web sites. If you expect to do most of your development in VWD rather than Visual Studio 2005 (VS2005), you will not be able to use the Source package.
| Note | Visual Web Developer is an alternative, low-cost development environment available from http://msdn.microsoft.com/vstudio/express/vwd. |
The following sections cover the installation of the new Starter Kit and the differences in the installation procedure for the Source/Install version. If you need more information on the Source/Install version, refer to the relevant section in the v3.x procedure.
Installing the Starter Kit
To install the Starter Kit, follow these steps:
-
Double-click the MSI file in Windows Explorer. The Visual Studio Content Installer, shown in Figure 2-16, launches.
-
Select the templates you would like to install (by default, all are selected). Click Next.
-
The packages are not signed with a Digital Certificate, so you will get the warning shown in Figure 2-17. Select Yes.
-
The installer is ready to install the items you selected (see Figure 2-18). Click Finish.
-
As Figure 2-19 shows, the installer lets you know when it has successfully completed its job. Click Close.
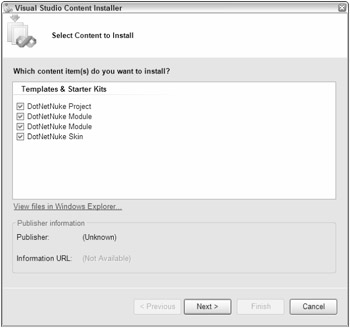
Figure 2-16
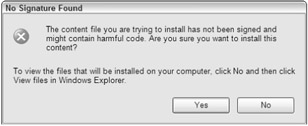
Figure 2-17
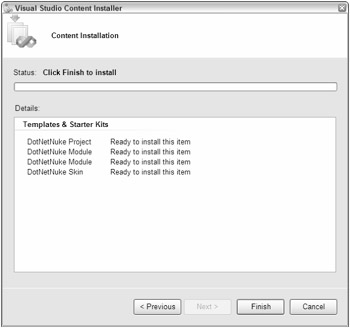
Figure 2-18
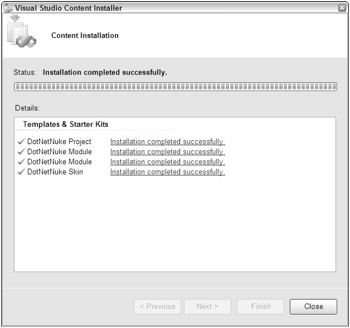
Figure 2-19
You can now create a new DotNetNuke project. In Visual Studio 2005 or Visual Web Developer Express, select File ð New Web Site. The New Web Site dialog box opens, as shown in Figure 2-20.
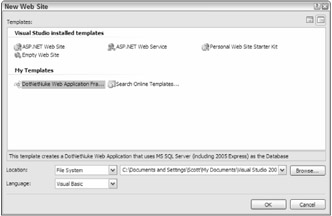
Figure 2-20
In the My Templates section, choose the DotNetNuke Web Application Framework template. At the bottom of the dialog box, specify a location and a language, and click OK. A web site is created in the folder you specified, and the Welcome.html file (see Figure 2-21) automatically opens in the internal browser.
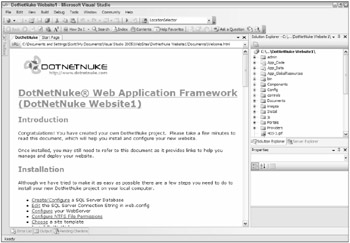
Figure 2-21
Welcome.html provides further instructions on how to complete the installation on your local machine.
Installing the Install/Source Package
This section focuses only on the differences between the v3.x and v4.x Install/Source installations. For more detailed instructions, see the appropriate section in the v3.x installation instructions. You've already downloaded the software, so we'll start with step 2.
Step 2: Unzip the Package
Like the v3.x installation, you have to extract your chosen installation package to a physical location on your computer.
Due to changes in the web project model for Visual Studio 2005, it is recommended that you extract the package as follows:
-
Create a directory where the application will reside (c:\websites\dotnetnuke, for example).
-
If you are using the Install package, do the following:
-
Create a subdirectory called website (such as c:\websites\dotnetnuke\website).
-
Extract the Install package into the website subdirectory you just created.
-
-
If you are using the Source package, extract the entire package to the original folder you created (c:\websites\dotnetnuke, for instance). The subfolders will be created automatically.
Steps 3–5: Set Up the Database, Login, and Permissions
Create the database to contain your data for the DotNetNuke application, create a user account to access your database, and set NTFS permissions. To do this, follow the relevant instructions in the "Install DotNetNuke v3.x" section at the beginning of the chapter.
Step 6: Configure IIS (Internet Information Server)
The next step in the process is to create a new web site pointing at the DotNetNuke installation files. Create a virtual directory in IIS called DotNetNuke (or whatever you choose) that points to the appropriate physical file directory.
The appropriate directory depends on how you extracted your chosen package. If you are using the Install package, point IIS to the folder you extracted the files to. If you are using the Source package, point IIS to the \website folder.
Ensure that your virtual directory is running ASP.NET 2.0 by right-clicking it and selecting Properties. The ASP.NET tab of the DotNetNuke Properties dialog box displays the version number (see Figure 2-22). You need version 2.0 or higher.
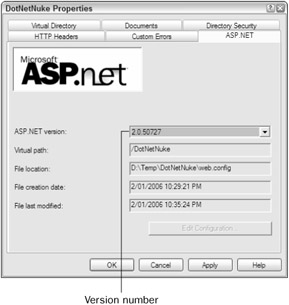
Figure 2-22
Step 7: Configure web.config for Installation
Although the web.config file for DotNetNuke v4.x differs quite a bit from that used in DotNetNuke v3.x, most of the disparity is due to .NET2.
As with v3.x, before doing anything else, rename release.config to web.config.
Three major differences exist between the v3.x web.config and the v4.x web.config:
-
Version 4.x needs the SiteSqlServer setting in <appSettings> just as v3.x does, but v4.x also requires the same connection string to be set in the <connectionStrings> section (see Listing 2-4). In other words, v4.x requires the connectionStrings setting in two sections, not just one.
Listing 2-4: <connectionStrings> Section

<connectionStrings> <add name="SiteSqlServer" connectionString="Server=(local);Database=DotNetNuke;uid=DotNetNukeUser; pwd=DotNetNukeUser;" providerName="System.Data.SqlClient" /> </connectionStrings>

-
The machine key settings in the v3.x <appSettings> section — MachineValidationKey, MachineDecryptionKey, and MachineValidationMode — are in v4.x's <machineKey> section (see Listing 2-5) located in the <system.web> section.
Listing 2-5: <machineKey> Section

<machineKey validationKey="F9D1A2D3E1D3E2F7B3D9F90FF3965ABDAC304902" decryptionKey="F9D1A2D3E1D3E2F7B3D9F90FF3965ABDAC304902F8D923AC" decryption="3DES" validation="SHA1"/>

Step 8: Perform the Installation
The v4.x installation process is identical to v3.x's. Open your web browser and navigate to http://localhost/dotnetnuke/ for a local install or http://www.mydomain.com/ for a remote install. When the installation completes, follow the Click Here To Access Your Portal hyperlink to access your new DotNetNuke 4.0 site.
EAN: 2147483647
Pages: 182