Help Systems That Use Excel Components
Help Systems That Use Excel Components
Perhaps the most straightforward method of providing help to your users is to use the features contained in Excel itself. The primary advantage of this method is that you don't need to learn how to create HTML Help files - which can be a major undertaking and might take longer to develop than your application.
In this section, I provide an overview of some help techniques that use the following built-in Excel components:
-
Cell comments: This is about as simple as it gets.
-
A text box control: A simple macro is all it takes to toggle the display of a text box that shows help information.
-
A worksheet: A simple way to add help is to insert a worksheet, enter your help information, and name its tab Help. When the user clicks the tab, the worksheet is activated.
-
A custom UserForm: A number of techniques involve displaying help text in a UserForm.
Using cell comments for help
Perhaps the simplest way to provide user help is to use cell comments. This technique is most appropriate for describing the type of input that's expected in a cell. When the user moves the mouse pointer over a cell that contains a comment, that comment appears in a small window, like a ToolTip (see Figure 24-1). Another advantage is that this technique does not require any macros.
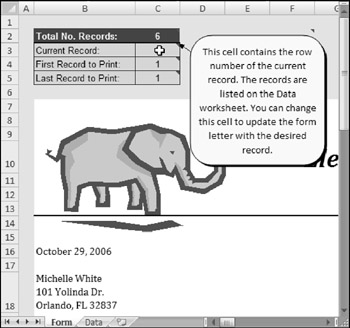
Figure 24-1: Using cell comments to display help.
Automatic display of cell comments is an option. The following VBA instruction, which can be placed in a Workbook_Open procedure, ensures that cell comment indicators are displayed for cells that contain comments:
Application.DisplayCommentIndicator = xlCommentIndicatorOnly
| CD-ROM | A workbook that demonstrates using cell comments is available on the companion CD-ROM. The filename is cell comments\formletter.xlsm . |
| Tip | Most users don't realize it, but a comment can also display an image. Right-click the comment's border and choose Format Comment from the shortcut menu. In the Format Comment dialog box, select the Colors and Lines tab. Click the Color drop-down list and select Fill Effects. In the Fill Effects dialog box, click the Picture tab and then click the Select Picture button to choose the image file. |
Another option is to use Excel's Data ![]() Data Tools
Data Tools ![]() Data Validation command, which displays a dialog box that lets you specify validation criteria for a cell or range. You can just ignore the data validation aspect and use the Input Message tab of the Data Validation dialog box to specify a message that's displayed when the cell is activated. This text is limited to approximately 250 characters .
Data Validation command, which displays a dialog box that lets you specify validation criteria for a cell or range. You can just ignore the data validation aspect and use the Input Message tab of the Data Validation dialog box to specify a message that's displayed when the cell is activated. This text is limited to approximately 250 characters .
Using a text box for help
Using a text box to display help information is also easy to implement. Simply create a text box by choosing Insert ![]() Text
Text ![]() Text Box, enter the help text, and format it to your liking.
Text Box, enter the help text, and format it to your liking.
| Tip | In lieu of a text box, you can use a different shape and add text to it. Choose Insert |
Figure 24-2 shows an example of a shape set up to display help information. I added a shadow effect to make the object appear to float above the worksheet.
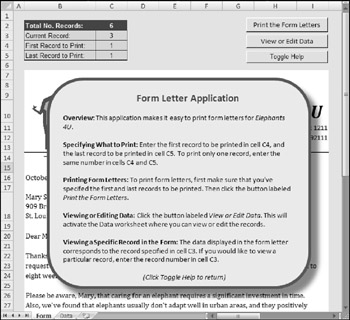
Figure 24-2: Using a shape object with text to display help for the user.
Most of the time, you won't want the text box to be visible. Therefore, you can add a button to your application to execute a macro that toggles the Visible property of the text box. An example of such a macro follows . In this case, the TextBox is named HelpText .
Sub ToggleHelp() ActiveSheet.TextBoxes("HelpText").Visible = _ Not ActiveSheet.TextBoxes("HelpText").Visible End Sub | CD-ROM | A workbook that demonstrates using a text box for help is available on the companion CD-ROM. The filename is textbox\formletter.xlsm . |
Using a worksheet to display help text
Another easy way to add help to your application is to create a macro that activates a separate worksheet that holds the help information. Just attach the macro to a button control, toolbar button, or menu item, and voil ! quick-and-dirty help.
Figure 24-3 shows a sample help worksheet. I designed the range that contains the help text to simulate a page from a yellow notebook pad - a fancy touch that you might or might not like.
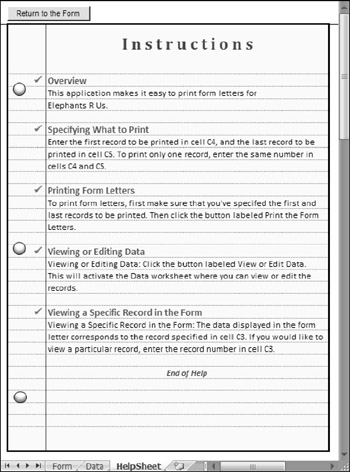
Figure 24-3: Putting user help in a separate worksheet is an easy way to go.
To keep the user from scrolling around the HelpSheet worksheet, the macro sets the ScrollArea property of the worksheet. Because this property is not stored with the workbook, it's necessary to set it when the worksheet is activated. I also protected the worksheet to prevent the user from changing the text and selecting cells, and I "froze" the first row so that the Return button is always visible, regardless of how far down the sheet the user scrolls .
The main disadvantage of using this technique is that the help text isn't visible along with the main work area. One possible solution is to write a macro that opens a new window to display the sheet.
| CD-ROM | The companion CD-ROM contains a workbook named worksheet\formletter.xlsm that demonstrates using a worksheet for help. |
Displaying help in a UserForm
Another way to provide help to the user is to display the text in a UserForm. In this section, I describe several techniques that involve UserForms.
USING LABEL CONTROLS TO DISPLAY HELP TEXT
Figure 24-4 shows a UserForm that contains two Label controls: one for the title and one for the actual help text. A SpinButton control enables the user to navigate among the topics. The text itself is stored in a worksheet, with topics in column A and text in column B.
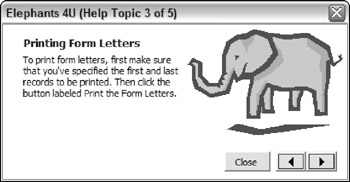
Figure 24-4: Clicking one of the arrows on the SpinButton changes the text displayed in the Labels.
Clicking the SpinButton control executes the following procedure. This procedure simply sets the Caption property of the two Label controls to the text in the appropriate row of the worksheet (named HelpSheet ).
Private Sub SpinButton1_Change() HelpTopic = SpinButton1.Value LabelTopic.Caption = Sheets("HelpSheet"). _ Cells(HelpTopic, 1) LabelText.Caption = Sheets("HelpSheet").Cells(HelpTopic, 2) Me.Caption = APPNAME & " (Help Topic " & HelpTopic & " of " _ & SpinButton1.Max & ")" End Sub | |
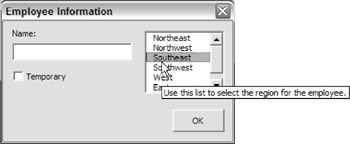
Every UserForm control has a ControlTipText property, which can store brief descriptive text. When the user moves the mouse pointer over a control, the Control tip (if any) is displayed in a pop-up window. See the accompanying figure.
| |
Here, APPNAME is a global constant that contains the application's name.
| CD-ROM | A workbook that demonstrates this technique is available on the companion CD-ROM. The filename is userform1\formletter.xlsm . |
USING A SCROLLING LABEL TO DISPLAY HELP TEXT
This technique displays help text in a single Label control. Because a Label control cannot contain a vertical scrollbar, the Label is placed inside a Frame control, which can contain a scrollbar. Figure 24-5 shows an example of a UserForm set up in this manner. The user can scroll through the text by using the Frame's scrollbar.
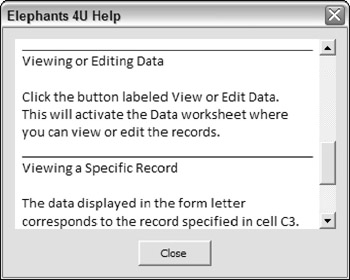
Figure 24-5: Inserting a Label control inside a Frame control adds scrolling to the Label.
The text displayed in the Label is read from a worksheet named HelpSheet when the UserForm is initialized . Here's the UserForm_Initialize procedure for this worksheet.
Private Sub UserForm_Initialize() Dim LastRow As Long Dim r As Long Dim txt As String Me.Caption = APPNAME & " Help" LastRow = Sheets("HelpSheet").Cells(Rows.Count, 1) _ .End(xlUp).Row .End(xlUp).Row txt = "" For r = 1 To LastRow txt = txt & Sheets("HelpSheet").Cells(r, 1) _ .Text & vbCrLf Next r With Label1 .Top = 0 .Caption = txt .Width = 160 .AutoSize = True End With With Frame1 .ScrollHeight = Label1.Height .ScrollTop = 0 End With End Sub Notice that the code adjusts the Frame's ScrollHeight property to ensure that the scrolling covers the complete height of the Label. Again, APPNAME is a global constant that contains the application's name.
Because a Label cannot display formatted text, I used underscore characters in the HelpSheet worksheet to delineate the Help topic titles.
| CD-ROM | A workbook that demonstrates this technique is available on the companion CD-ROM as a file named userform2\formletter.xlsm . |
USING A COMBOBOX CONTROL TO SELECT A HELP TOPIC
The example in this section improves upon the previous example. Figure 24-6 shows a UserForm that contains a ComboBox control and a Label control. The user can select a topic from the ComboBox or view the topics sequentially by clicking the Previous or Next buttons .
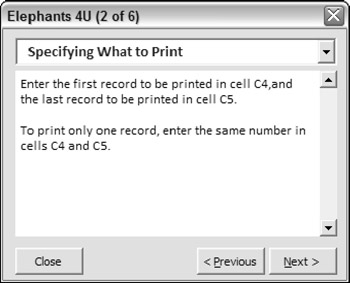
Figure 24-6: Using a drop-down list control to select a help topic.
This example is a bit more complex than the example in the previous section, but it's also much more flexible. It uses the label-within-a-scrolling-frame technique (described previously) to support help text of any length.
The help text is stored in a worksheet named HelpSheet in two columns (A and B). The first column contains the topic headings, and the second column contains the text. The ComboBox items are added in the UserForm_Initialize procedure. The CurrentTopic variable is a module-level variable that stores an integer that represents the Help topic.
Private Sub UpdateForm() ComboBoxTopics.ListIndex = CurrentTopic - 1 Me.Caption = HelpFormCaption & _ " (" & CurrentTopic & " of " & TopicCount & ")" With LabelText .Caption = HelpSheet.Cells(CurrentTopic, 2) .AutoSize = False .Width = 212 .AutoSize = True End With With Frame1 .ScrollHeight = LabelText.Height + 5 .ScrollTop = 1 End With If CurrentTopic = 1 Then NextButton.SetFocus ElseIf CurrentTopic = TopicCount Then PreviousButton.SetFocus End If PreviousButton.Enabled = CurrentTopic <> 1 NextButton.Enabled = CurrentTopic <> TopicCount End Sub | CD-ROM | A workbook that demonstrates this technique is available on the companion CD-ROM. The filename is userform3\formletter.xlsm . |
EAN: 2147483647
Pages: 319