| Video on the web is one of the most exciting (and high bandwidth) kinds of content out there. And Flash has not forgotten this in Flash Professional 8. With a streamlined import wizard and the capability to cut segments from imported videos, Flash has never looked better when it comes to video integrationespecially now that Flash has full support for the alpha channel in video, allowing you to completely remove the background. Importing Video into Flash Video can play natively inside the Flash 8 player or can be brought in at runtime as either a stream (if you have a streaming server) or progressive download (see Chapter 26, "Streaming Media," for more details). The video formats Flash supports are as follows: DV, MPEG, WMV, MOV, AVI, and Flash Video FLV. Chapter 26 will focus more on keeping video external to your Flash file, but this section covers how to work with video in the authoring environment. After the video is inside the authoring environment, you can scale, skew, distort, mask, rotate, and make it interactive using ActionScript. To import a video, follow these steps: 1. | Select File, Import, Import Video.
| 2. | When the Video Import Wizard pops up (see Figure 6.9), click Browse and choose any video you want (or use one from the companion site). Notice, however, that you can also map to videos that are out on the web.
Figure 6.9. The Import Video Wizard. 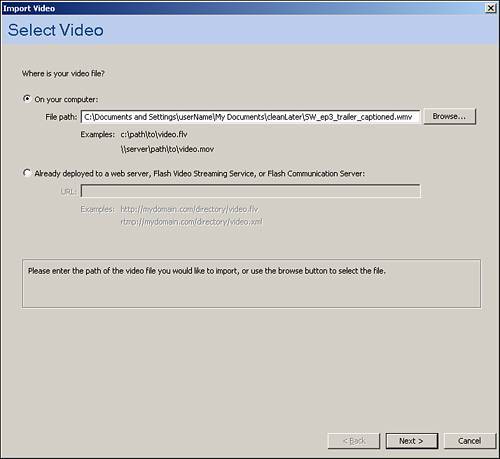
| 3. | Click Next and the next screen asks you how you want to deploy video (see Figure 6.10). For this chapter, choose Embed Video in SWF and Play in Timeline. Chapter 26 talks a bit more about having the video be external.
Figure 6.10. The deployment options for your video. 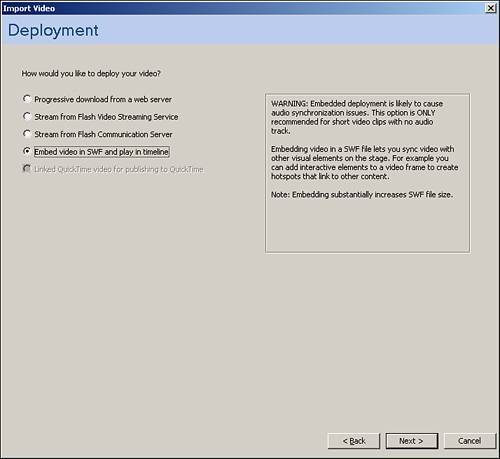
| 4. | The Embedding window (see Figure 6.11) enables you to choose different options for the symbol type. Set this to Movie Clip so it will work with a later example. You can also choose whether you want the audio either integrated into the video or as a separate file. And you can choose to place an instance of it on the stage and stretch the timeline. Finally, in this section, you can choose to edit your video before you import it, so choose that option and click Next.
Figure 6.11. The embedding options for your video. 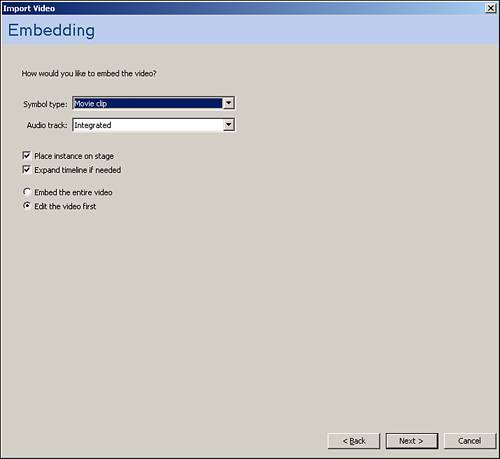
| 5. | Now the screen should look similar to Figure 6.12. In the video's progression bar, the top arrow represents the position in the video you are viewing, and the bottom two bars represent the starting and ending points of the segment of the video you would like to create. You can use the controls to go through and preview your selection, and then use the Create a New Clip in the List button (the plus sign in the top left) to make the video slice, which will then appear in the video list box.
Figure 6.12. The editing video interface. 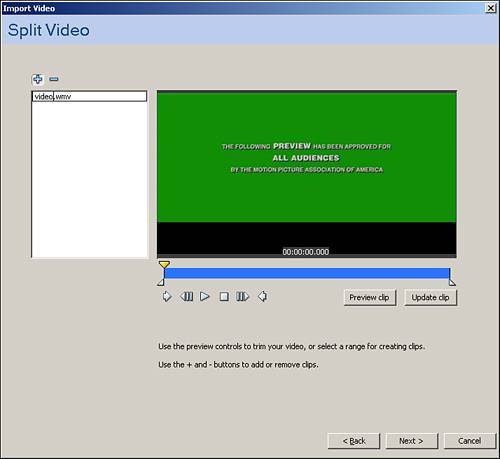
| 6. | After you have made the slice you want, click Next to get to the Encoding section. This section enables you to select the type of encoding, including quality and player, because the Flash 8 player has a different video codec than the Flash 7 player. This means that if your intended audience has the Flash 7 player, and you choose the Flash 8 player, errors will occur, and users with the older player will not be able to view all your content. Also in this section are some more options. If you click the Show Advanced Settings button, you will see something similar to Figure 6.13. This is where you can set it to encode the alpha channel, so keep that in mind. Click Next when you have the settings you like.
Figure 6.13. The Encoding section with the advanced options shown. 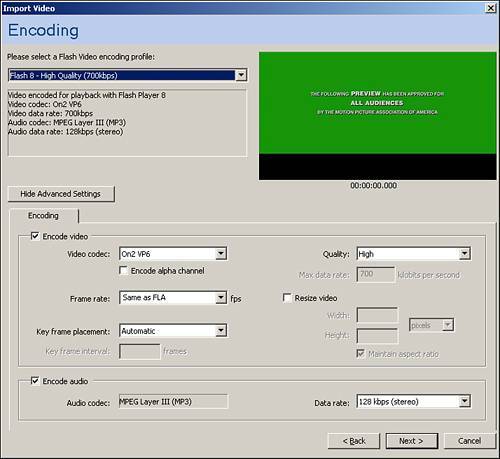
| 7. | Now your screen will look like Figure 6.14, where the only option is whether you want video help files to pop open when the video is done encoding. Go ahead and click Finish.
Figure 6.14. The Finish Video Import section. 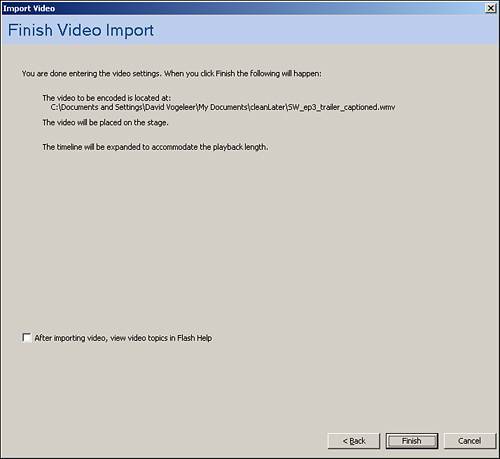
|
Play around with different video settings until you find the right settings for you and your audience, especially when it comes to quality versus file size. When the video is done importing, a movie clip will appear on the stage with the video embedded into it. And in the library, you will see both the movie clip and the video object. If you test now, the video will play right through, so the next example will take it a step further by showing how easy it is to add controls. CREATING CONTROLS TO PLAY AND STOP VIDEO In this exercise, we will be working from the previous example: 1. | If your video is very short, you might want to reimport the entire video so that the controls will make more of an impact.
| 2. | Back on the stage, name the layer the video resides in video and add two more layers, actions and buttons.
| 3. | Give the movie clip with your video in it an instance name of video_mc.
| 4. | Now you're going to set up the controls to stop and play the movie. Select the Button layer, then open the Buttons Common Library by choosing Window, Common Libraries, and choose Buttons. Choose a play and stop button you want (or you can create your own) and drag out an instance of each onto the stage in the Buttons layer and give them instance names of play_btn and stop_btn, respectively, as shown in Figure 6.15.
Figure 6.15. The Play and Stop buttons under the video clip. 
| 5. | Next, double-click the movie clip with your video in it to go inside for editing. Inside the movie clip, create another layer and call it actions. Then highlight the first frame in that layer and open up the Actions panel by choosing Window, Actions, and put these actions within it, which will keep the movie from automatically playing:
stop();
| 6. | Now go back to the main timeline and select the Actions layer. Then in the first frame of that layer, open the Actions panel (if it is not still open) and place these actions in it:
//this is for the play button play_btn.onRelease=function(){ video_mc.play(); } //this is for the stop button stop_btn.onRelease=function(){ video_mc.stop(); }
|
Test your movie. Notice that it takes a second to export. In a real-world situation, you would create a preloader to overcome the blank space while waiting for content to load. Preloaders are discussed later in Chapter 13, "The Movie Clip Object." |
You can also add fast-forward and rewind buttons using the goto action. This should give you a good understanding of how video is handled in Flash. Remember, you always have the options of animating, scaling, and rotating the video, just to name a few. In fact, if you're not satisfied with the quality of the video, you might consider taking down the alpha of the video, which seems to take away some of the compression artifacts. |