The Toolbar
| As mentioned in the previous paragraph, many of the drawing tools found in Flash may be somewhat familiar, as you can see in Figure 3.1. As we move through the tools, special note will be made of options that are available to each specific tool, as well as shortcuts that can be used in conjunction with the tool. Figure 3.1. The Flash 8 toolbar.
As you can see from the preceding figure, the toolbar has four major sections:
Now that you are familiar with the sections, let's go over what is in each section, from bottom to top, starting with the colors section. The Colors SectionAs previously mentioned, this section of the toolbar is one of the many places where you can control the color of both the stroke and fill. Although colors and gradients will be discussed in more detail later in this chapter, it's important that you understand how to use this section of the toolbar before you begin creating shapes. In addition to the two-color drop downs for both stroke and fill, there are also three little buttons along the bottom of this section, as shown in Figure 3.1. Here is what they do:
Also, more options for choosing colors can be found by clicking the color wheel in the color drop-down of either the fill or the stroke. The color pop-up window will appear as shown in Figure 3.2. Figure 3.2. In the color pop-up, you choose from an assortment of colors; you can change the lightness and darkness and even set RGB values.
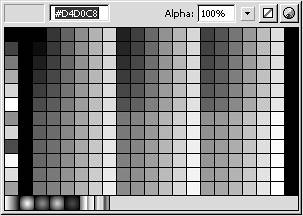
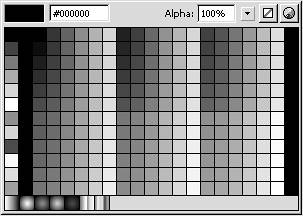
When you select a fill or stroke color from the Colors section, you can either select any color or gradient from the color palette or type the color in #rrggbb form into the input box. You can also adjust the alpha of the color or turn off the color completely with the No Color button. Figure 3.3. The stroke color section: Notice how gradients and alpha control are now available to both the fill and the stroke color section.
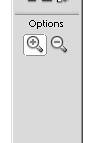
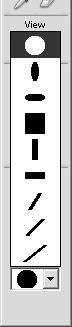
The View SectionThis section in the toolbar contains tools to help control the view of the stage. The Hand ToolShortcut: PC and MacH Use the Hand tool to drag the entire stage around to be able to see certain sections more clearly, especially while you're zoomed in. Also, holding down the Shift key while dragging the stage will make it so the stage can be dragged at only 45-degree angles from its original position. TIP You can also double-click the Hand Tool icon in the toolbar to make the stage go as large as possible while still being able to see it in its entirety. (Shortcut: PCCtrl+2, MacOpen Apple+2.) The Zoom Tool (or Magnification Tool)Shortcut: PC and MacZ or M The Zoom tool controls the magnification at which you are viewing the stage. This tool is very helpful when you need to create very detailed drawings. It has two options in the options section of the toolbar, as you can see in Figure 3.4. The options switch the direction of magnification when you click the stage. Besides being able to click the stage and have the stage zoom in or out, you can also click and draw a rectangle around a particular section of the stage to zoom into. Figure 3.4. The two options for the Zoom tool.
As with many things in Flash, there is more than one way to control the magnification level of the stage. Following is a short list of shortcuts:
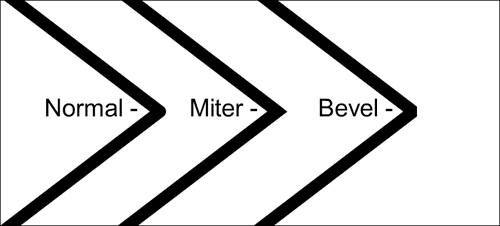
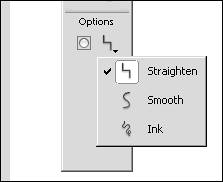
NOTE These shortcuts are all PC shortcuts. For Macs, simply replace Ctrl with Open Apple. The Tools SectionThis section contains all the tools for drawing shapes, manipulating objects, and creating text on the stage. Make special note of the options for each tool that can be found in the Options section of the toolbar; as previously mentioned, these change with each tool. As we go through the tools, they will be covered from top to bottom, and left to right on the toolbar. The Arrow ToolShortcut: PC and MACV The Arrow tool is Flash's basic selection tool. It can be used to select objects by clicking them or by clicking outside and dragging a rectangle around what you want to select. Remember, when selecting shapes on the stage, you must double-click to select both the fill and the stroke. The Arrow tool has three options: the first is the Snap to Objects option. This option, when selected, helps snap objects to one another, depending on how close they get to each other. This option is helpful when you're doing precise layouts. The other two options, which may appear grayed out, as in Figure 3.5, are for adjusting line segments on the stage and will not become active until a line is selected. Here are the other two options:
Figure 3.5. The options for the Arrow tool. If a line is selected on the stage, the bottom two options become available.
TIP
NOTE You can also use the arrow keys to move a selected object around the stage. The object will move more quickly if the Shift key is depressed while you use the arrow keys. The Subselection ToolShortcut: PC and MacA This works similarly to the Arrow tool, except the Subselection tool is designed to specifically select vector points. Unlike the Arrow tool, the Subselection tool has no options. The Free Transform ToolShortcut: PC and MacQ This tool is used to manipulate objects on the stage through the use of several small boxes, called handles, which appear around the object when it is selected with the Free Transform tool. It can be used to size, rotate, and skew the selected object by clicking and dragging. The Free Transform tool has the following options:
NOTE The final two options of the Free Transform tool can be used on primitive shapes, but not on graphics or movie clips. The Gradient Transform ToolShortcut: PC and MACF The Gradient Transform tool is used to adjust gradients or bitmap fills in shapes on the stage. Depending on which kind of gradient the selection has, a different set of handles will appear to adjust such things as center point, size, and rotation of the gradient, as you can see in Figure 3.6. This tool has one option, Snap to Objects. When selected, this option allows the sizing handle to snap to other objects on the stage. Figure 3.6. Using the handles to adjust the gradient is an easy way to make precise gradient fills.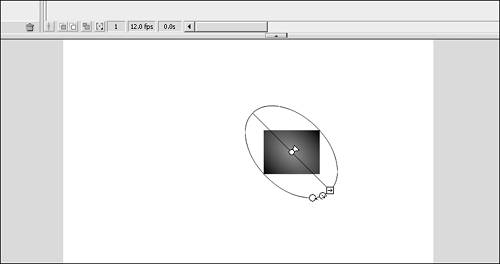 The Line ToolShortcut: PC and MacN The Line tool is used to draw straight lines from point to point on the stage. Simply select the tool, click where you want the start point to be, and then drag and release where the end point should be. The Line tool has the following two options in the toolbar:
TIP
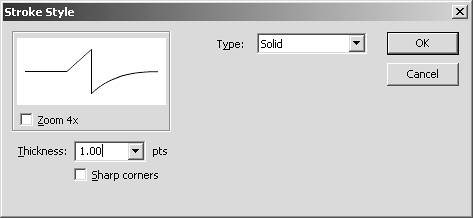
There are more options available for the Line tool in the Properties Inspector, as seen in Figure 3.7. The option available is actually the options for the stroke settings, which are used by the Line tool. The options available for the stroke settings are as follows:
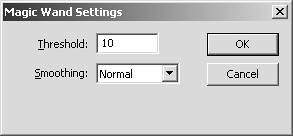
Figure 3.7. You can adjust stroke settings from the Properties Inspector. The Lasso ToolShortcut: PC and MacL The Lasso tool is another selection tool that can be used to select more precisely than the Arrow tool. Simply draw a shape as you would with any other drawing tool; make sure you close the shape before releasing the mouse or odd selections may be made. This tool does have a few options that can make it easier to make a desired selection starting with the Magic Wand. The Magic Wand will select areas based on where the tolerance level is set. To set this tolerance level, click the option to the right of the Magic Wand and you will see something similar to Figure 3.10. You will also be able to adjust the smoothing as well, which determines how smooth the selection should be. Here are those options:
Figure 3.10. The options for the Magic Wand.
The final option for the Lasso tool is the Polygon Mode option. This option, when selected, enables you to draw point-to-point lines to make selections in the shape of a polygon. TIP While using the Lasso tool, hold down the Alt key to go into Polygon Mode instantly. The Pen ToolShortcut: PC and MacP The Pen tool is another drawing tool used to draw both straight and curved lines. Drawing with the Pen tool is a little different from using the Line tool. As you move and click the mouse, a new line will be drawn that is connected to the previous one. And to draw curved lines, drag the mouse cursor away from the selected point. Although there is only one option for this tool, the Object Drawing option, its preferences can be found in the Preferences window by going to Edit, Preferences, Editing Tab (Shortcut Ctrl+U). Also, after you have drawn the shape or line you desire, you can use the Subselection tool to control the curves by selecting the handles. If you need more handles, use the Pen tool again to add them anywhere along the lines.
Besides these options, special smaller icons also appear with the Pen tool while it is in use to help refine the drawing you are making. Following is a list of those special icons and how to use them:
The Text ToolShortcut: PC and MacT This tool is used to manually create text fields on the stage. Although text fields will be gone over in extensive detail in Chapter 15, "Working with Text," it is important to go over some of the major points of the Text tool here. When you're drawing a text field, click approximately where you want the top-left corner of the text field to be, and then drag down and to the right (doing the opposite will have unexpected results). After the text field is drawn, you can manually type text into the field and use some of the basic text options, such as color, bold, and italic, as found in the Properties Inspector (see Figure 3.11). Figure 3.11. The Properties Inspector for the Text tool. TIP New to Flash 8, you can now adjust the size of a text field by selecting it with the Arrow tool and using the blue handles that appear. Do not use the Free Transform tool to change the size of a text field unless you want the text within the field to scale as well. There are three basic types of text fields:
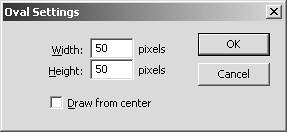
As previously mentioned, this tool is covered in more detail in Chapter 15. The Oval ToolShortcut: PC and MacO The Oval tool is used to draw circular shapes. This tool has two options; the first is the Object Drawing option, which is discussed later in more detail. The other option is the Snap to Objects option, which if selected, enables you to draw perfect circles if drawn at a 45-degree angle. You can also hold down the Shift key while drawing to accomplish the same task of drawing a perfect circle. New to Flash 8 is yet another way to create ovals on the stage. Simply hold down the Alt key and click the stage to reveal the Oval Settings dialog box, as shown in Figure 3.12. With this, you can set the width, height, and whether to draw from the center of the point you clicked on or have that point be the upper-left coordinate of the oval. Figure 3.12. The Oval Settings dialog box for creating ovals with numbers.
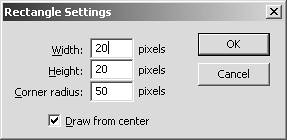
TIP While drawing an oval, you can hold down the Alt key to make the circle draw in both directions, so it will increase in size twice as fast. The Rectangle ToolShortcut: PC and MacR The Rectangle tool is used to draw rectangular shapes. The Rectangle tool has three options; the first is the Object Drawing option. The second option is the Snap to Objects option, which when selected, enables you to draw perfect squares when drawing at 45-degree angles. Again, you can accomplish the same thing by holding down the Shift key when you draw a rectangle. The third option is the Round Rectangle Radius option. When this option is selected (or you double-click the Rectangle tool in the toolbar), the Rectangle Settings pop-up appears, allowing you to set the roundness of the corners of the rectangle between 0 and 999. Like the Oval tool, you can now create rectangles on the stage without having to draw them by hand. Just hold down the Alt key and click the stage to reveal the Rectangle Settings dialog box, as shown in Figure 3.13. With this, you can set the width, height, corner radius, and whether to draw from the center of the point you clicked or have that point be the upper-left coordinate of the rectangle. Figure 3.13. The Rectangle Settings dialog box for creating rectangles with numbers.
TIP
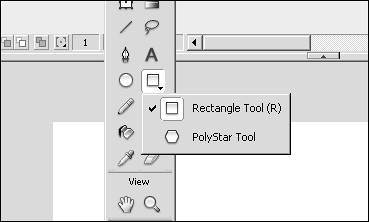
The PolyStar ToolShortcut: none The PolyStar tool is used to draw multisided polygons or multipoint stars. To select this tool, click and hold down the Rectangle tool in the toolbar. A submenu appears, as shown in Figure 3.14. Select the PolyStar tool from there. There is no shortcut key for this tool on the Mac or the PC. Figure 3.14. Choose the PolyStar tool.
When you select the PolyStar tool, the same options for the Rectangle and Oval tools appearObject Drawing and Snap to Objects. Also notice another option, called Options, in the Properties Inspector, as shown in Figure 3.15. Clicking this brings up the Tool Settings dialog box where you can choose either polygon or star, the number of sides (or points when drawing a star), and the star point size (which affects only stars). Figure 3.15. Click the Options button to open the Tool Settings dialog box. NOTE The maximum value of sides is 32, and the minimum is 3. The maximum value for point size is 1, and the minimum value is 0. Drawing polystars can be a bit tricky at first because unlike the other shape drawing tools, while you are drawing the size of the shape, you can also control the rotation of the shape. TIP Holding down the Shift key while drawing polystars will make it so they are drawn only at a rotation of 45-degree increments. The Pencil ToolShortcut: PC and MacY The Pencil tool is used to draw lines, but unlike the Line tool, which draws point to point, the Pencil tool can be used like a normal pencil. It does have some options to make drawing much easier, as you can see in Figure 3.16, as well as the Object Drawing option found in all the drawing tools. Figure 3.16. The options for the Pencil tool.
Here is a list of those options and what they mean:
Figure 3.17. You can see the difference in drawing a similar shape with each of the three pencil options.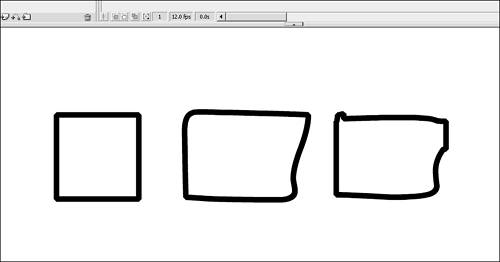 The Brush ToolShortcut: PC and MacB The Brush tool is used to paint the stage, much like a normal paintbrush would be used. Unlike the Pencil tool, the Brush tool's color options are controlled with the fill settings. There are also several options for the Brush tool that make a difference in how the brush works, as well as the Object Drawing option. The first is the mode of the Brush tool, which has these options:
Other options that affect the fill being painted are the size of the brush (from approximately 2.5 pixels to 30 pixels wide) and the style of the brush, as shown in Figure 3.18. Figure 3.18. The different choices of brush styles for the Brush tool.
TIP When you use the Brush tool, note that the size of the brush is not relativethe more you magnify the stage and use the Brush tool, the larger the painted fill will be. The final option for the Brush tool is the Lock Fill option. This option, when selected, will make a gradient or bitmap fill (discussed later in this chapter) more consistent over several items. The Ink Bottle ToolShortcut: PC and MacS The Ink Bottle tool is designed to help make adjustments to line segments on the stage through stroke properties. Although it has no options in the options section of the toolbar, you can make stroke settings in the Properties Inspector. Then you can apply these settings by clicking line segments with the tip of the Ink Bottle. The Paint Bucket ToolShortcut: PC and MacK The Paint Bucket tool is used to change fill settings of shapes on the stage. Select the color or gradient you want to use and click the fill you want to change. The Paint Bucket tool does have a couple options:
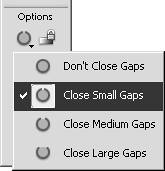
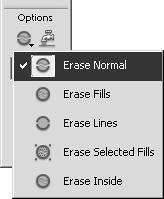
The Eyedropper ToolShortcut: PC and MacI The Eyedropper tool is used to snag properties of either strokes or fills. As you hover over a line or fill of a shape, a small icon will appear with an eyedropper to indicate which you are working with. When you've made your selection, the tool will automatically change to either the Paint Bucket (for fills) or the Ink Bottle tool (for strokes). TIP While using the Eyedropper tool, hold down the Shift key when you make a selection, and both the fill and stroke color will be changed to that selection. The Eraser ToolShortcut: PC and MacE The Eraser tool is used to erase both fills and strokes. Besides the size and shape drop-down (see Figure 3.20), the Eraser tool has a couple more options, including how to erase the following:
Figure 3.20. The different settings for how the Eraser tool will erase.
The final option of the Eraser tool is the Faucet option. This option, when selected, turns the Eraser tool into a one-click wonder. Just click the line or fill you want to get rid of, and the entire selection will be erased. TIP While using the Eraser tool (not in Faucet mode), hold down the Shift key to erase in straight lines. NOTE Although the Eraser tool will make quick work of getting rid of shapes and lines on the stage, it will not affect any nonprimitive object such as groups, graphics, movie clips, or text fields, but it will affect Drawing Objects. |

EAN: 2147483647
Pages: 319