Creating Behaviors
| Behaviors, as discussed in Chapter 8, "Welcome to ActionScript 2.0," are small blocks of code that can be adjusted to fit individual needs. Some of the behaviors that come with Flash can be used to control movie clips, screens (Flash PRO only), and to open new web pages. Those are okay, but for more intermediate to advanced developers, you will want more. Building behaviors is a simple process provided that you familiarized yourself with the XML-to-UI API. Table 27.3 shows a few other tags for behaviors that you should make yourself aware of.
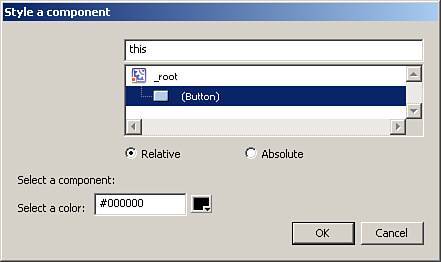
Now that you have seen the new tags for behaviors, you can go ahead and create them. In the following example, you will create a behavior to color components:
This code does a lot of things, so let's break it apart and talk about each piece. The first piece declares that it is an XML document, and then that it is a Flash behavior. <?xml version="1.0"?> <flash_behavior version="1.0"> The next section sets some of the behavior's attributes and declares a couple of properties.
After that comes the dialog box construction with all of the elements. <dialog title="Style a component" buttons="accept, cancel"> <vbox> <hbox> <label value="Select a component:" control="TARGET" required="true"/> <targetlist /> </hbox> <separator/> <hbox> <label value="Select a color:" control="COLOR" required="true"/> <colorchip color="#000000"/> </hbox> </vbox> </dialog> Then the ActionScript is created. Following are some things to know about sending ActionScript out of the behavior: In addition to the fact that it must be between <actionscript> tags, it must also follow <![CDATA[ and end with ]]>. Getting information from the UI elements in the dialog box is as easy as wrapping the id attribute of that element in dollar signs ($id$). <actionscript> <![CDATA[ // Color a component //Flash Unleashed var htmlColor:String = "$COLOR$"; $TARGET$.setStyle("themeColor", "0x"+htmlColor.slice(1)); //end of code ]]> </actionscript> And finally, the other open tags are closed as well. </behavior_definition> </flash_behavior> Now that you understand the fundamentals behind the behavior we just built, let's use it.
That was how to make a behavior. To see more about behaviors, look at the ones that come with Flash. Because they are made in XML, they are open source, so learn from their creators. Behaviors can save you development time, and so does the topic of the next sectionpanels. |
EAN: 2147483647
Pages: 319
- Article 424: Fixed Electric Space Heating Equipment
- Article 500 Hazardous (Classified) Locations, Classes I, II, and III, Divisions 1 and 2
- Example No. D4(b) Optional Calculation for Multifamily Dwelling
- Example No. D5(a) Multifamily Dwelling Served at 208Y/120 Volts, Three Phase
- Example No. D11 Mobile Home (See 550.18)