| You can create an interface between extendable JSFL files and Flash in two ways. One, which we will discuss later in this chapter, you build directly in Flash itself. The other involves a specific way of coding XML. Using specific XML tags (elements), we can describe and define a user interface for controlling any of our JSFL files. Listing every single tag is beyond the scope of this chapter, but Tables 27.1 and 27.2 show a few of the major tags. Table 27.1 lists layout tags, and Table 27.2 lists UI element tags. Table 27.1. Layout TagsTag | Description | Attributes | Child Tags |
|---|
<dialog> | This tag will hold the entire UI. | buttons (Accept, Cancel, Help) title | <hbox>, <vbox>,<grid> | <hbox> | Contains horizontally aligned UI elements. | N/A | <hbox>, <vbox>, controls | <vbox> | Contains vertically aligned UI elements. | N/A | <hbox>, <vbox>, controls | <spacer> | Invisible bumper for arranging UI elements. | N/A | N/A | <separator> | Visible bar aligned with parent <vbox> or <hbox>. | N/A | N/A | <grid> | Used to lay out tabular elements. | N/A | <columns>,<rows> | <columns> | Holds individual <column> tags. | N/A | <column> | <column> | Specifies column in grid. | N/A | controls | <rows> | Holds individual <row> tags. | N/A | <row> | <row> | Controls to be placed within these tags. | align (start, center, end, baseline) | controls |
Table 27.2. UI Element Tags (Controls)Tag | Description | Attributes | Child Tags |
|---|
<button> | Clickable buttons | id label accesskey tabindex oncommand | N/A | <checkbox> | Element for selecting Boolean values (true/false, yes/no) | id label accesskey tabindex | checked (TRue, false) N/A | <colorchip> | Color grid where a user can choose a certain color | id color (default color) | N/A | <listbox> | Holds <listitem> tags in a list box | id tabindex | | rows (rows to display) | <listitem> | | | <listitem> | A single element in a list box | label value | N/A | <menulist> | A drop-down list or combo box | id tabindex | <menupop> | <menupop> | Part of the <menulist> drop-down box | N/A | <menuitem> | <menuitem> | Item in the <menulist> drop-down box | label value selected (true, false) | N/A | <radiogroup> | Holds radio button objects | id tabindex | <radio> | <radio> | Individual choice in a <radiogroup> | label selected (TRue, false) | | accesskey | N/A | | | <popupslider> | A slider with a movable slide bar to control the value | id tabindex minvalue maxvalue | N/A | <textbox> | Simple text field | id maxlength value (default text) tabindex size (in characters) literal (puts quote marks around text) | N/A | <label> | Text label for UI elements | control (id of control being labeled) accesskey value | N/A | <flash> | Embedded Flash movie (.swf) | id width height src (source file) | N/A | <targetlist> | Used to sort through and choose instances of objects on the stage0 | id class tabindex required (true, false) | N/A |
So now that you've seen the basic code being used, let's return to the mytrace.jsfl example and make it more dynamic: 1. | Open a text editor such as Notepad or SciTe.
| 2. | Save the file on the desktop as TRaceMe.xml.
| 3. | Place the following code within it.
<dialog buttons="accept, cancel" title="Trace What?"> <hbox> <label value="String: "/> <textbox value="Sample Text" size="40"/> </hbox> </dialog>
The preceding code creates a UI box with the title "Trace What?" and two buttons. It then creates the type of UI box (<hbox>) and within that, it labels the text field, which is created 40 characters wide with the default text "Sample Text." And as in all XML documents, when a tag is opened, it must be closed.
| 4. | Now return to Flash and open myTRace.jsfl.
| 5. | Change the code that is already present to the following:
myResult = fl.getDocumentDOM().xmlPanel(fl.configURI + "/Commands/traceMe.xml"); if(myResult.dismiss == "accept"){ fl.trace(myResult.string); }
This code does the following: First, it maps to the XML file that describes the UI for this command and sets it to a variable myResult. Then, using a conditional statement, it checks whether the user has clicked the Accept button or the Cancel button, because we want the command to run only if the user clicks Accept. If the Accept (OK) button is clicked, it sends the message that is in the text field to the Output panel.
| 6. | Now save the JSFL file to the desktop.
| 7. | Copy both the JSFL file and the XML document to the Commands folder in the Flash 8 directory and restart Flash.
|
After you have restarted Flash, you can go to Commands in the menu bar, and you should see traceMe as a listed command. Select it and Figure 27.8 should appear. You can type in anything or keep the default text, and when you click OK (the Accept button), the message is sent to the Output panel. Also, if you select Cancel, nothing will happen except that the UI box will close. Figure 27.8. Enter some text to have the traceMe command trace the text. 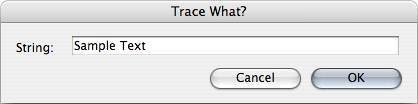
NOTE It is not necessary to have buttons in the UI (although you would normally want to). If a user cannot close the dialog box by clicking a button, the Escape key will always close the UI box.
That was one way to use the XML-to-UI API. Another way is with behaviors. |