Printing Forms
You can use a form to print information from a table or query. When you design the form, you can specify different header and footer information for the printed version. You can also specify which controls are visible. For example, you might define some gridlines that are visible on the printed form but are not displayed on the screen.
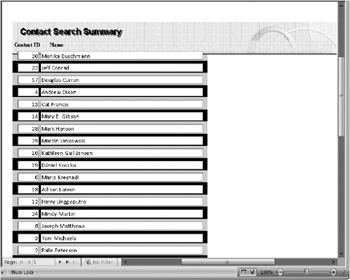
An interesting form to print in the Conrad Systems Contacts database is the frmContactSummaryXmpl form. Open the form, click the Microsoft Office Button, click the arrow to the right of the Print command, and then click Print Preview. On the Print Preview tab, click the Zoom button and scroll to the top of the first page. You should see a screen that looks like the one shown in Figure 10–37. Notice that the form footer that you saw earlier in Figure 10–1 (page 519) does not appear in the printed version. In fact, this form has one set of headers and footers designed for printing and another set for viewing the form on the screen.

Figure 10–37: When you view the frmContactSummaryXmpl form in Print Preview, you see a different set of headers and footers.
You can use the scroll bars to move around on the page. Use the Page Number box in the lower-left corner of the Print Preview window in the same way that you use the Record Number box on a form or in a datasheet. Click the Zoom button again to see the entire page on the screen.
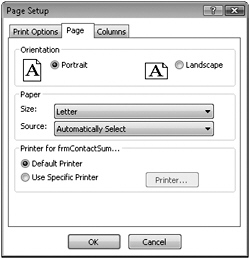
Click the Margins command in the Page Layout group on the Print Preview tab to set top, bottom, left, and right margins. Click the Page Setup button in the same Page Layout group to set additional options. Access displays the Page Setup dialog box, in which you can customize the way the form prints. Click the Page tab in the Page Setup dialog box (shown in Figure 10–38) to select Portrait or Landscape orientation, the paper size and source, and the printer. Access will store these specifications with the definition of your form.

Figure 10–38: The Page tab of the Page Setup dialog box for forms includes several page options.
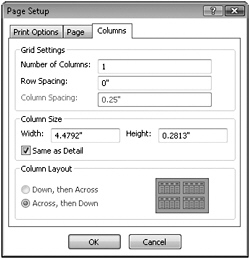
Click the Columns tab of the Page Setup dialog box to see additional options, as st as shown in Figure 10–39. We’ll explore the Columns options in detail in Chapter 14, “Using Reports.”

Figure 10–39: The Columns tab of the Page Setup dialog box for forms lets you define grid and column settings.
You should now have a good understanding of how forms work and of many design elements that you can include when you build forms. Now, on to the fun part-building your first form in the next chapter.
EAN: 2147483647
Pages: 234