Searching for and Sorting Data
When you use forms to display and edit your data, you can search for data or sort it in a new order in much the same way that you search for and sort data in datasheets. (See Chapter 7.) The following sections show you how to use some of the form filter features to search for data in a form or use the quick sort commands to reorder your data.
Performing a Simple Search
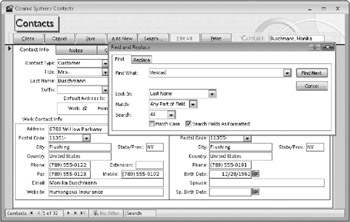
You can use Access 2007’s Find feature in a form exactly as you would in a datasheet. Open the frmContactsPlain form if you closed it, select the field you want to search, and then click the Find command in the Find group on the Home tab to open the Find And Replace dialog box, as shown in Figure 10–33. You can enter search criteria exactly as you would for a datasheet. Note that in a form you can also perform a search on any control that you can select, including controls that display calculated values.

Figure 10–33: You can use the Find And Replace dialog box to search your records for specific information.
In Figure 10–33 we clicked inside the Last Name field and then opened the Find And Replace dialog box. By default the Look In list in the Find And Replace dialog box remembers what you selected the last time you used Find. If you select Conrad Systems Database from the Look In list, Access will search through all the fields in this form for your criterion. Type the word Viescas in the Find What box, and make sure you select Last Name from the Look In list to search through only the Last Name field.
In the Match list, you can ask Access to search Any Part Of Field, Whole Field, or Start Of Field. When you select Any Part Of Field, Access looks for the characters you type in the Find What box anywhere within the field or fields you specified to search. If you select Whole Field, what you type in the Find What box must exactly match the contents of the field. When you select Start Of Field, the characters you type in the Find What box must be at the beginning of the field, but any or no characters can appear in the field after that.
By default, Access searches all records from the beginning of the recordset (the first record displayed in the form) unless you select either Up or Down in the Search list to search up or down from the current record position. Select the Match Case check box if you want to find text that exactly matches the uppercase and lowercase letters you typed. By default, Access is case-insensitive unless you select this check box.
You can select the Search Fields As Formatted check box if you need to search the data as it is displayed rather than as it is stored by Access. Although searching this way is slower, you should select this check box if you are searching a Date/Time field. You should also probably select this check box when searching any field that has a format or input mask applied-such as the Postal Code and phone number fields in this sample form. For example, if you’re searching a date field for dates in January, you can specify *-Jan-* if the field is formatted as Medium Date and you select the Search Fields As Formatted check box. You might also want to select this check box when searching a Yes/No field for Yes because any value except 0) is a valid indicator of Yes. Clear this check box to improve performance when searching a simple text or numeric field.
After selecting the options you want, click the Find Next button. Access proceeds to search through the last names in the form’s recordset for the value Viescas, and it finds John’s record. Click Find Next to continue searching from the current record. Each time you click Find Next again, Access moves to the next value it finds. When Access can find no additional records (either by searching up to the first record when you select Up in the Search list or by searching to the last record when you select Down or All), it opens a message box to inform you that it has completed the search. Click OK to dismiss the message box and return to the Find And Replace dialog box. Click Cancel to close the dialog box.
After you have established search criteria in the Find And Replace dialog box, you can press Shift+F4 to execute the search from the current record without having to open the dialog box again.
Using the Search Box
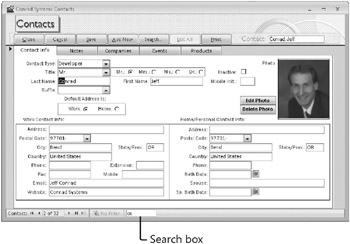
Access 2007 includes a new Search box on the record navigation bar at the bottom of the Form window, as shown in Figure 10–34. The Search box functions similarly to the Find And Replace dialog box discussed previously. Unlike the Find And Replace dialog box, the Search box does not give you any choices as to what fields to search in, what part of a string to match, or whether to match the string case. When you type something in the Search box, Access immediately begins to search through all fields in the form for the sequence of characters you enter. The characters you type can appear anywhere in the field, and Access performs the match “as formatted.” For example, if you type /196 in the Search box, you’re likely to find the first person whose birthday is in the 1960s.
Move to the first record in the frmContactsPlain form and type the letter c in the Search box. Notice that Access stays on the first record and highlights the letter C of the word Customer in the Contact Type field. Now type the letter o. after the letter c and observe that Access moves the focus to the Last Name field on the second record and highlights the letters Co in the name Conrad, as shown previously in Figure 10–34. To clear your search criteria, highlight all the text in the Search box and press Delete or use the Backspace key to remove the text.

Figure 10–34: You can also use the Search box to search through your form records.
Performing a Quick Sort on a Form Field
As you can with a datasheet, you can select just about any control that contains data from the underlying recordset and click the Ascending or Descending button in the Sort & Filter group on the Home tab to reorder the records you see, based on the selected field. If you want to perform a quick sort, open the frmContactsPlain form, click in the Postal Code field in the form under Work Contact Info, and then click the Descending button in the Sort & Filter group on the Home tab. The contact with the highest postal code is displayed first.
Adding a Filter to a Form
One of Access 2007’s most powerful features is its ability to further restrict or sort the information displayed in the form without your having to create a new query. This restriction is accomplished with a filter that you define while you’re using the form. When you apply the filter, you see only the data that matches the criteria you entered.
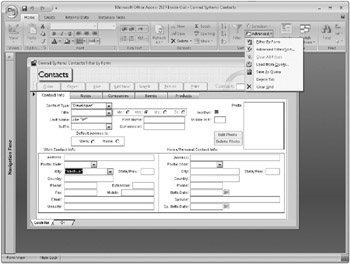
As with datasheets, you can define a filter using Filter By Selection, Filter By Form, or the Advanced Filter definition facility. Open the frmContactsPlain form, click the Advanced button in the Sort & Filter group on the Home tab, and click Filter By Form. Access adds features to the form to let you enter filter criteria, as shown in Figure 10–35 In this example, we’re looking for all contacts who are the Developer contact type, whose last name begins with V, and who work in the city of Nashua. You’ll see that you can click the arrow to the right of each field to display a list that contains all the values for that field currently in the database. If your database contains many thousands of rows, Access might not show the list if the field has more than several hundred unique values-it would take an unacceptably long time to retrieve the entire list. When the list is too long, Access gives you simple Is Null and Is Not Null choices instead. You can also type your own criteria, as shown in the Last Name field in Figure 10–35.

Figure 10–35: Enter filter criteria for the frmContactsPlain form in the Filter By Form window.
As you can with datasheets, you can enter one set of criteria and then click an Or tab at the bottom of the blank form to enter additional criteria. If you don’t like some of the criteria you’ve entered, click the Advanced button in the Sort & Filter group of the Home tab, and then click Clear Grid to start over. Click the Toggle Filter button in the Sort & Filter group to filter your records. Click the Clear All Filters command to exit the Filter By Form window without applying the new filter. Note that if you specify criteria on a subform, Access applies the filter only for records related to the record currently displayed on the main form. For example, you can’t create a filter on the Products tab for contacts who own the BO$$ Multi-User edition and then expect to see all the contacts who own that product-you’ll see only products for the current contact that match the value BO$$ Multi-User.
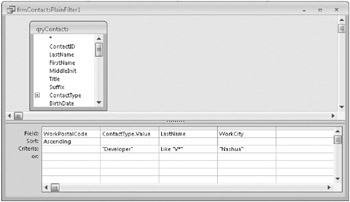
To turn off the filter, click the Toggle Filter button in the Sort & Filter group on the Home tab. To see the filter definition, click the Advanced button in the Sort & Filter group and then click Advanced Filter/Sort. After you apply the filter shown in Figure 10–35 and do an ascending quick sort on the WorkPostalCode field, the Advanced Filter/Sort window should look something like that shown in Figure 10–36.

Figure 10–36: In the Advanced Filter/Sort window for the frmContactsPlain form, you can see criteria previously entered using the Filter By Form command.
| Note | If you use one of the Sort (Ascending or Descending) buttons, you’ll discover that this “quick sort” uses the form’s filter definition to create the sorting criteria. For example, if you do a quick sort to arrange contacts in descending order by last name, you’ll find the LastName field in the form filter with the Sort row set to Descending when you click Advanced Filter/Sort under Advanced in the Sort & Filter group on the Home tab. |
If you often use the same filter with your form, you can save the filter as a query and give it a name. Open the Advanced Filter/Sort window and create the filter. Click the Advanced command in the Sort & Filter group on the Home tab, click the Save As Query command, and then type a name for the query when Access prompts you.
You can load an existing query definition to use as a filter. Click Advanced in the Sort & Filter group on the Home tab and click Load From Query when you’re in the Filter By Form window. Access presents a list of valid select queries (those that are based on the same table or tables as the form you’re using).
EAN: 2147483647
Pages: 234