Changing Field Names
Perhaps you misspelled a field name when you first created one of your tables. Or perhaps you’ve decided that one of the field names isn’t descriptive enough. As you learned in Chapter 4, you can change the displayed name for a field by setting its Caption property. But you won’t necessarily want the hassle of giving the field a caption every time it appears in a query, a form, or a report. Fortunately, Access 2007 makes it easy to change a field name in a table-even if you already have data in the table.
| Note | The next several examples in this chapter show you how to change the Contacts table that you created in the previous chapter to more closely match the tblContacts table in the Conrad Systems Contacts sample database. |
You created the first draft of the Contacts table by using a table template. Now you need to make a few changes so that it will hold all the data fields that you need for your application. The table template does not give you the option to rename the fields before creating them, but now you decide to rename one of the fields before beginning work on the rest of your application.
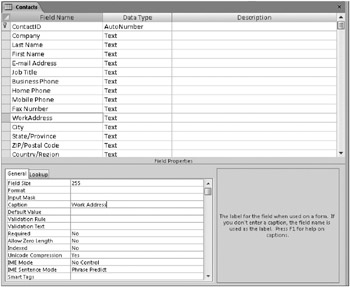
Renaming a field is easy. For example, the table template created a field called Address, but you’ve decided that you want to have two address fields because a contact could have a work address and a home address in this database. It makes sense to change the field name to reflect the actual data you intend to store in the field, so let’s change Address to WorkAddress. Open the Contacts table in the Contact Tracking database in Design view, use the mouse to move the insertion point to the beginning of the Address field name, and then type Work. You can also click in the field name, use the arrow keys to position the insertion point just before the letter A, and type Work. As you learned in the previous chapter, we recommend that you not have any spaces in your field names, so do not put a space between the words Work and Address. Your field should now be called WorkAddress. The table template also chose the Memo data type for this field, which is not necessary. Tab to the Data Type column, click the small arrow in the column (or press Alt+Down Arrow) to open the list, and select Text from the list of data types. While you’re at it, press F6 to move to the Field Properties section of the window, tab to the Field Size property, and change the field size to 255. Then, tab down to the Caption property, and change the field caption to Work Address. Your result should look like Figure 5–10.

Figure 5–10: You can change a field name, a field data type, and a field caption in Design view.
As you follow along with the examples in this chapter, it might be useful to compare the structure of the Contacts table you built in Chapter 4, and the actual tblContacts table in the Conrad Systems Contacts sample database. If you exactly followed the instructions in Chapter 4, your Contacts table in the Contact Tracking database should look like Table 5–1. You can see the actual design of tblContacts in Table 5–2.
| Field Name | Type | Length |
|---|---|---|
| ContactID | AutoNumber | |
| Company | Text | 255 |
| Last Name | Text | 255 |
| First Name | Text | 255 |
| E-mail Address | Text | 255 |
| Job Title | Text | 255 |
| Business Phone | Text | 255 |
| Home Phone | Text | 255 |
| Mobile Phone | Text | 255 |
| Fax Number | Text | 255 |
| Address | Text | 255 |
| City | Text | 255 |
| State/Province | Text | 255 |
| Zip/Postal Code | Text | 255 |
| Country/Region | Text | 255 |
| Web Page | Hyperlink | |
| Notes | Memo | |
| Attachments | Attachment |
| Field Name | Type | Length |
|---|---|---|
| ContactID | Auto Number | |
| LastName | Text | 50 |
| FirstName | Text | 50 |
| MiddleInit | Text | 1. |
| Title | Text | 10 |
| Suffix | Text | 10 |
| ContactType | Text | 50 |
| BirthDate | Date/Time | |
| DefaultAddress | Integer | |
| WorkAddress | Text | 255 |
| WorkCity | Text | 50 |
| WorkStateOrProvince | Text | 20 |
| WorkPostalCode | Text | 20 |
| WorkCountry | Text | 50 |
| WorkPhone | Text | 30 |
| WorkExtension | Text | 20 |
| WorkFaxNumber | Text | 30 |
| HomeAddress | Text | 255 |
| HomeCity | Text | 50 |
| HomeStateOrProvince | Text | 20 |
| HomePostalCode | Text | 20 |
| HomeCountry | Text | 50 |
| HomePhone | Text | 30 |
| MobilePhone | Text | 30 |
| EmailName | Hyperlink | |
| Website | Hyperlink | |
| Photo | Attachment | |
| SpouseName | Text | 75 |
| SpouseBirthDate | Date/Time | |
| Notes | Memo | |
| CommissionPercent | Number | Double |
| Inactive | Yes/No |
As you can see, we have a lot of work to do to make the two tables identical: rename fields, move fields, insert fields, add new fields, and change data types and lengths.
Before we go any further, you should rename the remaining fields and add captions so that they more closely match the fields in the tblContacts table in the Conrad Systems Contacts sample database. Following the preceding steps for renaming fields and changing the Caption property, go through each of the fields and change them as follows:
| Old Name | New Name | Caption |
|---|---|---|
| Last Name | LastName | Last Name |
| First Name | FirstName | First Name |
| E-mail Address | EmailName | Email Name |
| Job Title | Title | |
| Business Phone | WorkPhone | Work Phone |
| Home Phone | HomePhone | Home Phone |
| Mobile Phone | MobilePhone | Mobile Phone |
| Fax Number | WorkFaxNumber | Fax Number |
| City | WorkCity | Work City |
| State/Province | WorkStateOrProvince | State/Province |
| Zip/Postal Code | WorkPostalCode | Postal Code |
| Country/Region | WorkCountry | Work Country |
| Web Page | Website | |
| Attachments | Photo |
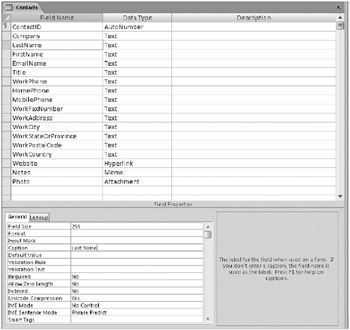
Your table should now look like Figure 5–11. Click the Save button on the Quick Access Toolbar to save the changes to the table.

Figure 5–11: After renaming the fields in the Contacts table created from the template, it is beginning to look more like the table in the Conrad Systems Contacts sample database.
| Inside Out-Why the Field Names Have Spaces in the Table Templates | Office Access 2007 provides enhanced capabilities to move not only your data but also your entire application to a Microsoft Windows SharePoint server. You’ll learn more about these features in Chapter 22, “Working with Windows SharePoint Services.” When you move or copy an Access table to a Windows SharePoint server, Windows SharePoint Services stores the data in an object called a list. One shortcoming of Windows SharePoint Services lists is the fields do not have a Caption property, so a Windows SharePoint Services list always displays the field name for a column of data. Because Microsoft is emphasizing the new Windows SharePoint Services features in Access 2007, all the table templates use spaces in the field names to make them more readable. As you’ll learn later in Part 7, “Designing an Access Project,” the Conrad Systems Contacts sample database is designed for you to easily migrate to SQL Server, not Windows SharePoint Services. If your application is more likely to upsize to SQL Server, you should consider not using spaces in your field names so that you won’t be forced to include bracket or quote delimiters in your references to these field names. |
EAN: 2147483647
Pages: 234