The Macro Design Facility-An Overview
The following sections explain how to work with the macro design facility in Access 2007.
Working with the Macro Design Window
Open the Wedding List Macro sample database (WeddingMC.accdb) from the folder where you installed the sample files. (The default location is \Microsoft Press\Access 2007 Inside Out on your OU drive.) As you’ll discover later in this chapter, a special macro called Autoexec runs each time you open the database. This macro determines whether the database is trusted, opens an informational form for a few seconds, and then tells you which macro to run to start the application. We’ll look at that macro in some detail later.
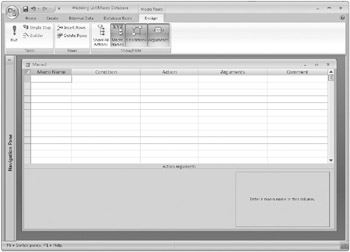
On the Create tab, in the Other group, click the arrow on the New Object button, and click Macro from the list of three options. (The top half of the New Object button displays the last type of new object created-Macro, Module, or Class Module. If you see the Macro icon in the top half of the New Object button, you can also click that button to begin creating a new macro.) Access opens a new Macro window similar to the one shown in Figure 18–1. In the upper part of the Macro window, you define your new macro; and in the lower part, you enter settings, called arguments, for the actions you’ve selected for your macro. The upper part shows at least two columns, Action and Comment. You can view all five columns shown in Figure 18–1 by clicking the Macro Names, Conditions, and Arguments buttons in the Show/Hide group on the Design tab.
| Note | You can cause the Macro Name and Condition columns to appear automatically for any new macro by selecting the Names Column and Conditions Column check boxes under Show In Macro Design in the Display section of the Advanced category in the Access Options dialog box. |

Figure 18–1: A new Macro window displays columns where you can define your macro.
Notice that the area at the lower right displays a brief help message. The message changes depending on where the insertion point is located in the upper part of the window. (Remember: You can always press F1 to open a context-sensitive Help topic.)
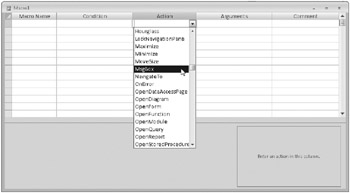
In the Action column, you can specify any one of the 70 macro actions provided by Access 2007. If you click any box in the Action column, an arrow appears at the right side of the box. Click this arrow to open a list of the macro actions, as shown in Figure 18–2.

Figure 18–2: The list of macro actions displays 70 actions you can use in Access 2007.
Troubleshooting
Why doesn’t the list include all the macro actions available?
Access 2007 includes 70 macro actions, but not all these actions can run in a database that is not trusted. By default, Access displays only the macro actions that can run in a trusted database in the Action column. To see the complete list of macro actions, click the Show All Actions button in the Show/Hide group on the Design tab. When you select an action that can run only in a trusted database, Access displays an exclamation point on the selection button to the left. If a macro in your application includes actions that can run only in a trusted database, your user must trust your database to be able to run the macro.
To see how the Macro window works, select the MsgBox action now. (Scroll down the list to find MsgBox.) You can use the MsgBox action to open a pop-up modal dialog box with a message in it. This is a great way to display a warning or an informative message in your database without defining a separate form.
Assume that this message will be a greeting, and type Greeting message in the corresponding box in the Comment column. You’ll find the Comment column especially useful for documenting large macros that contain many actions. You can enter additional comments in any blank box in the Comment column (that is, any box without an action next to it).
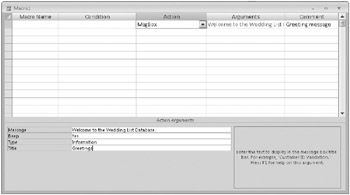
After you select an action such as MsgBox, Access displays argument boxes in the lower part of the window, as shown in Figure 18–3, in which you enter the arguments for the action. If you display the Arguments column, Access shows you a summary of the arguments that you have entered for each action. The Arguments column is a new feature in Access 2007. When you display this column, you can see a summary of the arguments for each action without having to click each action row to see the arguments in the lower part of the design window.

Figure 18–3: Enter arguments for the MsgBox action to display a greeting message.
| Note | As you can in the Table and Query windows in Design view, you can use the F6 key to move between the upper and lower parts of the Macro window. |
You use the Message argument box in the lower part of the design window to set the message that you want Access to display in the dialog box you’re creating. The setting in the Beep argument box tells Access whether to sound a beep when it displays the message. In the Type argument box, you can choose a graphic indicator, such as a red critical icon, that will appear with your message in the dialog box. In the Title argument box, you can type the contents of your dialog box’s title bar. Use the settings shown in Figure 18–3 in your macro.
Saving Your Macro
You must save a macro before you can run it. Click the Save button on the Quick Access Toolbar, or click the Microsoft Office Button and then click Save. When you do so, Access opens the dialog box shown in Figure 18–4. Enter the name TestGreeting, and click OK to save your macro.

Figure 18–4: Enter a name for this test macro in the Save As dialog box.
Testing Your Macro
You can run some macros (such as the simple one you just created) directly from the Navigation Pane or from the Macro window because they don’t depend on controls on an open form or report. If your macro does depend on a form or a report, you must link the macro to the appropriate event and run it that way. (You’ll learn how to do this later in this chapter.) However you run your macro, Access provides a way to test it by allowing you to single step through the macro actions.
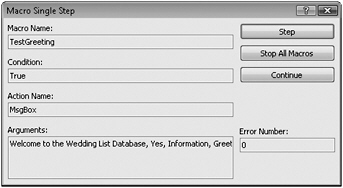
To activate single stepping, right-click the macro you want to test in the Navigation Pane, and then click Design View on the shortcut menu. This opens the macro in the Macro window. Click the Single Step button in the Tools group on the Design tab. Now when you run your macro, Access opens the Macro Single Step dialog box before executing each action in your macro. In this dialog box, you’ll see the macro name, the action, and the action arguments.
Try this procedure with the TestGreeting macro you just created. Open the Macro window, click the Single Step button, and then click the Run button in the Tools group on the Design tab. The Macro Single Step dialog box opens, as shown in Figure 18–5. Later in this section, you’ll learn how to code a condition in a macro. The Macro Single Step dialog box also shows you the result of testing your condition.

Figure 18–5: The Macro Single Step dialog box allows you to test each action in your macro.
If you click the Step button in the dialog box, the action you see in the dialog box will run, and you’ll see the dialog box opened by your MsgBox action with the message you created, as shown in Figure 18–6. Click the OK button in the message box to dismiss it. If your macro had more than one action defined, you would have returned to the Macro Single Step dialog box, which would have shown you the next action. In this case, your macro has only one action, so Access returns you to the Macro window.

Figure 18–6: Access displays the dialog box you created by using the MsgBox action in the TestGreeting macro.
If Access encounters an error in any macro during the normal execution of your application, Access first displays a dialog box explaining the error it found. You then see an Action Failed dialog box, which is similar to the Macro Single Step dialog box, containing information about the action that caused the problem. At this point, you can click only the Stop All Macros button. You can then edit your macro to fix the problem. We’ll discuss handling errors in “Trapping Errors in Macros” on page 910.
Before you read on in this chapter, you might want to return to the Macro window and click the Single Step button again so that it’s no longer selected. Otherwise you’ll continue to single step through every macro you run until you exit and restart Access or click Continue in one of the Single Step dialog boxes.
EAN: 2147483647
Pages: 234