| Managing access to a WLAN through WEP keys or authentication is one viable security measure. You can also configure access to be restricted according to device; to do this, you use the Media Access Control (MAC) address or Internet Protocol (IP) address. For example, you can employ filtering on your APs to keep out clients who do not have an authorized client adapter. Without an explicitly approved MAC address on the network adapter, it doesn't matter if the correct username and password are presented because the AP does not allow access. Simply put, filtering checks a wireless client's MAC or IP address against a list of authorized MAC or IP addresses maintained on the AP. When a client tries to connect to the AP, it must be on the list. If it is not, the client cannot connect. Filtering should not be the only security measure, however. Both MAC and IP addresses can be spoofed, thus circumventing this layer of security. MAC Filtering You can set up a MAC filter two ways: Furthermore, you can apply these filters to either or both the Ethernet and radio ports and to incoming or outgoing traffic. Note Be careful when setting MAC filters. If you incorrectly apply the setting, you can easily lock yourself out of the AP. If this does occur, use the command-line interface (CLI) to disable filters, and then go in and correct your mistake.
MAC filters are managed on the MAC Address Filters page (see Figure 8-1); simply follow these steps: Step 1. | On the AP's web page, click Services on the menu to the left of the page.
| Step 2. | Click Filters in the list of services.
| Step 3. | Click the Mac Address Filters tab on the Apply Filters page.
|
Figure 8-1. MAC Address Filters Page 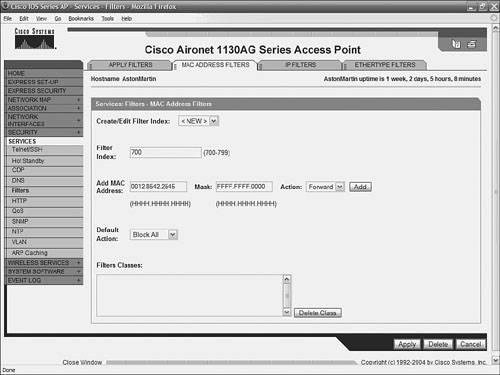
After you reach the Apply Filters page, you can enable MAC address filters. Note Be aware that software often changes. The version of the AP firmware you use might differ from what is shown here, but the steps are similar.
Setting MAC Filters To configure a MAC filter, follow these steps: Step 1. | To create a new MAC address filter, click Create > Edit Filter Index > <NEW>. To edit a filter, select the filter number from the menu.
| Step 2. | In the Filter Index field, identify the filter with a number between 700 and 799. This number is used to assign an access control list (ACL) for the filter.
| Step 3. | Enter a MAC address in the Add MAC Address field. The address is entered as three groups of four characters, separated by periods (for example, 0125.4275.7879).
| Step 4. | Use of the Mask entry field enables the filter to check against certain bits, but not others. For example, if you have several clients whose MAC addresses all end in the same four bits, you can use the mask to allow any clients whose MAC address matches those four bits. If you want to force an exact match of the MAC address, in the Mask entry field, enter FFFF.FFFF.FFFF. If you just want to check the last four bits, enter FFFF.FFFF.0000.
| Step 5. | Choose Action > Forward or choose Action > Block.
| Step 6. | Click Add. The MAC address you entered has been added to the Filters Classes field. You can remove this address by selecting it and clicking Delete Class.
| Step 7. | Choose Default Action > Forward All or Default Action > Block All. You must establish the default action for this filter, and it must be the opposite of the action for at least one of the MAC addresses in the filter. For example, if you chose Forward for several MAC addresses, you should select Block All as the filter's default action.
| Step 8. | Click Apply.
| Step 9. | Click the Apply Filters tab. This is shown in Figure 8-2.
Figure 8-2. Apply Filters Tab 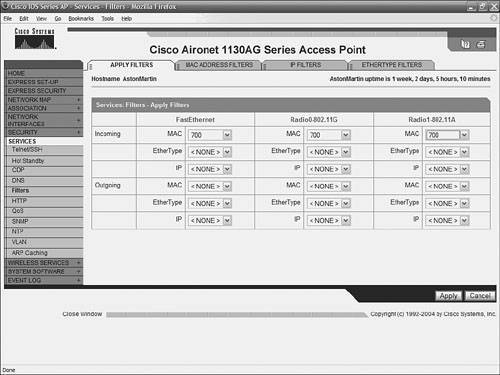
| Step 10. | Select the filter number from one of the MAC drop-down menus. The filter can be applied to either the Ethernet port, the radio ports, or both. You can also apply the filter to incoming traffic, outgoing traffic, or both.
| Step 11. | Click Apply.
|
Note You need to restart the system, so that all clients are appropriately filtered.
IP Filtering You can also limit access to your AP with IP filters. IP filtering can be applied based on IP address, IP protocol, and IP port. This allows or prevents the use of specific protocols through the AP's Ethernet and radio ports. Like MAC filtering, you can also set up the filter to allow or deny sending or receiving traffic from the AP based on IP address.You can set up IP filters to allow combinations of all three IP filtering components (address, protocol, and port). IP filters are managed on the IP Filters page, shown in Figure 8-3. Figure 8-3. IP Filters Page 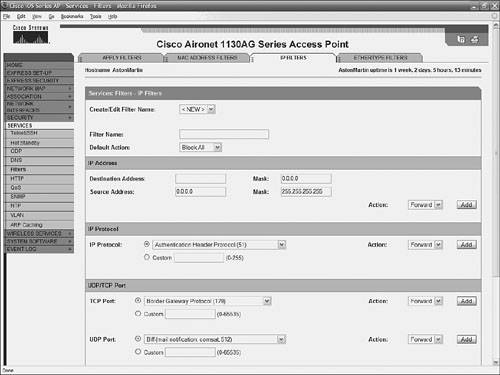
To reach the IP Filters page, follow these steps: Step 1. | On the AP's web page, click Services on the menu to the left of the page.
| Step 2. | Click Filters in the list of services.
| Step 3. | Click the IP Filters tab.
|
After you reach this page, you can enable IP filters. Setting IP Filters To configure an IP address filter, follow these steps: Step 1. | To create a new IP address filter, select Create > Edit Filter Index > <New>. To edit a filter, select the filter number from the menu.
| Step 2. | In the Filter Name field, identify the filter with a name.
| Step 3. | Select Default Action > Forward All or Default Action > Block All from the Default Action. You must establish the default action for this filter and it must be the opposite of the action for at least one of the IP filters. For example, if you chose Forward for several IP addresses, you should select Block All as the filter's default action.
| Step 4. | To filter a specific IP address, enter that address under the IP Address section. The Destination Address field is used to filter traffic going to an address; the Source Address filters filter traffic coming from a given IP address.
Note If you intend to block traffic to all IP addresses except those specified, make sure you include the IP address of your own computer in the list of specified exceptions; otherwise, your computer is shut out from the AP. | Step 5. | The Mask entry field allows the filter to check against certain bits, but not others. Type the subnet mask in this field. The mask is used if you are filtering everything to or from a subnet.
| Step 6. | Select Action > Forward or select Action > Block.
| Step 7. | Click Add. The IP address you entered has been added to the Filters Classes field. This address can be removed if you select it and click Delete Class.
| Step 8. | To filter an IP protocol, select one of the protocols from the IP protocol drop-down menu, or select the Custom radio button and enter the number of an existing ACL in the Custom field. Enter an ACL number from 0 to 255.
| Step 9. | Select Action > Forward or select Action > Block.
| Step 10. | Click Add. The protocol appears in the Filters Classes field. This field is at the bottom of the page and is shown in Figure 8-4. This filter can be removed if you click Delete Class.
Figure 8-4. IP Filters Page with Filters Classes Field 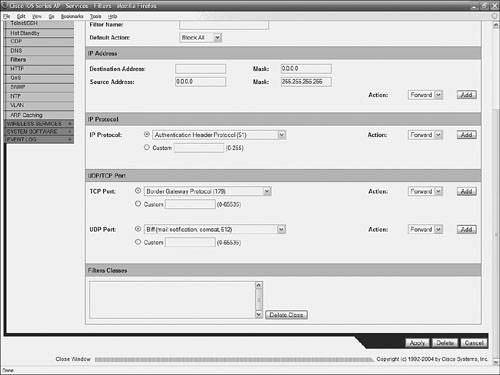
| Step 11. | To filter a TCP or UDP port protocol, select one of the common port protocols from the TCP Port or UDP Port drop-down menus, or you can select the Custom radio button and enter the number of an existing protocol in one of the Custom fields. Enter a protocol number from 0 to 65535.
| Step 12. | Select Action > Forward or select Action > Block.
| Step 13. | Click Add. The protocol appears in the Filters Classes field. This filter can be removed if you click Delete Class.
| Step 14. | Click Apply.
| Step 15. | Click the Apply Filters tab.
| Step 16. | Select the filter names from one of the IP drop-down menus. The filter can be applied to the Ethernet port, the radio ports, or both. You can also apply the filter to incoming traffic, outgoing traffic, or both.
| Step 17. | Click Apply.
|
|