| To configure encryption and security on your client, you use the Network Security screen, which is the fourth tab at the top of the ACU. The Network Security screen is shown in Figure 6-8; it allows you to manage the client adapter's security settings for connection with the AP, encryption, and authentication on the WLAN. Figure 6-8. The Network Security Screen Is Used to Configure Client Security Settings 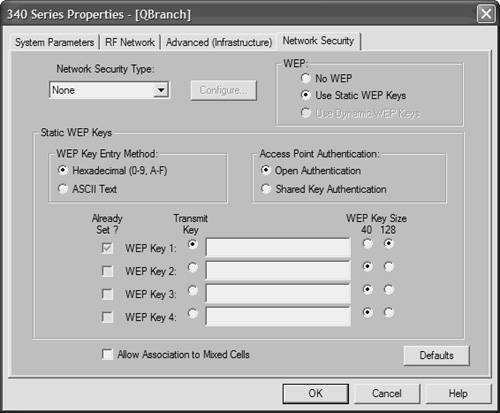
Unlike the preceding tabs, the Network Security tab contains many complicated steps. Before you make any changes to the client adapter's security settings, you must first decide how to set the Allow Association to Mixed Cells parameter, located at the bottom of the screen. The Allow Association to Mixed Cells parameter is used to specify whether the client can associate to an AP, which allows both WEP and non-WEP association. Check the Allow Association to Mixed Cells box if the AP to which the client associates has WEP set to Optional and WEP is enabled on the client adapter. Clear the check box if the AP does not have WEP set to Optional. Configuring WEP Keys To configure WEP keys for a given profile, follow these steps: Step 1. | Select None from the Network Security Type drop-down box in the Network Security screen.
| Step 2. | Select Use Static WEP Keys.
| Step 3. | Select one of the following WEP key formats:
- Hexadecimal (0-9, A-F) WEP keys are entered in the hexadecimal format; that is, it is comprised of numbers 09 and letters AF (upper- or lowercase).
- ASCII Text WEP keys are entered in ASCII text, which includes characters, numbers, and punctuation marks.
| Step 4. | Select an AP authentication option. This establishes how your client authenticates with the AP:
- Open Authentication The client adapter is allowed to authenticate and communicate with the AP, regardless of WEP settings.
- Shared Key Authentication The client adapter can communicate only with APs having the same WEP key.
| Step 5. | Select a key size from the right side of the screen. Choices are 40 or 128 bits. Clients with 128-bit adapters can use either size key, but clients with 40-bit adapters can use only 40-bit keys.
| Step 6. | Enter the WEP key in the field. You must adhere to key size and format. You can choose between two WEP key sizes:
40-bit keys contain 10 hexadecimal characters (for example, 1b2D3f1B2d) or 5 ASCII text characters (for example, JB0ND). 128-bit keys contain 26 hexadecimal characters (for example, 123abc456dEF123Abc321Cba78) or 13 ASCII text characters (for example, St@vR0bL0f31d).
Note The client adapter's WEP key must matchexactlythe WEP key used by your AP or other clients when in ad hoc mode. Be mindful of capitalization and whether "0" or "o" are used. | Step 7. | Click the Transmit Key radio button to the left of the key you wish to use to transmit packets.
| Step 8. | Click OK to return to the Profile Manager screen.
| Step 9. | Click OK to save your settings.
|
Configuring 802.1X Authentication Configuring 802.1X authentication is more complicated than the process to enable WEP keys. Not only are there configuration steps using the ACU, but Extensible Authentication Protocol-Transport Layer Security (EAP-TLS), Extensible Authentication Protocol-Message Digest algorithm 5 (EAP-MD5), Protected Extensible Authentication Protocol (PEAP), and Extensible Authentication Protocol-Subscriber Identity Module (EAP-SIM) authentication require configuration on your operating system. In addition, you cannot switch between these authentication modes if you change profiles. If you must change authentication methods, you have to enable the authentication type in Windows. Because Windows can be set up for one type of authentication at a time only, multiple authentication methods must be switched within Windows after switching profiles in the ACU. You can use two 802.1x authentication methods with ACU: LEAP To configure LEAP (also known as Cisco EAP) authentication on the client, follow these steps: Step 1. | Select LEAP from the Network Security Type drop-down box located at the bottom of the Network Security screen.
| Step 2. | Click Configure. Figure 6-9 shows the resulting LEAP Settings screen.
Figure 6-9. Configuring LEAP Settings 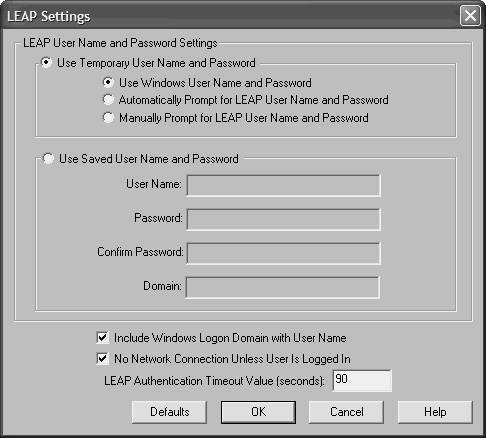
| Step 3. | You are asked for a LEAP username and password settings option:
- Use Temporary User Name and Password A username and password is required each time the computer reboots to authenticate to the network.
- Use Saved User Name and Password A username and password are not required at each reboot. Instead, authentication occurs because it uses a saved username and password.
| Step 4. | If you chose Use Temporary User Name and Password in Step 3, select one of these options (otherwise skip ahead to Step 5):
- Use Windows User Name and Password The client's Windows username and password are also used as LEAP username and password. This is the default setting.
- Automatically Prompt for LEAP User Name and Password A username and password distinct from the client's Windows username and password is used for authentication. This information is asked during the Windows login process.
- Manually Prompt for LEAP User Name and Password The client must ask for LEAP authentication.
| Step 5. | If you chose Use Saved User Name and Password in Step 3, follow these steps:
Enter a username and password. Enter the password, again, in the Confirm Password field. If necessary, enter a domain name that is passed to the RADIUS server, along with the client's username in the Domain field.
| Step 6. | If you are in an environment with multiple domains and you want your Windows login domain and username passed to the RADIUS server, check the Include Windows Logon Domain with User Name check box.
| Step 7. | To force a disassociation after the client logs off, select the No Network Connection Unless User Is Logged In check box.
| Step 8. | In the LEAP Authentication Timeout Value field, enter the amount of time (in seconds) the client waits before authentication is considered failed. This value is between 45 and 300 seconds.
| Step 9. | Click OK to save changes and take you to the previous window.
| Step 10. | Click OK to save changes and take you to the previous window.
| Step 11. | Click OK to save changes and take you to the previous window.
|
Host-based EAP To enable host-based EAP, follow these steps: Step 1. | Select Host Based EAP from the Network Security Type drop-down box on the Network Security screen.
| Step 2. | Depending on what type of EAP you plan to use, select one of the following from the radio buttons in the upper-right corner of the window shown in Figure 6-10:
If you authenticate with EAP-TLS, PEAP, or EAP-SIM, select Use Dynamic WEP Keys under WEP. If you use EAP-MD5 with static WEP to authenticate, select Use Static WEP Keys. Next, enter a static WEP key as explained in the "Configuring WEP Keys" section of this chapter. If you use EAP-MD5 without WEP, select No WEP under WEP.
Figure 6-10. Selecting WEP Options 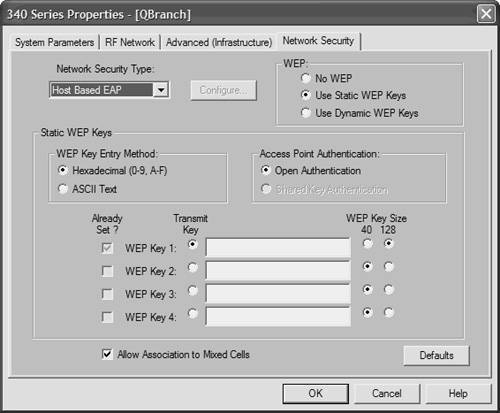
| Step 3. | Click OK to save changes and return to the previous window.
| Step 4. | Click OK to save changes and return to the previous window.
|
Configuring EAP in Windows At this point, ACU cannot configure authentication on your client. You can mitigate this and configure authentication settings on the client's operating system. Step 1. | Do one of the following (make sure you know whether the client's operating system is Windows 2000 or Windows XP):
| Step 4. | Click the Authentication tab. The screen that appears is shown in Figure 6-11.
Figure 6-11. Configuring Authentication Using Windows XP 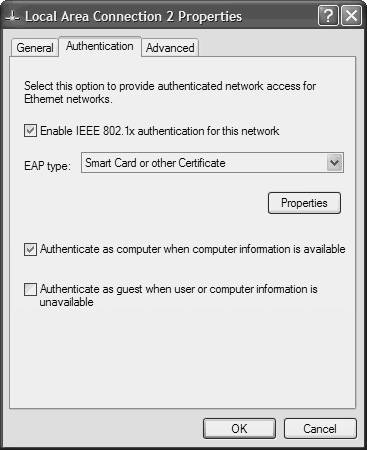
| Step 5. | Select the Enable IEEE 802.1X Authentication for This Network check box.
|
At this point, configuration branches off for each type of EAP authentication. EAP authentication methods include the following: Perform the steps outlined in the following sections based on which EAP authentication method you use. EAP-TLS Follow these steps to select EAP-TLS as your authentication method: Step 1. | Under EAP type, select Smart Card or Other Certificate.
| Step 2. | Click Properties.
| Step 3. | From the Smart Card or Other Certificate Properties screen, select Use a certificate on This Computer.
| Step 4. | Check the Validate server certificate check box.
| Step 5. | Ensure that the name of the certificate authority (CA) from which the EAP-TLS certificate was downloaded is listed in the Trusted root certificate authority field.
| Step 6. | The check box next to the CA must be selected and the user or computer's certificate must be on the machine.
| Step 7. | Click OK.
|
PEAP Follow these steps to select PEAP as your authentication method: Step 1. | Under EAP type, select PEAP.
| Step 2. | Click Properties.
| Step 3. | On the PEAP Properties screen, select the Validate Server Certificate check box if server certificate validation is required.
| Step 4. | Select the Connect only if server name ends with check box and enter the server name suffix in the text box.
| Step 5. | Ensure that the CA name from which you downloaded the server certificate is listed in the Trusted Root Certificate Authority field.
| Step 6. | Click Properties.
| Step 7. | On the Generic Token Card Properties screen, select either the Static Password (Windows NT/2000, LDAP) or the One Time Password option.
| Step 8. | If you chose One Time Password in Step 7, select one or both of the following check boxes:
- Support Hardware Token The hardware token device obtains the one-time password.
- Support Software Token The PEAP supplicant retrieves the one-time password.
| Step 9. | Click OK.
|
EAP-SIM Follow these steps to select EAP-SIM as your authentication method: Step 1. | Under EAP type, select SIM Authentication.
| Step 2. | Click Properties.
| Step 3. | For access to resources on the SIM, the EAP-SIM supplicant must provide a valid PIN to the SIM card. To indicate how the EAP-SIM supplicant should handle the SIM card's PIN, select one of the following on the SIM Authentication Properties screen:
Ask for my PIN once after I turn my computer on (recommended). Ask for my PIN every time the network asks for authentication. Let me give my PIN to the computer now and never ask me again; PIN will be encrypted and stored on computer (not recommended).
| Step 4. | Click OK.
|
Client configuration can seem like a lengthy process. However, if you understand the requirements of the client adapter and how you can configure by both the operating system and the ACU, it can be a straightforward process. |