| When you locate the network to which you want to connect, the following sections walk you through the process of configuring your client. However, different versions of your software will vary slightly. Because of this, what you have on your client might differ from what's presented here, but the steps should be similar. Profiles Profiles allow you to establish settings for different WLAN configurations without a need to reconfigure the client adapter with each change. ACU can manage up to 16 profiles. The benefit to establish different profiles is that you can have a profile for the home, one for the office, and 14 more for different environments, so you do not have to change client adapter settings each time you move to a new environment. To start the ACU's profile manager, double-click the ACU icon on your desktop (or in your Start menu), then click Profile Manager from the command drop-down menu. The Profile Manager screen appears, such as the one shown in Figure 6-3. Figure 6-3. Profile Manager 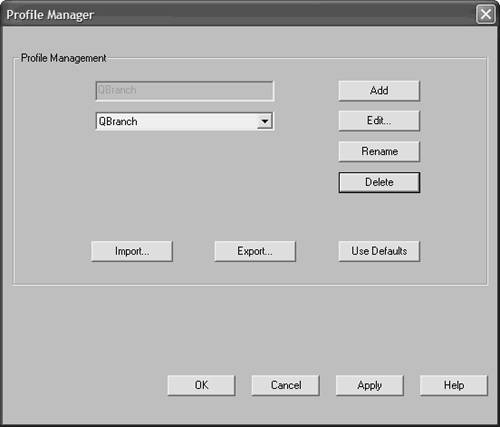
Profile Manager is used to handle many tasks as they relate to profile management, including: Creating a Profile The following steps are used to create a new profile: Step 1. | Click Add.
| Step 2. | Enter a name for your new profile and press Enter.
| Step 3. | When the Properties screen appears, do one of the following:
To use the default values for this profile, click OK. To change any of these settings, go to the "Setting System Parameters" section for steps that explain how to make changes.
| Step 4. | Click OK.
|
Selecting an Active Profile After your profiles have been created, you must select which profile to use. To do this, follow these steps: Step 1. | Open the ACU and then choose Select Profile from the command drop-down menu. Figure 6-4 shows the Select Profile screen.
Figure 6-4. Selecting a Profile 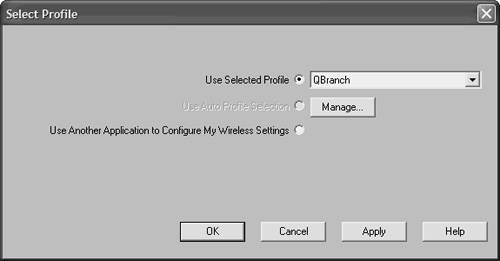
| Step 2. | Choose one of the following options:
- Use Selected Profile Allows you to select the profile you wish to use for the adapter. If you select this option, it requires the selection of a profile from the drop-down box. If the adapter is unable to associate to an AP or loses its association, it does not automatically select another profile to attempt a connection.
- Use Auto Profile Selection The adapter driver automatically selects a profile from the list. The profile used appears in the box to the right of the Use Auto Profile Selection option. In this case, if the association is not made or is lost after 10 seconds (orif Lightweight EAP LEAP is enableda time longer than that specified by the LEAP authentication timeout value in the LEAP Settings screen), the driver switches to another profile and attempts reassociation.
- Use Another Application To Configure My Wireless Settings Allows other applications, such as Windows XP, to configure the client adapter.
| Step 3. | Click OK.
|
Setting System Parameters System parameters are managed to prepare a client adapter for use in a wireless network. This screen is shown in Figure 6-5 and appears when you create a new profile, or edit an existing profile. Figure 6-5. Setting System Parameters 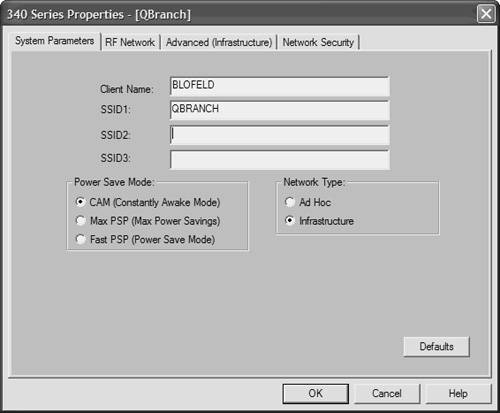
Table 6-3 describes the various parameters you can manage on this screen. Table 6-3. System Parameter SettingsParameter | Description |
|---|
Client Name | Name your client here. It allows the identification of your client on the network. It also appears on the AP's list of connected clients. | SSID1 | The service set identifier (SSID) indicates which wireless network you want to access. If this parameter is left blank, the client can associate to any AP that is configured to allow broadcast SSIDs. | SSID2 | An optional SSID that allows the client to roam to another network without the need to reconfigure the client adapter. | SSID3 | A second optional SSID that allows the client to roam to another network without the need to reconfigure the client adapter. | Power Save Mode | The power saving settings are: Constantly Awake Mode (CAM) The client is constantly powered for maximum response. This option consumes the most power. Maximum Power Savings (Max PSP) Using Max Power Save Protocol (PSP), the AP buffers incoming messages for the client. The client "wakes" up periodically and checks with the AP, which then sends for any buffered messages. This mode conserves the most power, but offers the least amount of throughput. Fast PSP (power save mode) Alternates between PSP and CAM modes, depending on network traffic. When the client receives buffered traffic, the client switches to CAM mode. When the packets are received, it switches back to PSP mode.
| Network Type | Used to specify to which type of network your adapter can connect. The options are: Ad Hoc Use this when the wireless network is comprised of a few wireless devices that are not connected to a wired LAN. Infrastructure Use this setting when you connect to a wired network through an AP.
Setting this radio button impacts the next tab, which differs based on the network type you select. You learn more about these options in the next section. |
After you choose your settings, click OK to return to the Profile Manager screen. Choosing Between Infrastructure and Ad Hoc Wireless clients can connect to a network in two ways: This section describes the two tabs on the ACU that allow you to configure your client for either infrastructure or ad hoc connections. Note The RF Network tab is not explained in this chapter because it has advanced features that will likely not change.
Advanced Infrastructure Parameters The Advanced (Infrastructure) tab is shown in Figure 6-6. This screen allows you to set parameters to control how the client operates within an infrastructure network. Figure 6-6. Advanced Infrastructure Settings 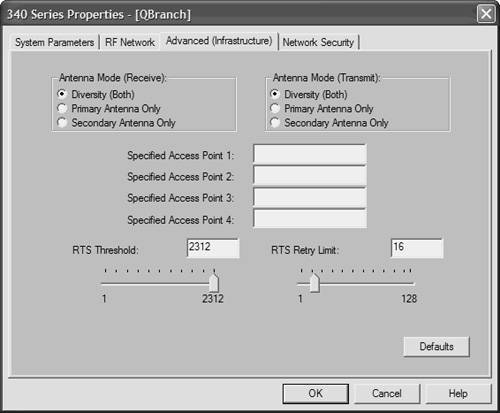
Table 6-4 describes the various parameters. Table 6-4. Advanced (Infrastructure) ParametersParameter | Description |
|---|
Antenna Mode (Receive) | Selects which antenna the client uses to receive data. The default setting uses "Diversity," which employs both antennas and is most effective, especially in environments where multipath distortion is an issue. Alternately, you can choose between the primary or secondary antennas. PCI card adapters must use only the Primary Antenna Only setting. | Antenna Mode (Transmit) | Selects which antenna the client uses to transmit data. You can select the primary, secondary, or both with the antenna's receive mode. | Specified Access Point 1-4 | Identifies the MAC addresses of up to four preferred APs. If those APs are not available, the client can associate to another AP. It's best to use these settings for APs in repeater mode. For clients operating normally, these fields should be left blank because if you specify an AP, it slows the roaming process. | RTS Threshold | Sets the size of the data packet that the RF protocol issues to a request-to-send (RTS) packet. The lower this setting, the more RTS packets are sent and the more bandwidth is consumed. However, smaller values allow the system to recover faster from interference and collisions caused by multipath distortion or obstructions. | RTS Retry Limit | Specifies the number of times the client adapter resends the RTS packet if it does not receive a clear-to-send packet from previously sent RTS packets. |
Advanced Ad Hoc Parameters If you operate in Ad Hoc mode, the Advanced (Ad Hoc) tab looks similar to the one shown in Figure 6-7. However, there are two additional settings when you connect to an ad hoc network. Table 6-5 describes these settings. Figure 6-7. Advanced Ad Hoc Settings 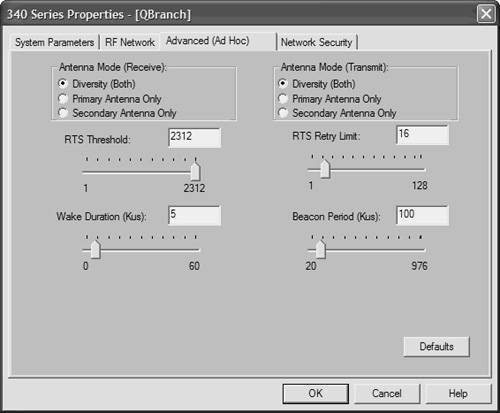
Table 6-5. Advanced (Ad Hoc) SettingsParameter | Description |
|---|
Wake Duration (Kms) | Indicates the amount of time following a beacon that the client stays awake to receive announcement traffic indication messages (ATIM). ATIMs are used by the adapter to keep it awake until the next beacon. This parameter works in conjunction with the Power Save Mode parameter in Table 6-3. When the client adapter is in CAM mode, this setting is limited to 0 Kms. In Max PSP or Fast PSP, this setting is between 560 Kms.[*] | Beacon Period (Kms) | Sets the duration of time between beacon packets. |
[*] Kms is a unit of time measurement. Where K=1024, m=106, and s=seconds. Therefore, Kms is short for 1.024 milliseconds.
|