| Wired Equivalent Privacy (WEP) keys protect your data and keep your WLAN secure at the most basic level. WEP is easy to beat, so a better option is 802.1X authentication. This section explains how you can set up either of these mechanisms on your AP. 40/64-Bit Versus 104/128-Bit Encryption Although WEP keys are not the best option for WLAN security, they are better than nothing. If you find yourself in a situation in which 802.1X authentication is not possible, you should at least use WEP keys. WEP keys come in two "strengths": 64- and 128-bit. Note WEP keys are often referred to as 40- and 104-bit, or 64- and 128-bit. The terms are interchangeable. 40-bit and 64-bit keys offer the same level of protection. So what's happening to the other 24 bits? Those "missing" 24 bits are the key's initialization vector. So, in a 64-bit WEP environment, only 40 bits are considered part of the actual key.
Ideally, you use 128-bit encryption whenever possible, because it is more difficult to break than 64-bit encryption. So why include 64-bit encryption at all? It's largely a matter of backwards compatibility with early wireless clients that supported only 64-bit encryption. In almost every case, if you have to use WEP, opt for 128-bit over 64-bit encryption. To establish a WEP setting is straightforward and you can perform it quickly with the Express Security selection on the AP configuration screen (the first screen that appears when you log onto your AP). Simply open the screen and enter your WEP key. You can perform more detailed WEP key tasks if you follow these steps: Step 1. | On the Cisco 1130AG AP, use a web browser and navigate to the device's home page.
| Step 2. | On the menu located to the left side of the window, click Security.
| Step 3. | When the Security section expands, click Encryption Manager. This spawns the screen shown in Figure 5-2.
Figure 5-2. Managing WEP Keys on the Cisco AP 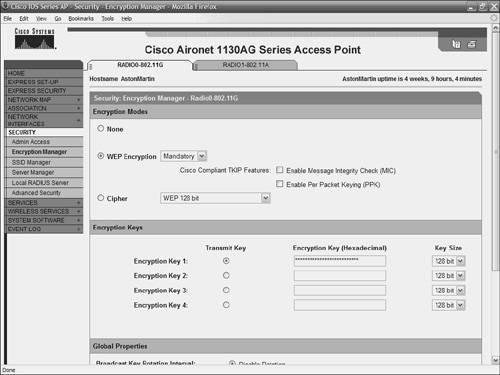
| Step 4. | This screen allows you to manage your WEP key settings:
The Encryption Modes area contains settings to disable WEP, enable WEP, or establish cipher settings. The Encryption Keys area is the section in which up to four WEP keys and their lengths are entered. For security, the WEP keys are not shown as you enter them. Because of this, it is somewhat difficult to determine if you mistype the key. Enter a key on each line if you plan on rotating through WEP keys. The Global Properties area is used to manage the behavior of your WEP keys. Here, you can select whether to rotate between keys, how long the interval is between each rotation, and how to manage keys within your group.
| Step 5. | Because the Cisco 1130 AP has both 2.4-GHz and 5-GHz radios, you can apply these settings to one radio or both radios. In this case, click Apply-Radio0 to establish these settings for the 2.4-GHz radio. Apply-All sends the settings to both radios.
|
Setting WEP Keys Using the CLI If you prefer to use the command-line interface to configure WEP keys on your Aironet AP, follow these settings: ap1130# configure terminal ap1130(config)# configure interface dot11radio 0 ap1130(config-if)# encryption vlan 07 key 1 size 128 abc123abc123abc123abc123cc transmit-key ap1130(config-ssid)# end ap1130# copy running-config startup-config
Table 5-1 explains the meaning of each command. Table 5-1. Configuration Commands for WEP Key Configuration.Command | Description |
|---|
configure terminal | Enters global configuration mode. | configure interface dot11radio {0 | 1} | Enters interface configuration mode for the radio. The 2.4-GHz radio is 0; the 5-GHz radio is 1. | encryption [vlan vlan-id] key key-number size {40 | 128} [transmit-key] | Establishes the settings for your WEP key. vlan is optional. It allows you to select the VLAN for which you wish to use the WEP key. Sets which key number you want to use. You can set up to four WEP keys. Enters the size of the WEP key. Settings are either 40- or 128-bit and contain 26 hexadecimal digits. transmit-key is optional. By default, the key in slot 1 is the default transmit key, but you can use this setting to specify which key (1 through 4) to use. | End | Returns to privileged EXEC mode. | copy running-config startup-config | An optional step that allows you to save your entries to the configuration file. |
In this example, a 128-bit WEP key was configured on the AP's 2.4-GHz radio. The keyspecified as the first keywas established as a transmit key in the 07 VLAN. 802.1X Configuration A stronger means of security is 802.1X authentication. Like most other aspects of Aironet configuration, Cisco gives you the option to set it up quickly, or really dig down into the configuration details. Note To set up 802.1X authentication, you must have a RADIUS server on your network. Without it, you cannot set up 802.1X authentication. The AP itself, or routers, can also act as RADIUS servers.
To configure 802.1X authentication, follow these steps: Step 1. | Navigate to the AP's home page.
| Step 2. | Click Express Security from the menu on the left. This calls up the screen shown in Figure 5-3.
Figure 5-3. 802.1X Input Information on the Express Security Screen. 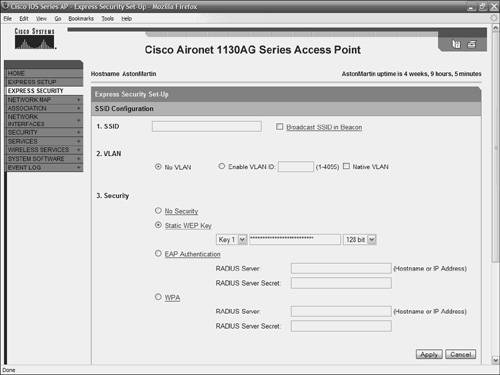
| Step 3. | In the Security area, you establish whether you want no security, a static WEP key (along with a place to enter the key), Extensible Authentication Protocol (EAP) authentication, or Wi-Fi Protected Access (WPA) authentication.
| Step 4. | To set up LEAP, Protected EAP (PEAP), EAP-Transport Layer Security (EAP-TLS), EAP-Tunneled TLS (EAP-TTLS), EAP- Generic Token Card (EAP-GTC), EAP-Subscriber Identity Module (EAP-SIM), and other 802.1X/EAP-based protocols, click the EAP Authentication radio button. To use WPA, click the WPA radio button.
| Step 5. | In the boxes next to the EAP Authentication radio button or WPA radio button, enter the name of the RADIUS server and the secret that will be shared between the AP and the RADIUS server.
| Step 6. | Click Apply.
|
These settings allow for a quick configuration of 802.1X authentication. For more control over your AP's handling of 802.1X, click Security from the menu on the left. This allows you to do such things as specify backup RADIUS servers, enable accounting, manage the authentication port, and manage several other details. 802.1X CLI Configuration If you prefer to use the command-line interface to configure authentication on your Aironet AP, follow these settings: ap1130# configure terminal ap1130(config)# interface dot11radio 0 ap1130(config-if)# ssid qbranch ap1130(config-ssid)# authentication open mac moneypenny alternate eap moneypenny ap1130(config-ssid)# authentication key-management wpa optional ap1130(config-ssid)# end ap1130# copy running-config startup-config
Table 5-2 explains these commands. Table 5-2. CLI Commands for 802.1X AuthenticationCommand | Description |
|---|
configure terminal | Enters global configuration mode. | interface dot11radio {1 | 0} | Enters the configuration mode for the radio interface. The 2.4-GHz radio is 0; the 5-GHz radio is 1. | ssid ssid-string | Create a Service Set ID (SSID) and enter configuration mode for the new SSID. | authentication open [mac-address list-name [alternate]] [eap list-name] | This step is optional. It sets the authentication type to open for this SSID. mac-address sets the SSID's authentication type to open with MAC address authentication. This requires all clients to perform MAC address authentication before joining the network. The keyword alternate is used to allow clients to join using either EAP or MAC authentication. eap sets the SSID's authentication type to open with EAP authentication. The AP requires all clients to perform EAP authentication before joining the network. For list-name, specify the authentication method list. | authentication shared [mac-address list-name] [eap list-name] | This is an optional step and is used to set the authentication type for the SSID to shared key. mac-address sets the SSID's authentication type to shared key with MAC address authentication. For list-name, enter the authentication method list. eap sets the SSID's authentication type to shared key with EAP address authentication. For list-name, enter the authentication method list. | authentication network-eap list-name [mac-address list-name] | This step is optional. It is used to set the authentication type for the SSID to Network-EAP. It is used to authenticate an EAP client with an EAP-compatible RADIUS server. The SSID's authentication type can be altered so that it also requires MAC address authentication. For list-name, enter the authentication method list. | authentication key-management {[wpa] [cckm]} [optional] | This is an optional step and is used to set the authentication type for the SSID to WPA, Cisco Centeralized Key Management (CCKM), or both. If you use the keyword optional, clients that do not use WPA or CCKM are allowed to use the SSID. However, if optional is not used, clients must use WPA or CCKM to connect. If you choose to enable CCKM for an SSID, you must also enable Network-EAP authentication. To enable WPA for an SSID, you must also enable Open authentication, Network-EAP, or both. | end | Return to privileged EXEC mode. | copy running-config startup-config | This step is optional and saves your entries in the configuration file. |
In this example, the authentication type for the SSID qbranch on the 2.4-GHz radio has been set to Network-EAP with WPA key management. Clients that use qbranch are authenticated with the moneypenny server list. |