ACCESS POINT CONFIGURATION
Up to this point, we've talked about wireless basics, concepts, company positioning, and the handful of products Cisco has to offer. In this section, however, we'll take a more hands-on approach, and actually set up and configure a WLAN.
Installing a switch or router generally means finding rack space in the server room, sliding the device in, and connecting cabling. It's somewhat of a different game for APs.
As we noted, there are two basic pieces of equipment involved in a wireless network-the AP and a wireless adapter. The wireless adapter (which we'll talk about in a few pages) is the mobile component. This is the one that you plug into a laptop and can move around your organization. With the limitation of the AP's range, that piece of hardware can be anywhere in your organization.
Conversely, to afford yourself the flexibility to have highly mobile clients, you must locate the AP in the optimal location.
Site Survey
Many organizations employ site surveys. This is an exercise in which an AP is temporarily placed and bandwidth analyzer taken throughout the office to find the best and worst spots for connectivity. Bandwidth analyzers are expensive, and if you want to do it yourself, this task is generally undertaken with a rented analyzer. However, since there is a bit of a learning curve involved with a bandwidth analyzer, it's better to hire someone with both the analyzer and the knowledge to do it for you.
When it's done, a site survey can tell you:
-
Ideal location of APs
-
Bit rates and error rates in different locations
-
Whether the amount of APs you're planning to deploy is adequate
-
The performance of applications on the WLAN
AP Placement
When conducting a site survey, the first step is to place the AP. Initially, situate the AP as close to its final position as possible. This can help solve any placement problems that could occur after the AP is finally mounted.
In most office environments, APs should be mounted at ceiling height. In warehouses and other sites with high ceilings, it's best to mount them between 15 and 25 feet.
At this height, however, you probably don't have electrical outlets conveniently located. As such, this is an excellent time to use Power over Ethernet (PoE). PoE can be added to your Cisco network using a power injector, like a line-power patch panel, and it is also part of some Cisco switches (like Catalyst switches, for example). As the name suggests, it delivers power to the downstream device using the same Ethernet cabling used to deliver data. PoE is a great option to consider when connecting remotely placed APs or when a power outlet is not conveniently located.
There's no reason that your AP has to be located on the corner of a desk or affixed to the wall. You may find it aesthetically and strategically advantageous to place your AP within the ceiling plenum. That said, you should place your antennas outside of the ceiling plenum for optimal connectivity, but the AP can certainly make that its home. If you do opt for a ceiling plenum-located device, you should select one that is designed for remote antenna configuration.
| Note | Check your local fire codes. You might need plenum-rated APs and cabling if they're to be placed above the ceiling tiles. |
Interference
Interference is a major consideration in the placement of your AP. You need to be cognizant of such sources of interference as photocopiers, microwave ovens, cordless telephones, and anything else that operates on the same frequency as your AP.
Just to make life more interesting, the 802.11g standard works in the 2.4MHz band-the same band that other unlicensed devices operate on. As such, if your office has cordless phones that operate in this band, you might encounter some interference.
Also, since WiFi has become more prevalent, you may experience problems, because a neighbor may already be using a WiFi device. If this is the case, you might need to change channels.
Saying that 802.11g networks offer 11 channels is somewhat misleading. With 802.11g networks, it's necessary to move five complete channels away from another device to avoid interference. Normally, 802.11g networks operate on channels 1, 6, and 11. 802.11a networks, on the other hand, have more usable channels from which to choose, so you have more options if a neighbor is using 802.11a gear.
After you perform a site survey, check your error rates and connectivity. If the results aren't satisfactory, place the AP somewhere else and try again. This can be a long and somewhat tedious task, but if you approach it with an eye toward possible sources of interference and ideal placement, you should be able to locate the best site for your AP reasonably quickly.
Initial Settings
Setting up an AP might seem like it should be a daunting task-after all we're mixing computer networking with radio transceivers, so there are two sciences we're combining. Truth be told, you can make wireless networking as complex as you want.
Cisco Aironet APs allow you to get extremely granular with your settings for both network and radio transceiver functions. You can manage the size of packets, the transmission power, and a host of other settings. These details are managed through many, many subpages on the Aironet configuration page.
Happily, however, Cisco has made their APs not only powerful, but easy to use as well. The APs can be easily set up and routinely managed using two express setup pages.
In this section, we'll cover those initial setup pages. However, if you need more detailed and powerful control of the AP, those are a little outside the scope of what we're covering here-you can find out about those settings at Cisco's Web site.
Express Setup
The Express Setup page is accessed by opening a Web browser and entering the IP address of your AP. When you first log on to your AP, you'll see a status page like the one shown in Figure 8-11.
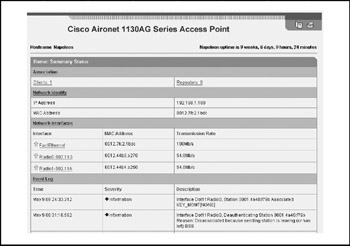
Figure 8-11: Once logged onto a Cisco AP, the home page shows you an overview of device settings
For our example, we're using a Cisco Aironet 1130AG AP. This tells us how many clients are associated (connected) to the AP, the AP's IP address, the status of its network interfaces, an event log, and so forth.
To get to the Express Setup page, click the link on the left side of this screen. The resulting Express Setup page is shown in Figure 8-12.
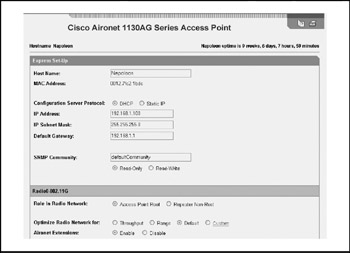
Figure 8-12: The AP's Express Setup page allows management of the most prevalent AP settings
This page allows you to manage such details as:
-
Host name.
-
How the AP's IP address is acquired, whether through dynamic host configuration protocol (DHCP) or statically.
-
The device's IP address.
-
IP subnet mask.
-
Default gateway.
-
SNMP community.
-
Whether the AP is an AP root or a repeater.
-
Options for AP performance optimization.
-
Whether Aironet Extensions are enabled or disabled. Enabling Aironet
Extensions is ideal if yours is an all-Cisco environment.
| Note | Aironet Extensions provide enhanced capabilities when other Aironet devices are used. However, in environments where other wireless products are used, it's best not to enable Aironet Extensions. |
When you've entered or configured all this information, click the Apply button in the lower-right corner of this page and the settings will be applied to the AP.
Express Security
Security is such an important issue in internetworking in general and wireless networking in particular that Cisco has dedicated a second express page to the management of your AP's security. It is managed through the Express Security page.
Like Express Setup, this screen is used to quickly and easily manage the functions of your AP's security. The details can be managed in more depth from elsewhere on the device, but for initial setup, this is a convenient place to go.
Figure 8-13 shows this page, which is accessed through a link on the left side of the Aironet AP's configuration pages. You can access this page from anywhere in your AP's configuration by clicking the link at the left.
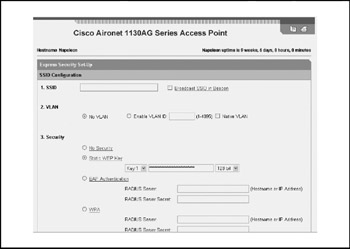
Figure 8-13: An Aironet AP's Express Security page allows management of security settings
This page allows you to:
-
Establish your AP's Security Set Identifiers (SSIDs). SSIDs indicate which wireless network an AP is part of.
-
Enable and specify VLANs.
-
Set up security protocols:
-
WEP (including specifying WEP keys).
-
WPA.
-
02.1X.
-
View a table showing your AP's SSIDs.
This page is a quick way to set up the initial WEP keys and to select between different security features that you would have to establish elsewhere in your AP's configuration file.
Let's talk about how you can set up and manage the two most prevalent forms of AP security WEP keys: WPA, and 802.1x.
Security
The easiest and most basic security measure (and also the least secure) on an AP is the WEP key. This is a series of alphanumeric characters entered into both the AP and your client. When a client tries to connect to the AP, it must have the correct key or it will be unable to connect. While this shouldn't be your sole means of security, it should at least be set if no other security measures are in place.
| Note | WEP keys are weak and easily broken. That said, enabling WEP is better than nothing. Believe it or not, many organizations don't set any sort of security mechanism, providing an open door into their network. You should enable WPA or 802.1x. Failing that, at the very least, enable WEP. |
WEP Keys
You can perform more detailed WEP key tasks by following these steps:
-
On the Aironet 1130AG AP, click Security on the left side of the window.
-
When the Security section expands, click Encryption Manager. This displays the screen shown in Figure 8-14.
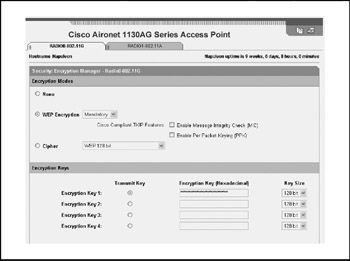
Figure 8-14: The Encryption Manager is used to set up and manage your AP's encryption -
This screen allows you to manage your WEP key settings:
-
Encryption Mode contains settings to disable WEP, enable WEP, or establish cipher settings.
-
Encryption Keys is the section in which up to four WEP keys and their lengths are entered. The WEP keys are not shown as you enter them. This is a security measure, but it also makes it difficult to tell if you've mistyped a character. Enter a key on each line if you plan on rotating through WEP keys.
-
Global Properties is used to manage the behavior of your WEP keys. Here, you can select whether to rotate between keys and how long the interval is between each rotation and how keys are to be managed within your group.
-
-
Since the Aironet 1130AG AP has both 2.4and 5-GHz radios, these settings can be applied to either radio or both. In this case, clicking Apply-Radio0 would establish these settings for the 2.4-GHz radio. Clicking Apply-All sends the settings to both radios.
WPA
To answer the shortcomings of WEP, WiFi Protected Access (WPA) was introduced by the WiFi Alliance in 2003.
WPA combines both authentication (using an authentication server) and encryption to secure the connection. WPA enhanced WEP by using automatically changing encryption keys, using the Temporal Key Integrity Protocol (TKIP).
There are two flavors of WPA that you might hear about: WPA and WPA2. For the most part, they provide the same functionality. The main difference between the two is the encryption method used. WPA uses an RC4 stream cipher, employing a 128-bit key and a 48-bit initialization vector (IV). When an IV (the larger the better) is used in conjunction with TKIP's key rotation mechanism, it becomes harder and harder to compromise the system's encryption.
WPA2 replaces RD4 with AES, which is a beefier encryption method. Whether WPA2 is available on your clients and APs will depend on which firmware version you are using.
| Note | WPA was designed as an intermediate step toward 802.1x authentication. One of the main reasons was that the development and finalization of 802.1x took much longer than anticipated, and during that time, organizations became more and more worried about security weaknesses. |
WPA also made wireless transmissions more resilient. Not only does the system provide authentication and encryption, but it also improves a payload's integrity. The cyclic redundancy check (CRC) in WEP is insecure, and it is possible to alter the payload or update the message CRC without first knowing the WEP key. WPA uses a message integrity code (MIC). The MIC used in WPA utilizes a frame counter, preventing replay attacks, which is another weakness of WEP.
Let's take a walk through the process of setting up WPA on your AP. Before we begin, however, we're making the assumption that you have a working LEAP, EAP, or PEAP configuration.
To start, navigate to your APs Encryption Manager. We're using a Cisco Aironet 1130AG AP. These steps will be similar to whatever Cisco AP you're using, but don't be surprised if there are some subtle differences based on your AP model and what firmware version it's running.
The Encryption Manager, shown in Figure 8-14, is accessed from the AP's home page by selecting Security | Encryption Manager.
From there, follow these steps:
-
Select the Cipher option.
-
Select TKIP from the drop-down menu.
-
Clear Encryption Key 1.
-
Select the Transmit Key option next to Encryption Key 2.
These results of these steps are shown in Figure 8-15.
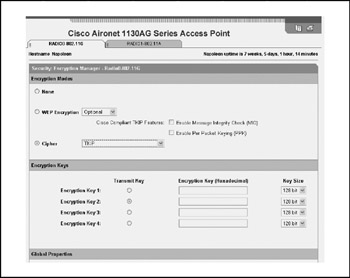
Figure 8-15: WPA can be configured on the Encryption Manager page -
Click the Apply-Radio# button at the bottom of the page.
-
The SSID Manager must be set up next. On the leftmost menu, select SSID Manager.
The SSID Manager is shown in Figure 8-16.
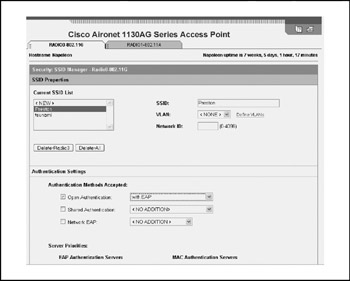
Figure 8-16: The SSID Manager can be configured by selecting it from the Security menu on the left of the page -
Select the desired SSID from Current SSID List.
-
Based on what type of clients will be connecting to the AP, select the authentication method to use. Table 8-4 lists the types of clients and what selection you should choose.
Table 8-4: Authentication Methods for Client Types Client Type
Authentication Method
Cisco clients
Use Network-EAP
Third-party clients, including Cisco Compatible Extension (CCX) clients
Use Open Authentication with EAP
Both Cisco and third-party clients
Use both Network-EAP and Open Authentication with EAP
-
Under Authenticated Key Management, choose Mandatory from the dropdown menu.
-
Select the WPA check box.
-
Click Apply-Radio# at the bottom of the page.
WPA configuration can be verified by clicking Association from the leftmost menu on your AP's home page, and then clicking the client's MAC address. If WPA has been properly configured, TKIP will be displayed.
802.1x
WEP is quick and easy, but it can also be cracked by a dedicated hacker. 802.1x authentication provides a stronger means of security.
| Note | In order to set up 802.1x authentication, you must have a RADIUS server on your network. |
To configure 802.1x authentication, follow these steps:
-
Click Express Security from the menu on the left of the AP's configuration screen.
-
Under Security, you establish whether you want no security, a static WEP key (along with a place to enter the key), EAP authentication, or WPA authentication.
-
To set up LEAP, PEAP, EAP-TLS, EAP-TTLS, EAP-GTC, EAP-SIM, and other 802.1x/EAP-based protocols, click the relevant option next to EAP Authentication. To use WPA, click the WPA Authentication option.
-
In the boxes next to EAP Authentication or WPA Authentication, enter the name of the RADIUS server and the secret that will be shared between the AP and the RADIUS server.
-
Click Apply.
These settings allow for a quick configuration of 802.1x authentication. For more control over your AP's handling of 802.1x, click Security from the menu on the left. This allows you to do such things as specify back up RADIUS servers, enable accounting, manage the authentication port, and several other details.
Antenna Placement
There are two types of AP-one that employs internal antennas (like the Aironet 1130AG AP) and one that uses external antennas (like the Aironet 1240AG AP).
Those requiring external antennas aren't designed that way to be inconvenient; rather, they provide greater flexibility in their use and deployment. That said, there are some important considerations to keep in mind when connecting an external antenna to your AP: The antenna should be located as closely to the AP as possible. The further the antenna is from the AP, the more signal reduction you can expect. For example, if you are placing antennas to cover an outside courtyard, don't place the AP in the server closet inside the building. In this case, it's best to place the AP outside in a weatherproof housing (or buy a weatherproof AP from the start), so it'll be closer to the antenna.
The type of antenna cabling you use is also important. Signal loss will be affected by the type of cabling you use. You can expect about 6 dB of loss for every 100 feet of cable. The thicker cable you use, the better. The trade-off, however, is that thicker cable costs more money and is more difficult to run.
The type of wireless AP you use will also be a factor. If you are using an 802.11a AP, cable loss will become more significant because cable loss increases with higher frequencies. As such, you can expect more loss between antennas with an 802.11a AP than you would with an 802.11g AP.
EAN: 2147483647
Pages: 102