2.4. Checking Spelling Spelling errors are never a good thing. At best, they can give your audience the impression that you don't pay attention to details. At worst, they can actually prevent your audience from understanding what you're talking about. And make no mistake about it: the typo that no one but the former English teacher noticed when it appeared on a hard-copy handout is obvious to everyone when it's four feet high and splashed across a projector screen.
Note: Spell checkers' suggestions aren't always right, and they can miss errors, too. What's more, studies suggest that some folks actually make more mistakes when they use spell checkers than when they don't because they rely on the tool instead of their own proofreading skills. A spell checker can be a timesaver, but it's no substitute for carefully reading through your presentation.
PowerPoint gives you two choices when it comes to spell checking your presentation. You can check as you go, automatically, or wait until you're finished with your presentation and then run the check manually. 2.4.1. 2.4.1.1. Setting up spelling Whether you choose automatic spell checking or manual, you want to give PowerPoint a heads-up on what kinds of special words to look out forwords like company-specific acronyms, passwords, or other non-words that you want PowerPoint to skip during a spell check. To set spelling options: -
Select Office button  PowerPoint Options . PowerPoint Options . The PowerPoint Options window appears. -
On the left side of the PowerPoint Options window, click the Proofing category to select it . -
Turn on the checkbox next to one or more of the following: -
Ignore words in UPPERCASE . You want to choose this option if you use a lot of acronyms, like FUBAR. -
Ignore words that contain numbers . This option is useful if, say, you're a system administrator who peppers presentations with passwords like edgar123 . -
Ignore Internet and file addresses . This option tells the spell checker not to flag computer-era "words" such as www.oreilly.com and myFile.txt . -
Flag repeated words . Catches mistakes mistakes that the human eye often misses. -
Click OK . The PowerPoint Options window disappears, returning you to your slides. WORD TO THE WISE
Contextual Spelling (And Why It's Not Reliable, Either) | | Spell checking is great for catching misspelled words (such as mispelled ). But it's useless when it comes to catching misused words, which are at least as common asand can tarnish your well-polished presentation even more thanglaring typos. Take, for example, the phrase more then this . Because then is a legitimate , correctly spelled word, the PowerPoint spell checker doesn't flag it and suggest the correct word for this phrase, than . PowerPoint does offer an option called contextual spelling which can help catch this sort of grammar error. When you turn on contextual spelling, the PowerPoint spell checker examines words in the context of their neighbors to see if it can spot common grammar mistakes. For example, the spell checker correctly flags then in the phrase More then this . It even suggests than , which is in fact the correct spelling. As long as you're aware that no contextual spell checker can catch every grammatical error. Here's how to turn it on: Choose Office PowerPoint Options Proofing, turn on the checkbox next to "Use contextual spelling," and then click OK. |
2.4.1.2. Automatic (continuous) spell checking Out of the box, PowerPoint assumes you want it to flag misspelled words automatically, as you type, by underlining them with a wavy red line. Figure 2-7 shows you an example
Note: If you see an obvious misspelling on a slide but don't see a wavy underline, someone turned off automatic spell checking. To turn it on again, select Office PowerPoint Options Proofing. Then make sure the radio box next to "Check spelling as you type is turned on , and the one next to "Hide spelling errors" is turned off .
To correct a misspelling, right-click the misspelled word. 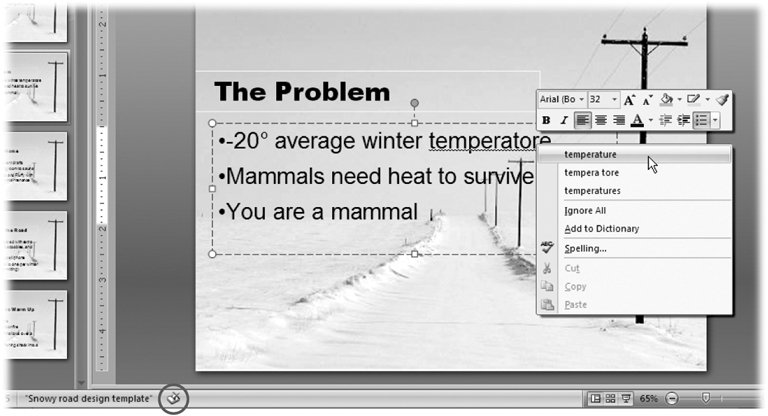 | Figure 2-7. The misspelling icon in the status bar and the wavy line you see underneath "temperatore" is PowerPoint's way of letting you know that it doesn't recognize the word. (In other words, "temperatore" doesn't appear in PowerPoint's built-in dictionary.) To tell PowerPoint to recognize a particular spelling in the future, or to display any of the other options you see here, right-click the misspelled word. | |
Note: PowerPoint's spell checker examines WordArt and charts , but ignores misspellings in any pictures (such as bitmaps) or graphs that you add to your slides.
From the context menu that appears (Figure 2-7), click to choose one of the following options: -
One of the suggested correct spellings . (In the example in Figure 2-7, the suggested correct spellings are temperature, tempera tore , and temperatures ). Power-Point's built-in dictionary contains quite a few common words, so unless you're using trademarked names or jargon, chances are good you'll find the correct spelling listed for the word you've misspelled. When you choose a word, the context menu disappears. On the slide, PowerPoint replaces the misspelled version with the corrected version you chose. -
Ignore All . Tells PowerPoint to ignore this misspelled word each time it encounters it in this presentation. Choose this option when you're using an "illegitimate" word that you don't want PowerPoint to recognize a year from now, such as company-specific code name you know will be retired after the presentation you're currently working on. When you choose this option, the context menu disappears, as does the red wavy line beneath the misspelled word. PowerPoint doesn't flag additional occurrences of the misspelling (if it encounters them) in this presentation. -
Add to Dictionary . Tells PowerPoint to ignore this particular spelling when it appears in any presentation (technically, any presentation to which you've attached a custom dictionary; see the box in Section 2.4.1.3 for more information). This is the option you want to use for teachers ' names, company acronyms, and other words you know you'll be using in more than one presentation. When you choose this option, the context menu disappears, as does the red wavy line beneath the misspelled word. PowerPoint doesn't flag additional occurrences of this new word ( assuming it encounters them) in any presentation. -
Spelling . Tells PowerPoint to display the Spelling dialog box shown in Figure 2-8. 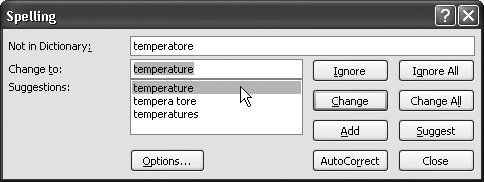 | Figure 2-8. The options you can choose from in this dialog box change depending on whether or not you've selected a suggested spelling. Here, the suggested spelling temperature is selected, so Power-Point activates all of the options. If you don't select a suggested spelling, then the only available options are Resume, Ignore All, Add, Suggest, Options, and Close. | |
In the Spelling dialog box, you tell PowerPoint how to handle the misspelled word. Your options include: -
Ignore . Tells PowerPoint to ignore this particular occurrence of the misspelling, but to highlight any additional occurrences it finds in this presentation. -
Ignore All . Tells PowerPoint to ignore every existing occurrence of the misspelling in this presentation. -
Change . Tells PowerPoint to swap the selected suggestion (in Figure 2-8, temperature ) for this particular occurrence of the misspelling. -
Change All . Tells PowerPoint to swap the selected suggestion for every existing occurrence of the misspelling. -
Add . Tells PowerPoint to add the "misspelled" word to the custom dictionary you choose (see box below). -
Suggest . Tells PowerPoint to cough up additional suggested spellings. -
AutoCorrect . Tells PowerPoint to keep an eye out for this misspelling in the future, and automatically substitute the selected suggestion if you misspell the same word the same way again. -
Close . Closes the Spelling dialog box without taking any additional action. -
Options . Tells PowerPoint to display the PowerPoint Options window, which lets you customize the way PowerPoint checks spelling. POWER USERS' CLINIC
Cleaning up the Custom Dictionary | | PowerPoint uses two separate dictionaries to check your spelling: a "real" dictionary (one that you can't change) and a custom dictionary (one called custom.dic that you can change). Say, for example, that you accidentally added the word persnicketty to the custom dictionary when what you wanted to add was persnickety . In PowerPoint 2007, the process of cleaning up erroneous custom spellings is easier than in previous versions. To delete a word from custom.dic , follow these steps: -
Choose Office button PowerPoint Options. -
Select Custom Dictionaries. -
In the Custom Dictionaries dialog box that pops up, make sure the checkbox next to the custom dictionary you want to use is turned on, and then click Edit Word List. -
In the dialog box that appears, click to select the word(s) you want to delete, and then click Delete to get rid of the word and OK to dismiss the dialog box. |
2.4.1.3. Manual spell checking Some folks find automatic spell checking (Section 2.4.1.2) more distracting than helpful. They either resent those wavy red underlines distracting them while they're busy trying to concentrate, or they just get so used to seeing the underlines that they ignore them and end up leaving in misspellings. If either of these reactions sounds familiar, you'll want to turn off automatic spell checking and run the tool yourself, when you've finished composing your text and are ready to begin proofreading in earnest. To turn off automatic spell checking: -
Select Office button PowerPoint Options Proofing . The PowerPoint Options window (Figure 2-9) appears showing all the spelling and automatic spelling options.  | Figure 2-9. The options you set here in the PowerPoint Options window are divided into labeled sections. Some settings (such as whether or not you want the spell checker to flag repeated words) affect all Microsoft Office programs; others (such as whether or not you want automatic spell checking turned on) affect PowerPoint only. | | -
Turn off the checkbox next to "Check spelling as you type" and then click OK . The PowerPoint Options window disappears. To check the spelling of your presentation manually: -
Click the Review tab . The reviewing tools appear (Figure 2-10).  | Figure 2-10. The Review tab shows you all the options you're likely to need after you've finished creating your presentation, when you're ready to read through and tweak it. To bypass the Review tab altogether and skip directly to the Spelling window, press F7. | | -
Click Spelling . Up pops the Spelling window shown back in Figure 2-8. -
Spell check your presentation following the instructions in Section 2.4.1 .  |