Managing Policy Objects
| Now that we have an idea of what policy is and what it can do for you, let's take a look at how to implement it in your network. Fortunately, Microsoft has supplied a multitude of management features for GPOs, such as inheritance, filtering, and blocking, which we cover in the next sections. Linking GPOsWhen we created the GPO in Step by Step 9.3, we actually performed two operations. We created the GPO and we linked it to the domain. As we saw earlier, all GPOs are stored in Active Directory in a central location. By keeping all the GPOs in a single location, they are easier to manage. When we want to apply a GPO to a domain site or OU, we link it to that object. By default, only members of the Enterprise or Domain Admins groups can link GPOs to a domain or OU, and only Enterprise Admins can link GPOs to sites. Members of the Group Policy Creator Owners group can create GPOs; however, they cannot link them to an object. Note: Disabling a Link If a GPO no longer should be applied to an object, but is still being used for other objects, you can unlink it. If you already have a GPO in place that you want to use for an additional OU, you can link it to that OU. In Step by Step 9.4, we will link our Rename Guest Account GPO to the Kansas City OU we created in a previous exercise.
Note: Containers? If you look closely in the left pane of the Active Directory Users and Computers MMC, you will notice that all the folder icons are not the same. Some icons are plainthese are containers. The other icons have an open folder label on themthese are OUs. Most of the containers are automatically created by the operating system, and some of them, such as the Users or Computers containers, cannot be linked to GPOs. Linking GPOs is handy for a variety of reasons. For example, suppose that you have a test OU where you keep your test servers. Part of your testing is to create suitable GPOs to manage these servers. When testing is complete, you can move the servers to your production OU. Instead of manually copying the settings from your test GPOs, you can link them to the production GPO. Default Group Policy ObjectsWindows Server 2003 comes with two default GPOs:
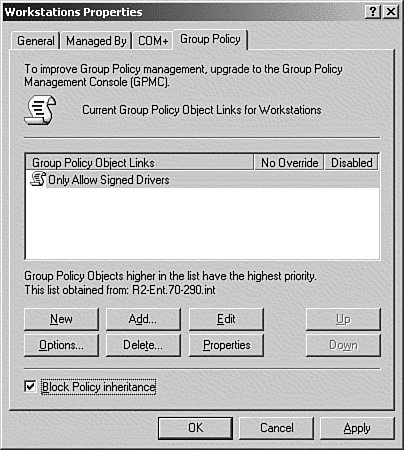
It's best to not edit the default GPOs. Any changes should be implemented in new GPOs. Group Policy InheritanceGroup Policy in Windows 2003 works according to the hierarchy of site What this means is that if you apply a GPO for a site, it will apply to everything in that site. If you apply a GPO to a domain, both the site and the domain GPOs will be applied. This continues down the hierarchy of OUs. For example, take a look at the OU structure in Figure 9.9 that we created in Chapter 2. Figure 9.9. The OU hierarchy. When we get to the bottom of our hierarchy, at the Users OU, we could potentially have applied at least four GPOsone each at the site, domain, Kansas City OU, and the Users OU levels. Note: Active Directory Sites Sites are handled a little differently from other objects in AD, because they are a physical object and can contain resources from several domains. When an OU is linked to a site, the properties of the OU affect all resources in the site, regardless of their domain membership. This process is called Inheritance. The Active Directory objects lower in the hierarchy inherit the settings from those higher in the hierarchy. In addition to inheritance, an Active Directory container can have multiple GPOs linked to it. In addition to the SDOU order, the GPOs linked to the container can be assigned in order. This is configured from the Properties dialog box on the Group Policy tab of the OU, as shown in Figure 9.10. Figure 9.10. Setting GPO priority. As you can see in the figure, changing the priority of the GPOs is a simple as clicking a button. Blocking Group Policy InheritanceAlthough inheritance might sound like a good thing in theory, in practice it can get quite messy. For example, what if you want the users in the Users OU to have different settings from those at the domain level? Or what if you as the system administrator have delegated the management of the Kansas City OU to a junior administrator in that location, and she insists on changing the corporate settings? In these situations, you have the option of modifying the standard inheritance rules for specific GPOs. The first option is to Block Policy Inheritance. This option is set on a per-container basis and will block the inheritance of all policies. It's strictly an all-or-nothing solution. In Step by Step 9.2 and 9.3, we implemented both a Local and a Group Policy to rename the Guest account. As we left things in Step by Step 9.3, there is a GPO at the domain level that is Renaming the Guest account. In Step by Step 9.5, we will put our member server or workstation in the workstations OU and block inheritance, so that the GPO is not in effect.
The Block Policy Inheritance option is useful for situations where the objects in a container require unique settings, and you want to ensure that those settings are not in conflict with inherited settings. In addition, this option can be used when a local administrator is responsible for managing an OU, and she prefers to control her own Group Policy configurations. However, even when Block Policy Inheritance is turned on, it cannot block the inheritance of a GPO that has the No Override option turned on. We'll look at enforcing Group Policy in the next section.
Enforcing Group PolicyThe second way to control Group Policy Inheritance is to select the No Override option. This option is used to prevent a child container from blocking the application of a GPO that is inherited from the parent. Unlike the all or nothing of the Block Policy Inheritance option, the No Override option is set on a per-GPO basis. Note: Enforced The No Override option is renamed to Enforced after the Group Policy Management Console (GPMC) is installed. The No Override option allows the administrator to enforce specific settings, possibly companywide configuration settings that should take precedence over anything else. A GPO that has the No Override option turned on will take precedence over the settings in the child container, even though traditionally the child settings would take precedence. On GPOs with the No Override setting enabled, the Block Inheritance setting is ignored. In Step by Step 9.6, we continue our scenario using the Rename Guest Account GPO. This time we set the No Override option to force the setting in the Kansas City\Workstations OU.
Group Policy Management ConsoleThe Group Policy Management Console (GPMC) is a free add-on from Microsoft that can be downloaded from the website at http://www.microsoft.com/downloads/details.aspx?FamilyId=0A6D4C24-8CBD-4B35-9272-DD3CBFC81887&displaylang=en. The GPMC allows you to manage your GPOs via a GUI interface in a more intuitive manner with more functionality than the tools we have been using so far in this chapter. The GPMC can be installed on either Windows Server 2003 or Windows XP SP1 and can be used to manage GPOs in either a Windows 2000 or a Windows Server 2003 domain. After the GPMC is installed, the Group Policy tab that we've been using in the Active Directory Users and Computers MMC is replaced with a message and a button that opens the GPMC, as shown in Figure 9.13. Figure 9.13. Click to open the GPMC. After the GPMC is installed, it can be opened directly by selecting the Group Policy Management icon in the Administrative Tools folder. Exam Alert: To Study or Not to Study? As this book was going to press, Windows Server 2003 SP2 is being released, and the GPMC was not included in it. It is still just an add-on downloadable from the web. However, it has been added to the exam. We will cover both methods of working with GPOs in this book. As you can see in Figure 9.14, the GPMC allows you not only to see all of the OUs and GPOs in your domain, but it displays every domain in the forest. If you have the proper permissions, you can copy, back up, restore, import, and link GPOs between and across domains. Another point of interest is the display of the Group Policy Objects container. The GPO container holds all the GPOs in the domain. If you look at the icons for the other GPOs shown in the console, you will notice that they are linked to the other containers. Previously, we knew that the GPO container existed, but it was just a logical entity. We couldn't see itnow we can. Figure 9.14. The GPMC, showing the forest view. In effect, all the logical things we discussed about Group Policy are now visible. To find out more about the Group Policy Management Console, consult the online help for the GPMC, and read the GPMC white papers available at http://www.microsoft.com/windowsserver2003/gpmc/default.mspx. Group Policy FilteringIn Windows Server 2003, the default is for all objects in the container to be affected by all GPOs that are applied to that container. However, there will be situations where you will want some GPOs to apply only to certain users, computers, or groups. This process is called Group Policy Filtering. Group Policy Filtering works by applying permissions on the GPO so that it can be used only by certain users, computers, or groups. For a Group Policy to be applied to an object, that object must have at least Read permissions for the GPO. The default permissions for a GPO are the following:
As you can see, because the Authenticated Users group has Read and Apply permissions on all GPOs, they apply by default to everything on the network. There are two ways to filter GPOs:
Either method works the same in practice; it's strictly a matter of preference. In Step by Step 9.7, we will use the Group Policy Management Console to use the Explicitly Deny method to keep the Rename Guest Account GPO from being applied to our member server or workstation.
|

 domain


EAN: 2147483647
Pages: 219