| When you publish HTML for displaying movies in a Web page, you need to think in terms of three windows : -
The browser window contains the entire Web page. -
Within the browser window is a movie-display window (created by the OBJECT , EMBED , and IMG tags), where the Flash plug-in displays a Flash movie. -
Inside the movie-display window is the actual movie window . Each of the three windows has its own dimensions, and you need to tell Flash where to put the windows and how to handle them if their aspect ratios differ , for example, or when a user resizes the browser window. You instruct browsers on how to deal with these three windows by choosing settings in the HTML tab of the Publish Settings dialog box. To set the dimensions of the movie-display window: To set the width and height of the rectangle created by the OBJECT and EMBED tags for displaying your movie in the browser, from the Dimensions pop-up menu in the HTML tab of the Publish Settings dialog box (Figure 16.23), choose one of the following: -
To use the movie's dimensions (specified in the Document Properties dialog box), choose Match Movie. -
To specify the dimensions as a percentage of the browser window's dimensions, choose Percent, and type a value between 1 and 100 in the Width and Height fields. -
To specify new dimensions, choose Pixels, and type the new values in the Width and Height fields. When you define a movie-display window with a different width or height from the original Flash movie, you must tell Flash how to scale the movie to fit in that window. To scale the movie to fit a movie-display window: From the Scale pop-up menu (Figure 16.24), choose one of the following: -
To keep the movie's original aspect ratio (width to height) and resize the movie so that it fits completely within the newly specified rectangle, choose Default (Show All) (Figure 16.25). (Be aware that the resized movie may not fill the new rectangle: Gaps may appear on the sides or at the top and bottom.) Figure 16.25. This 300-by-300 pixel movie looks quite different in the different dimension-and-scale combinations. The movie-display window's dimensions and the scale setting are identified in the examples above. 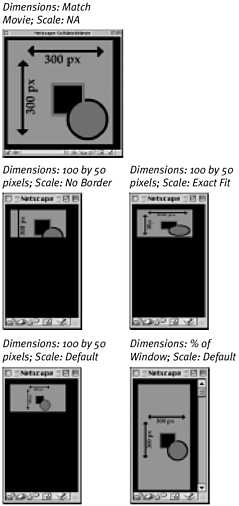 -
To keep the movie's original aspect ratio and resize the movie so that the whole new rectangle is filled with the movie, choose No Border. (Some of the movie may slop over the edges and be cropped.) -
To change the movie's height and width to the new specifications, even if it involves changing the aspect ratio and distorting the image, choose Exact Fit. -
To keep the movie at a constant size , choose No Scale. Resizing the browser window can crop the image.  Tip Tip -
If you define the movie-display window as 100 percent of the width and height of the browser window, in some browser versions, no matter how large your viewer makes the browser window, a scroll bar always appears. Setting the width and height to 95 percent (or lower) ensures that all viewers will be able to enlarge the browser window enough to eliminate the scroll bar.
To control placement of the movie window in the movie-display window: To align the movie window within the movie-display window, in the Flash Alignment section of the HTML tab of the Publish Settings dialog box, do one of the following: -
From the Horizontal pop-up menu, choose Left, Center, or Right. -
From the Vertical pop-up menu, choose Top, Center, or Bottom. Flash positions the movie within the movie-display window (Figure 16.26). Figure 16.26. The Flash Alignment section's Horizontal and Vertical pop-up menus allow you to position your movie within the movie-display window when the dimensions of that window differ from those of the movie. Compare the results of two different settings for this 300-by-300-pixel movie set inside a 200-by-100-pixel display window. The light-gray rectangle is the display window. 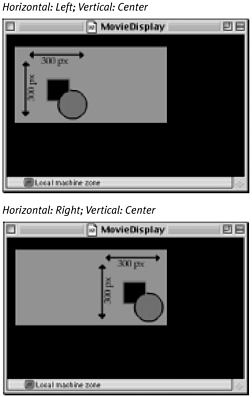 To set playback options: In the Playback section of the HTML tab of the Publish Settings dialog box, choose any of the following options: -
To make users begin the movie manually (by clicking a button or by choosing Play from the contextual menu), choose Paused At Start. -
To create a contextual menu with playback options that are available to users, choose Display Menu. -
To make the movie start over when it reaches the last frame, choose Loop. -
To speed playback on Windows systems, choose Device Font. The Device Font option allows Windows systems to substitute aliased system fonts for fonts that are not installed on the user's system. This substitution takes place only in static text blocks where you have enabled device fonts during the authoring phase. For the best viewing experience, you need to balance the image quality and playback speed of your published movie. To control antialiasing and smoothing: From the Quality pop-up menu in the HTML tab of the Publish Settings dialog box (Figure 16.27), choose one of the following options: -
Low. Flash keeps antialiasing off. -
Auto Low. Flash starts playback with antialiasing off, but if it finds that the viewer's computer and connection can handle antialiasing while keeping the movie's specified frame rate, Flash turns antialiasing on. -
Auto High. Flash turns antialiasing on to start with and turns it off if playback drops below the movie's specified frame rate. -
Medium. Taking the middle ground, Flash forgoes bitmap smoothing but does do some antialiasing. -
High. Flash uses antialiasing on everything but smooths bitmaps only if there is no animation. -
Best. Flash keeps antialiasing on. On Windows computers running Internet Explorer 4.0 with the Flash ActiveX control, Flash movies can have transparent backgrounds. To control transparency (Windows only): From the Window Mode pop-up menu, choose one of the following options: -
To play the movie in its own window within the Web page, choose Window. -
To make the transparent areas of your movie block out the background and other elements of the Web page that lie below the Flash movie, choose Opaque Windowless. -
To allow those elements to show through in any transparent areas of your movie, choose Transparent Windowless (Figure 16.28). Figure 16.28. For viewers of your movie who use Internet Explorer 4.0 with the ActiveX control on the Windows platform, you can create a transparency effect that reveals Web-page elements beneath any transparent areas of your Flash movie. In the HTML tab of the Publish Settings dialog box, set Window Mode to Transparent Windowless.  To alert users to problems with HTML: Tip -
The default HTML template automatically sets the background color of your Web page to the background color of your movie. If you want to use a different color , try creating a modified template (Figure 16.29). Open the default template, and save a copy with a new name . In the first line of code $TTFlash Only change the title to something like $TTFlash Only (MyBackground) , so that Flash recognizes and adds the template to the Template menu. In the tag <BODY bgcolor ="$BG"> , replace $BG with the HTML code for a specific hex color ( 000000 for a black background, for example). Be sure to place the new template in Flash's HTML folder (Macromedia/Flash MX/Configuration/ HTML), which you'l find in the Application Support (Mac) or Application Data (Windows) folder on the drive where you've installed Flash. Figure 16.29. The default HTMLtemplate picks up the movie's background color as the Web page's background color. You can modify a copy of the template (top). Change the Title tag, and set a specific background color (middle). The new title appears in the Template menu in the HTMLtab of the Publish Settings dialog box (bottom). 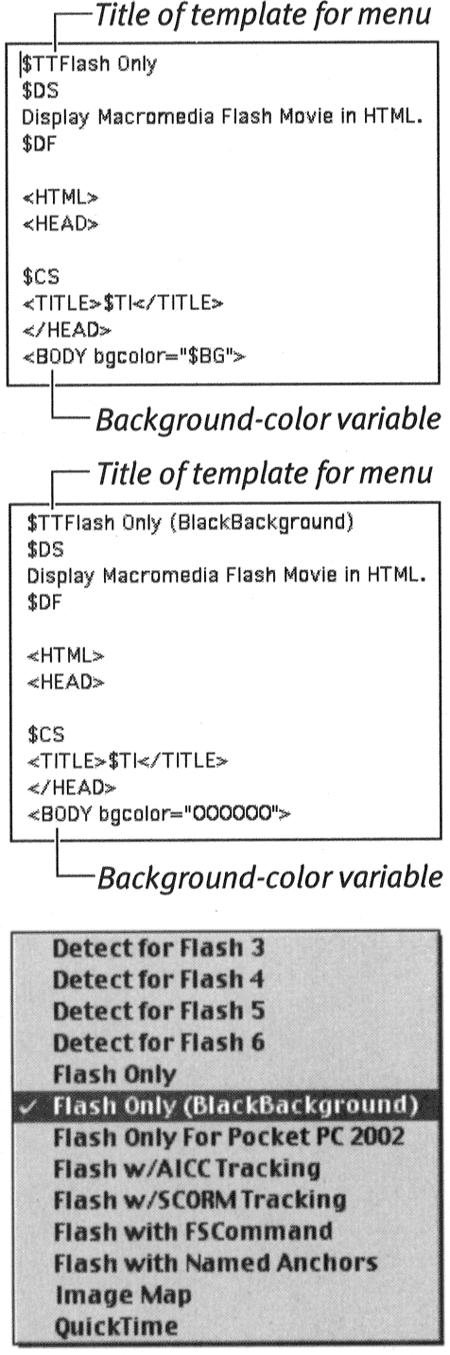
 |