Editing Bitmaps with Flash's Tools You can always edit bitmaps with an external bitmap editor, but Flash also lets you create a version of a bitmap that you can edit (to a certain degree) within Flash. First, you break the image apart; next , use the magic-wand tool to select a region of color within the image; and finally, use Flash's drawing tools to edit that region. To create a bitmap that you can edit in Flash: -
Create a new Flash document. -
Import a bitmapped graphic, using the procedures in "Importing Non-Flash Graphics" earlier in this chapter. An instance of the bitmap appears on the Stage, and Flash adds the bitmap to the library. -
Select the bitmap instance on the Stage. -
From the Modify menu, choose Break Apart (Figure 7.13). Figure 7.13. Select a bitmap; then choose Modify >Break Apart (top). Flash converts the bitmap to an editable bitmap (bottom). The editable bitmap acts like a gradient fill in that it's not a single color, but the various color areas are not vector shapes . 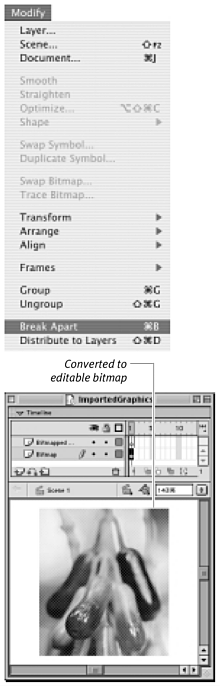 Flash converts the bitmap to a special type of graphic and selects it. Flash doesn't have a specific name for this type of graphic, but let's call it an editable bitmap. An editable bitmap is no longer a collection of individual pixels, each with its own color value; neither is it a collection of tiny vector shapes. A bitmap you've broken apart acts more or less like a single vector shape with a gradient fill. (Macromedia describes this state as being a number of discrete color areas.) If you click any area of the image now, you select the entire image. Try selecting the paint bucket tool and setting the fill color to solid red; click the image, and it becomes a red rectangle. Don't forget to undo your experiment. To select a range of colors within an editable bitmap: -
Following the steps in the preceding exercise, create an editable bitmap. -
Deselect the editable bitmap. -
In the Toolbox, select the lasso tool. -
Select the Magic Wand Properties modifier (Figure 7.14). Figure 7.14. The Magic Wand modifier of the lasso tool allows you to select regions of color within an editable bitmap. 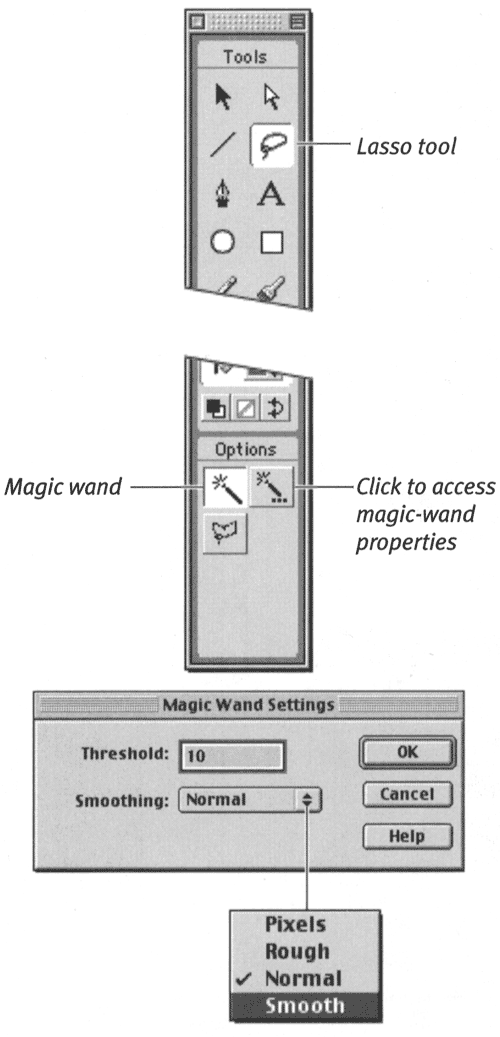 The Magic Wand Settings dialog box appears. -
In the dialog box, enter the settings for Threshold and Smoothing. The Threshold setting works the same way as the Color Threshold setting in the Trace Bitmap dialog box (described earlier in this chapter). Smoothing works similarly to the Curve Fit setting of the Trace Bitmap dialog box; it determines how smooth a vector path Flash draws when the magic wand makes a selection. -
Click OK. -
On the Stage, position the pointer over the editable bitmap. The pointer changes to a magic-wand icon. The tool's hot spot is the transparent area in the center of the starburst (Figure 7.15). Figure 7.15. Click with the magic wand's hot spot to select a region of color. The Threshold setting in the Magic Wand Settings dialog box determines how large a color range the magic wand grabs. 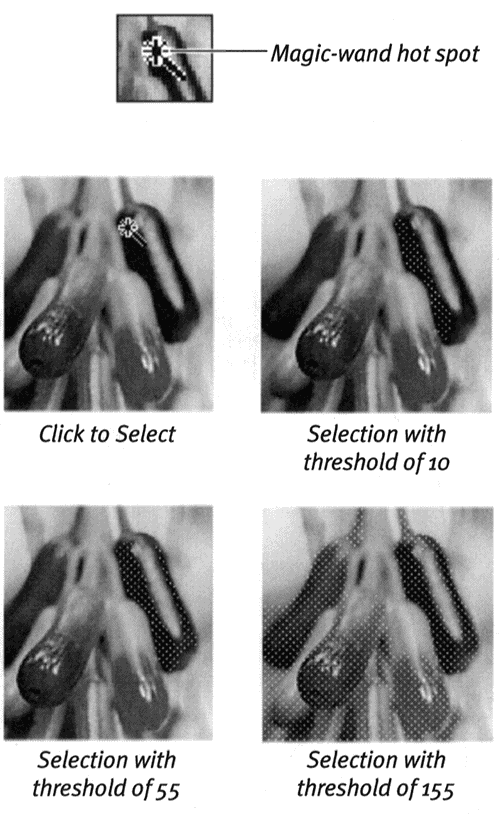 -
Click a pixel in the region you want to select. Flash selects that pixel and all the surrounding pixels that fall within the threshold you chose.  Tip Tip -
If the magic wand fails to grab the full range of colors you wanted, change Threshold to a higher number and try again. You can also add to the selection by clicking (or Shift-clicking, depending on your Preferences setting) the missed pixels.
To create areas of solid color within an editable bitmap: -
Make a selection within the editable bitmap. You can use any of the selection tools (arrow, lasso, or magic wand). The most precise way to select regions of the image is by color, using the magic wand as described in the preceding exercise. -
In the Toolbox, select the paint bucket. -
Select a new fill color. Choose one from any fill-color box's pop-up swatch set (for example, in the Toolbox or Property Inspector), or from the Color Swatches panel, or define a new color in the Color Mixer panel. Flash fills the selection with the selected color. This solid-color area is a vector shape, which you can edit just like any other shape in Flash (Figure 7.16). Figure 7.16. Filling the selection with a solid fill reduces the full range of colors to a single color. This figure uses white, because it shows up well in this grayscale image. That part of the editable bitmap then becomes an editable vector shape. 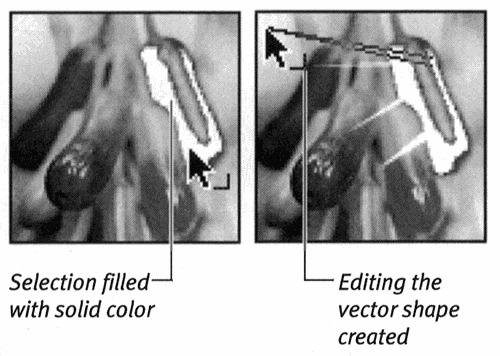 Tip -
You can use the magic wand to reduce the number of colors in an editable bitmap. Keep selecting regions of similar colors and filling them with solid color until the entire bitmapped fill consists of vector shapes filled with solid colors. Use higher Threshold settings to gather more colors in each selection. If you were to select and convert all the color regions in the editable bitmap to vector shapes, the result would be something like tracing a bitmap. The difference is that you can use this version as a tiling fill pattern; you cannot use a traced bitmap as a fill.
|