| Flash offers two commands for creating keyframes. Insert > Timeline > Blank Keyframe defines a keyframe that's empty, and Insert > Timeline > Keyframe defines a keyframe that duplicates the content of the preceding keyframe in that layer. Use the Insert > Timeline > Blank Keyframe command when you want to change the contents of the Stage completely. Use Insert > Timeline > Keyframe when you want to duplicate the content of the preceding keyframe. To add a blank keyframe to the end of your movie 1. | Create a new Flash document.
The new document by default has one layer and one blank keyframe at frame 1.
| 2. | In the Timeline, click the protoframe for frame 10 to select it.
| 3. | Choose Insert > Timeline > Blank Keyframe (Figure 8.4).
Figure 8.4. Select a frame in the Timeline (top) and then choose Insert > Timeline > Blank Keyframe (middle) to add a new blank keyframe (bottom). 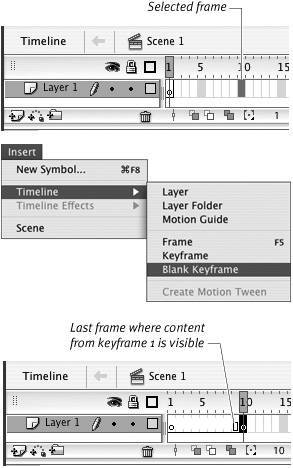
Flash revises the Timeline to give you information about the frames you've defined. A hollow rectangle appears in frame 9, and a black line separates frame 9 from frame 10. This line indicates where the content for one keyframe span ends and the content for the next keyframe begins. Flash replaces the gray bars separating protoframes 29 with gray tick marks and removes the gray highlight that appeared in every fifth frame of the undefined frames.
 Tip Tip
|
To create a blank keyframe in the middle of your movie 1. | Follow the steps in the preceding task to create a single-layer, 10-frame movie.
| 2. | In the Timeline, click frame 1 to select it.
| 3. | Draw a shape on the Stage.
Flash updates the Timeline, adding a solid bullet to frame 1 (Figure 8.5).
Figure 8.5. When you place content in a keyframe, Flash displays that frame in the Timeline with a solid bullet. The gray tint on the frames between keyframes indicates that content from the preceding keyframe appears during these frames. The hollow square indicates the end of the span of in-between frames displaying the same content. The hollow circle indicates a blank keyframe. 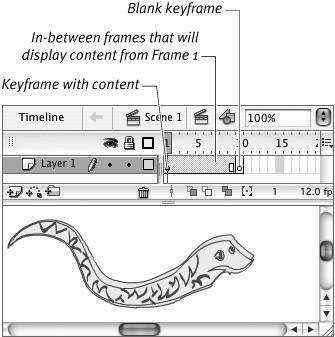
With Tinted Frames selected in the Frame View menu (Flash's default setting), Flash shades frames 19 with gray. The shading indicates that keyframe 1 has content that remains visible until frame 10 in this layer. A hollow rectangle appears in frame 9, indicating the end of the span of in-between frames that displays the content of keyframe 1.
Frame 10 still contains a hollow bullet, meaning that it has no content. (Try clicking frame 10 to see that the Stage is blank.)
| 4. | In the Timeline, in the area above the layers, click the number 5 or drag the playhead to position it in frame 5.
Flash displays frame 5 on the Stage. Notice that this in-between frame continues to display the content of the preceding keyframe, frame 1.
| 5. | Choose Insert > Timeline > Blank Keyframe.
Flash converts the selected in-between frame to a keyframe and removes all content from the Stage in that frame (Figure 8.6).
Figure 8.6. When you convert an in-between frame that displays content to a blank keyframe, Flash removes content from the Stage for that frame. Frames 69 are tinted when they display the content of frame 1 (top). When you insert a blank keyframe at frame 5 (bottom), the tint disappears, because these frames now display the content of the most recent keyframe, frame 5, which is empty. 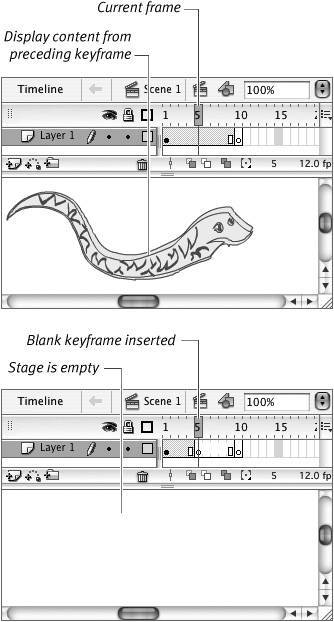
|
To duplicate the contents of the preceding keyframe 1. | Follow steps 13 in the preceding task.
You should have a document with content in keyframe 1.
| 2. | In the Timeline, select frame 3.
The playhead doesn't move into the protoframe area, but frame 3 is highlighted as the current selected frame.
| 3. | Choose Insert > Timeline > Keyframe.
Flash creates a new keyframe, duplicates the contents of frame 1 in frame 3, and places a solid bullet in the Timeline at frame 3 and a hollow rectangle in frame 2 (Figure 8.7). The content of frames 1 and 3 is totally separate. Try selecting frame 1 and making changesmove the graphic or delete it. Now select frame 3 again; it remains unchanged.
Figure 8.7. The Insert > Timeline > Keyframe command creates a keyframe that duplicates the contents of the preceding keyframe in that layer. 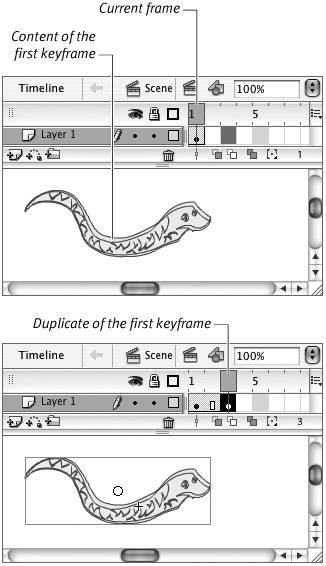
Tips The word insert used in connection with keyframes is a bit misleading. Choosing Insert > Timeline > Keyframe adds frames only if you've selected a protoframe. If you select an existing in-between frame, Insert > Timeline > Keyframe converts that frame to a keyframe and leaves the length of the movie as it was. The Insert > Timeline > Frame command always adds frames to your movie. You can't add a keyframe between back-to-back keyframes. With keyframes in frames 5 and 6, select frame 5 and choose Insert > Timeline > Blank Keyframe. The playhead moves to frame 6, but Flash doesn't add a new blank keyframe. With frame 5 selected, you must choose Insert > Timeline > Frame. Flash creates an in-between frame at frame 6. Now select frame 5 or frame 6 and choose Insert > Timeline > Blank Keyframe; Flash converts frame 6 to a keyframe.
|
Keyframe Mysteries: Insert vs. Convert In addition to the Insert > Timeline > Keyframe and Insert > Timeline > Blank Keyframe commands, Flash offers commands for converting frames to keyframes. Choose Modify > Timeline > Convert to Keyframes (or press F6) or choose Modify > Timeline> Convert to Blank Keyframes (or press F7). These conversion commands are also found in the contextual menu for framesControl-click (Mac) or right-click (Windows) a frame in the Timeline to access the menu. Whether you should insert or convert keyframes depends on how many frames you have selected when you issue the command and how many frames you want to create. The Insert commands create a single keyframe regardless of how many frames you have selected; the Modify commands create multiple keyframes, one for each selected frame. With a single frame selected, the Insert > Timeline > Keyframe command and the Modify > Timeline> Convert to Keyframe command work identically. If you select one protoframe or in-between frame, both commands transform that frame to a keyframe and duplicate the content of the preceding keyframe (if any). If you select a keyframe that is followed by an in-between frame or protoframe, both commands transform that following frame to a keyframe with the same content as the selected frame. Neither command has any effect on a selected keyframe that is followed by another keyframe. With multiple protoframes or in-between frames selected, the Insert > Timeline > Keyframe command creates a single keyframe, usually in the same frame as the playhead (if you select frames at the end of your movie, Flash places the new keyframe in the last selected frame). The remaining selected frames become in-between frames. With multiple protoframes or in-between frames selected, the Modify > Timeline> Convert to Keyframes command creates a keyframe in every selected frame. The commands for blank keyframes work similarly. Insert > Timeline > Blank Keyframe creates one keyframe in the same frame as the playhead; the remaining frames become in-between frames. Modify > Timeline> Convert to Blank Keyframe creates a blank keyframe in all the selected frames. |
|