| The subselection tool allows you to reveal and manipulate the anchor points that define a line segment or curve. You can reposition these points to modify lines and curves, and you can manipulate a point's Bézier handles to modify the slope and depth of the curve. You can add and delete points and convert existing curve points to corner points, or vice versa, with the pen tool. To view a path and anchor points 1. | In the Tools panel, choose the subselection tool, or press A (Figure 4.58).
Figure 4.58. Use the subselection tool to modify the path of a line segment. 
The pointer changes to a hollow arrow.
| 2. | On the Stage, click the line or curve you want to modify.
Flash selects and highlights the entire path and shows the anchor points. In Flash's default editing mode, anchor points appear as hollow squares in a contrasting highlight color. To manipulate a particular point, you must select it directly.
|
To select an anchor point 1. | Follow the steps in the preceding task, and then position the pointer over the middle of the highlighted path.
The anchor-point modifier (a small square) appears next to the hollow-arrow icon (Figure 4.59).
Figure 4.59. A solid square appears next to the subselection tool when it's ready to select the entire path (top). When a hollow square appears (bottom), the tool is ready to select and manipulate a single anchor point. 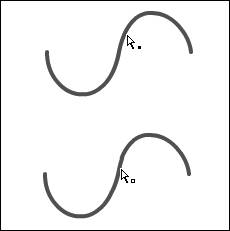
| 2. | Click an anchor point.
Flash highlights the selected point. With Drawing Preferences set to Show Solid Points, selected corner points appear as solid squares; selected curve points appear as solid circles with Bézier handles.
|
 Tips Tips
If you know where a point is in your element, you can skip the step of clicking the path to highlight all the anchor points. To select the point directly, double-click it. You can select multiple points on a path directly with the subselection tool. Draw a selection rectangle that includes the points you want to select. Flash highlights the entire path and selects any points that fall within the rectangle. To view anchor points as hollow squares and selected points as solid, you need to change Flash's editing preferences. From the Edit menu (Windows) or the Flash menu (Mac), choose Preferences to open the Preferences dialog. Choose the Drawing category, and deselect the Show Solid Points check box.
To move corner points 1. | Use the subselection tool to highlight the path and anchor points of the element you want to modify.
| 2. | Position the pointer over a corner point.
| 3. | Click and drag the desired corner point to a new location.
Flash redraws the path (Figure 4.60).
Figure 4.60. Using the subselection tool, drag a corner point to reposition it. 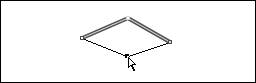
|
Tip Corner points are often easy to identify withouth highlighting the path. You can click and drag such points directly without first highlighting the path. If you don't click right on the point, however, you'll move the whole path, not just the intended point.
To move a curve point 1. | Use the subselection tool to highlight the path and anchor points of the element.
| 2. | Position the pointer over a curve point.
The anchor-point modifier appears.
| 3. | Click and drag the point to a new location (Figure 4.61).
Figure 4.61. When you select an anchor point (A), Flash highlights the entire path (B). You can drag the anchor point to modify the path (C). The path and anchor points remain highlighted when you're done (D). 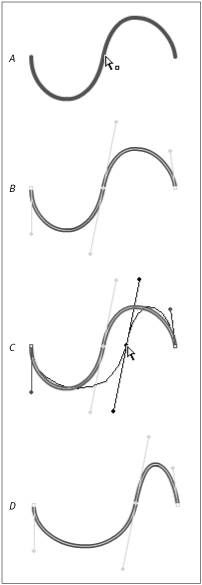
Flash previews the new curve as you drag.
After you move a curve point, the path remains selected, and the Bézier control handles become active so that you can further manipulate the curve.
|
To reshape a curve with the Bézier handles 1. | With the subselection tool, click the curve you want to modify.
| 2. | Click one of the anchor points that define the curve you want to modify.
Bézier handles appear.
| 3. | Click and drag one of the Bézier handles.
The pointer changes to an arrowhead.
| 4. | To modify the curve, do one or more of the following:
- To make the curve more pronounced, position the Bézier handle farther from the curve in the direction in which the curve bulges.
- To make the curve flatter, position the Bézier handle closer to the curve.
- To make the curve bulge in the opposite direction, move the Bézier handle past the existing curve, in the opposite direction from the current bulge.
- To make the curve deeper, position the Bézier handle farther from the anchor point.
- To make the curve shallower, position the Bézier handle closer to the anchor point.
Flash previews the new curve as you manipulate the Bézier handle (Figure 4.62).
Figure 4.62. When you select anchor points, their Bézier handles appear (A). Leaning a Bézier handle away from a curve (B) makes that curve segment more pronounced (C). Leaning the handle toward the curve flattens that part of the curve. Dragging the Bézier handle away from its anchor point (D) makes the curve deeper (E); dragging the handle toward the anchor point makes the curve shallower. 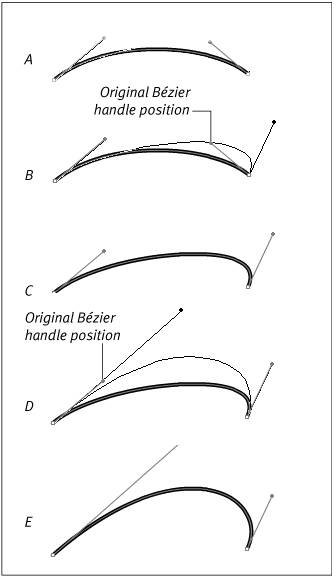
|
Tips To select an anchor point and activate its Bézier handles quickly, use the subselection tool to draw a selection rectangle around the curve you want to modify. Even if the path wasn't highlighted, Flash selects any anchor points that fall within the selection and activates their handles. You can move selected anchor points with the arrow keys. To move in larger increments, press the Shift-arrow key.
To convert corner points to curve points 1. | Using the subselection tool, click the path you want to modify.
Flash highlights the path and its anchor points.
| 2. | Position the hollow-arrow pointer over a corner point.
The anchor-point modifier appears.
| 3. | Click the anchor point to select it.
| 4. | To pull Bézier handles out of the point, Option-drag (Mac) or Alt-drag (Windows) away from the selected corner point.
Flash converts the corner point to a curve point (Figure 4.63).
Figure 4.63. To change a corner point into a curve point (one with Bézier handles) using the subselection tool, Option-drag (Mac) or Alt-drag (Windows) a selected corner point (top). You pull a Bézier handle out of the point instead of relocating the point. When you release the mouse button, Flash redraws the curve (bottom). 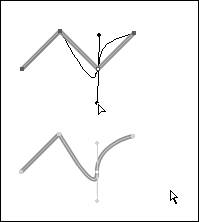
|
To convert curve points to corner points 1. | With the path you want to modify selected, in the Tools panel, choose the pen tool.
| 2. | Position the pen pointer over a curve point.
The convert-to-corner-point modifier (a small caret) appears next to the pen icon.
| 3. | Click the curve point.
Flash converts the curve point to a corner point and flattens the curved path (Figure 4.64).
Figure 4.64. When you position the pen tool over a curve point, a small caret appears next to the pointer (top). With the caret modifier active, click the curve point to reduce it to a corner point (bottom). Flash redraws the path accordingly. 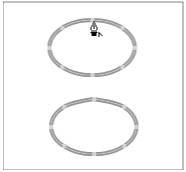
|
Tip
To delete anchor points 1. | With the path you want to modify selected, in the Tools panel, choose the pen tool.
| 2. | Position the pen pointer over a corner point.
The remove-point modifier (a minus sign) appears next to the pen icon.
Note that if the point you want to delete is currently a curve point, you must first follow the steps in the preceding exercise to convert it to a corner point.
| 3. | Click the corner point.
Flash removes the anchor point and reshapes the path to connect the remaining points (Figure 4.65).
Figure 4.65. When you position the pen tool over a corner point, a small minus sign appears next to the pointer (top). With the minus-sign modifier active, click the corner point to reduce it to no point at all (bottom). Flash redraws the path accordingly. 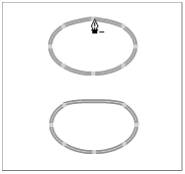
|
Tip
To add new anchor points to a curve segment 1. | With the path you want to modify selected, choose the pen tool from the Tools panel.
| 2. | Position the pen pointer over the path between two curve points.
The add-point modifier (a plus sign) appears next to the pen icon.
| 3. | Click the path.
Flash adds a new curve point (Figure 4.66).
Figure 4.66. When you position the pen tool between existing curve points, a small plus sign appears next to the pointer (top). With the plus-sign modifier active, click the path to add a new curve point (bottom). Note that the pen tool can't add points between corner points. 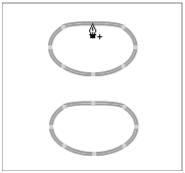
|
Tips If you need to add points to a straight-line segment (one that's made up solely of corner points), first convert one of the corner points that define the segment to a curve point. Then you'll be able to add another curve point between them. To add points to the end of an open path, position the pen pointer over the end of the path. When the x to the right of the pen pointer disappears, click the last anchor point, and then continue clicking to add more points. To switch between the pen and subselection tools quickly, use the keyboard shortcuts: A accesses the subselection tool, P accesses the pen tool.
Modifying Shapes with the Eraser Tool Flash's eraser tool allows you to modify shapes by deleting parts of fills and strokes. To use the eraser tool, click and scrub on the Stage, as you'd rub an eraser over a piece of paper. The eraser tool has five modes; you select a mode from the Eraser Mode menu in the Options section of the Tools panel. The eraser modes govern how the tool interacts with fills and strokes. For simple shapes on a single layer, Erase Normal is a good setting; it enables the eraser tool to remove any line or fill you drag over. The other eraser modes limit what the tool affects: in Erase Fills, the tool affects only fills; in Erase Lines, the tool affects only strokes; in Erase Selected Fills, the tool only erases from fills that have been selected; and in Erase Inside, the tool affects only the fill in which you begin an erasure. These modes become important when you work with complex graphics with multiple elements (see Chapter 5). Another eraser option is the Faucet modifier. The faucet speeds removal of lines and fills. Clicking a deselected line with the eraser in Faucet mode deletes all the segments that make up that line. If multiple merge-shape strokes and/or fills are selected, clicking any of the selected items with the faucet deletes the entire selection. (If multiple drawing-objects are selected, however, the faucet deletes the individual fills you click, one at a time; the faucet can't delete selected drawing-object strokes.) In addition, the Faucet mode overrides the complex eraser mode settings. For example, with the eraser set to Erase Lines, you can't scrub to erase a fill; but without changing the Erase Lines setting, you can choose the Faucet mode and then click a fill to erase it. The eraser tool's quickest trick is to clear the decks completely. Double-click the eraser tool in the Tools panel to delete the entire contents of the Stage. |
|