| All the strokes and fills you create in Flash can be edited after you've drawn them. You can edit them in their more naturalistic form, using the selection tool, or you can work directly with the path's anchor points and Bézier curves by using the subselection and pen tools (see "Modifying Shapes: Subselection Tool," later in this chapter). You can also apply the pencil tool's editing assistance after the fact. When you use the selection tool, the shape you want to modify must be deselected. If the segment is selected, the selection tool moves the segment as a unit. Always note what kind of icon the selection pointer is displaying as it hovers over the line you want to modify. For the following tasks, make sure the item you want to modify is deselected. These tasks all deal with modifying strokes, but the same techniques work for modifying fills by reshaping their outlines (see the sidebar "The Mystery of Fill Outlines"). About Curve and Corner Points Flash's selection and pen/subselection tools let you modify an element's curves and lines. The subselection tool lets you do so by moving the curve and corner points that define the element's path and by rearranging the curves' Bézier handles. When you drag a selection rectangle to enclose a path with the subselection tool, Flash reveals any curve points' Bézier handles. (Corner points have no handles.) When you use the selection tool, Flash hides all that technical stuff. You simply pull on a line to reshape it. Still, the selection tool has its own hidden version of curve and corner points, which are evident only in the changing icons that accompany the tool as it interacts with a line or curve (Figure 4.49). Figure 4.49. The small icons appearing with the selection pointer indicate what type of graphic element lies beneath the pointer. 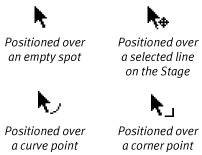
For the selection tool, corner points appear at the end of a segment or at the point where two segments join to form a sharp angle. All those other in-between pointseven if they fall in the middle of a line segment that happens to be completely flatare curve points. When you tug on a curve point with the selection tool, you pull out a range of points in a tiny arc. When you tug on a corner point with the selection tool, you pull out a single point. |
Clean Up Rough Pencil-Tool Sketches In Chapter 2, you learned about using the pencil tool with assistance to draw shapes freehand and have Flash clean them up. Rather than have Flash assist you with everything while you draw, you may prefer to sketch with the pencil tool's free-form Ink mode. Flash can recognize pencil-drawn lines and apply smoothing and straightening after you draw them. To smooth or straighten existing pencil-drawn lines, select them. With the selection tool active, in the Tools panel, click the Smooth or Straighten button. Flash smoothes the curves or straightens the line segments in the selected lines according to the tolerances currently set in the Drawing category of the Preferences dialog (see Chapter 2). You can also smooth or straighten selected lines by choosing Modify> Shape > Smooth or Modify> Shape > Straighten. If a line still looks too rough after your first attempt, apply the Smooth or Straighten command again. Repeated smoothing eventually flattens your curves; repeated straightening eventually turns curve segments into straight-line segments (Figure 4.50). Figure 4.50. Invoking the Smooth and Straighten commands several times can change the appearance of a line dramatically. 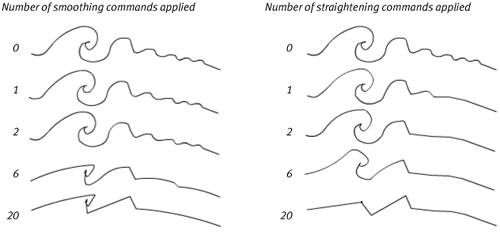
You can also make Flash recognize shapes you've sketched with the pencil tool. Select your rough version of an oval or rectangle. With the selection tool active, in the Tools panel, click the Straighten button; or, from the Modify menu, choose Shape > Straighten. If the shape is recognizable under the tolerances currently set in the Preferences dialog, Flash recasts the shape as a perfect oval or rectangle. If at first Flash fails to recognize your rough shape, try again. Often, the newly straightened shape falls within the parameters Flash needs to recognize it. |
To activate the end of a segment with the selection tool 1. | Position the pointer over the end point of a deselected line segment.
The corner-point modifier appears.
| 2. | Click the end point.
The end of the segment becomes active.
| 3. | Reposition the end point in any of the following ways:
- Drag away from the existing line or curve to lengthen the segment (Figure 4.51).
Figure 4.51. Drag away from the existing curve or line segment (top) to lengthen it (bottom). 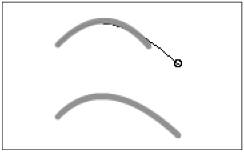
- Drag toward the existing line or curve to shorten the segment (Figure 4.52).
Figure 4.52. Drag toward the existing line or curve segment (top) to shorten it (bottom). 
- Drag at an angle to the original line to pivot a straight-line segment to a new position or reshape the end of a curve segment (Figure 4.53).
Figure 4.53. Reposition the end point to change the direction of the line or curve segment. 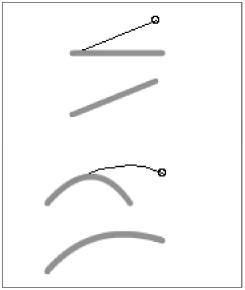
As you drag, the end of the line changes to a small circle, showing that the line is active for modifications; Flash previews the modified segment as you drag
| 4. | Release the mouse button.
Flash redraws the line segment.
|
To reshape curves with the selection tool 1. | Position the selection tool's pointer over the middle of a curve segment.
The curve-point modifier appears.
| 2. | Click and drag the curve to reshape it (Figure 4.54).
Figure 4.54. Click the middle of a curve (A). Flash activates the curve segment (B). Drag the curve to a new position (C, D). When you release the mouse button, Flash redraws the curve (E). 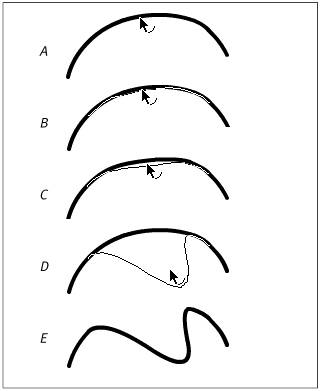
Flash previews the curve that you're drawing.
| 3. | Release the mouse button.
Flash redraws the curve.
|
To turn straight-line segments into curve segments with the selection tool 1. | Position the selection tool's pointer over the middle of a line segment.
The curve-point modifier appears.
| 2. | Click and drag the line to reshape it (Figure 4.55).
Figure 4.55. Although this line doesn't look curved (top), Flash considers all its middle points to be curve points. Drag one of those points to create a line that looks like a curve (bottom). 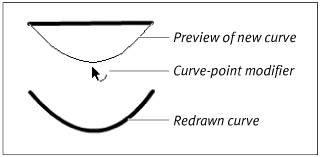
Flash previews the curve that you're drawing.
| 3. | Release the mouse button.
Flash redraws the line, giving it the curve you defined.
|
To create new corner points with the selection tool 1. | Position the selection tool's pointer over the middle of a line or curve segment.
The curve-point modifier appears.
| 2. | Option-click (Mac) or Ctrl-click (Windows).
After a brief pause, the selection tool's modifier changes to the corner-point modifier, and a circle appears where the pointer intersects the line. You're now activating a corner point.
| 3. | Drag to modify the line or curve segment and add a new corner point (Figure 4.56).
Figure 4.56. Option-click (Mac) or Ctrl-click (Windows) to create a new corner point for editing your line. Dragging a corner point from a straight-line segment creates a sharp V (top). Dragging a corner point from a curve creates a V with curving sides that comes to a sharp point (bottom). 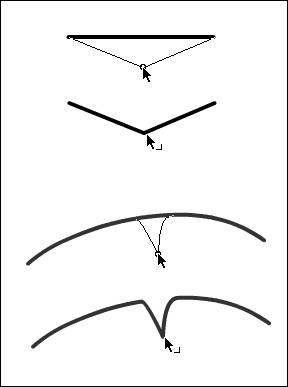
|
The Mystery of Fill Outlines You can't see the outline of a filled shape unless you give the shape a stroke, but fills do have outlines that act just like strokes for modification purposes. The selection, pen, and subselection tools all work to reshape fills just as they do to reshape strokes, as outlined in the tasks in this chapter (Figure 4.57). Figure 4.57. When you position the pointer over the edge of a fill shape, the selection tool displays either the curve-point or corner-point modifier. Clicking the edge of the fill activates part of the outline for reshaping (left). Selecting the edge of a fill shape with the subselection tool highlights the path and anchor points that outline the shape. You can reposition anchor points and Bézier handles to modify the fill shapes (right). 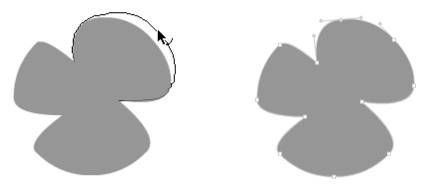
|
|