| Flash provides two methods for modifying existing fills and strokes: you can apply new attributes with a tool (the paint bucket tool for fills, the ink bottle tool for strokes), or you can select the fill or stroke on the Stage and choose new attributes in an appropriate panel. For fills or strokes that contain a gradient, you can also modify the way the gradient fits in the shape by using the gradient-transform tool. To change fill color with the paint-bucket tool 1. | In the Tools panel, select the paint-bucket tool, or press K.
| 2. | Select new fill attributes (see Chapter 2).
| 3. | Click the paint bucket's hot spot (the tip of the drip of paint) somewhere inside the fill you want to change.
The fill can be selected or deselected. The fill changes to the new color (Figure 4.37).
Figure 4.37. Clicking a fill with the paint bucket applies whatever color is selected in the Fill Color control. Use this technique to change existing fills. 
|
Use Panels to Change Selected Fills and Strokes You can modify the fill and stroke attributes of a selected graphic element by changing the settings in any appropriate panel. For example, draw an oval with a red fill and a 1-point, solid blue stroke; then select the whole shape (note that if you create the oval as a drawing-object, Flash automatically selects it). Now access the Properties tab of the Property inspector; it displays the attributes of the selected shape (or drawing-object). Select green from the Fill Color control; the oval fill changes to green. Increase the stroke height or choose a new stroke style; the oval stroke changes to match. You can choose new colors for selected fills and strokes from any appropriate panelColor Mixer, Color Swatches, Tools, or Property inspector. When a selected merge-shape has a stroke or fill set to No Color, however, the only way to change that setting is to add a fill or stroke by using the paint-bucket or ink-bottle tool (see Chapter 2). When your selected shape is a drawing-object, changing the fill or stroke attributes in a panel adds the missing element (Figure 4.36). Figure 4.36. Changing the attributes of a drawing-object whose fill or stroke was originally set to No Color causes Flash to add the missing element, whereas doing the same thing for a selected merge-shape has no effect. 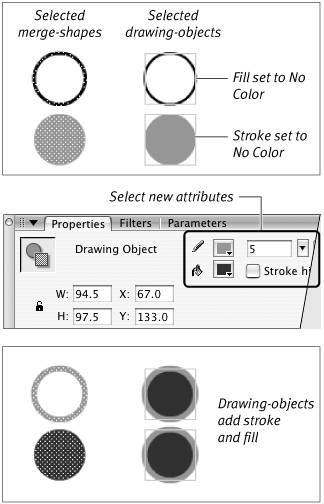
|
To change stroke color with the ink-bottle tool 1. | In the Tools panel, select the ink-bottle tool, or press S.
| 2. | Select new stroke attributes (see Chapter 2).
| 3. | Click the ink bottle's hot spot (the tip of the drip of paint) in one of the following ways:
- Click directly on the stroke.
- If a shape has both stroke and fill, and both are deselected, click the fill.
- If a shape has both stroke and fill, and both are selected, click the fill.
- If a shape has both stroke and fill, and only the fill is selected, click the stroke.
The stroke takes on its new attributes (Figure 4.38).
Figure 4.38. You don't have to select a stroke to change its attributes; just click the stroke or the unselected fill with the ink bottle. Warning: If the fill is selected, you must click the stroke itself; you can't click the selected fill to change an unselected stroke. 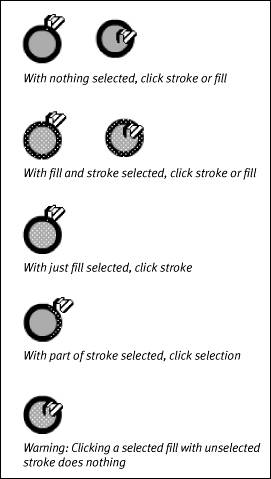
|
 Tips Tips
To save time, you can copy the fill and stroke attributes of one element and apply them to another. In the Tools panel, select the eyedropper tool, or press I. The pointer changes to an eyedropper. To copy a fill color or gradient, position the eyedropper over a fill and click. To copy all of a stroke's attributes, position the eyedropper over the stroke and click. Flash switches tools; the paint bucket appears for fills, the ink bottle for strokes. The attributes of the clicked item appear in all related panels; when you click a fill, for example, the fill type and fill color appear in the Tools panel, the Color Mixer panel, and the Properties tab of the Property inspector. You can then use the loaded paint-bucket or ink-bottle tool to apply the attributes to a different graphic element. To pick up the color of a stroke or fill and use it for both strokes and fills, Shift-click with the eyedropper tool. Flash loads the selected color into the Fill Color and Stroke-Color controls in the Tools panel, the Color Mixer panel, and the Properties tab of the Property inspectors relevant to the selected color.
To change a gradient fill's center point 1. | In the Tools panel, select the gradient-transform tool (Figure 4.39).
Figure 4.39. The fill-transform tool (left) and the pointer with which you manipulate gradients (right). 
| 2. | Position the pointer over the graphic element whose gradient you want to modify; the gradient can be located in a fill or in a stroke.
The pointer changes to the gradient-transform pointer.
| 3. | Click.
Handles for manipulating the gradient appear (Figure 4.40). You can rotate the gradient or change its size and/or center point.
Figure 4.40. Handles for transforming gradients appear when you click a gradient with the gradient-transform pointer. 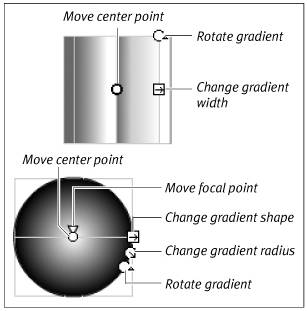
| 4. | Position the pointer over the gradient's center-point handle, the circle icon.
The move icon appears.
| 5. | Drag the center-point handle to reposition the center point of the gradient (Figure 4.41).
Figure 4.41. Drag the center-point handle to reposition the center of the gradient within your shape. 
|
To change a radial gradient's focal point 1. | Follow steps 13 in the preceding task.
| 2. | Position the gradient-transform pointer over the focal-point handle, the triangle.
The pointer changes to a triangle.
| 3. | Drag the focal-point handle to a new location (Figure 4.42).
Figure 4.42. This gradient blends from white (in the left-most gradient pointer) to black (in the right-most). This arrangement puts white at the center of a radial gradient, giving the illusion of highlighting on a three-dimensional object. By moving the focal point, you can mimic changes in the way light hits the object. 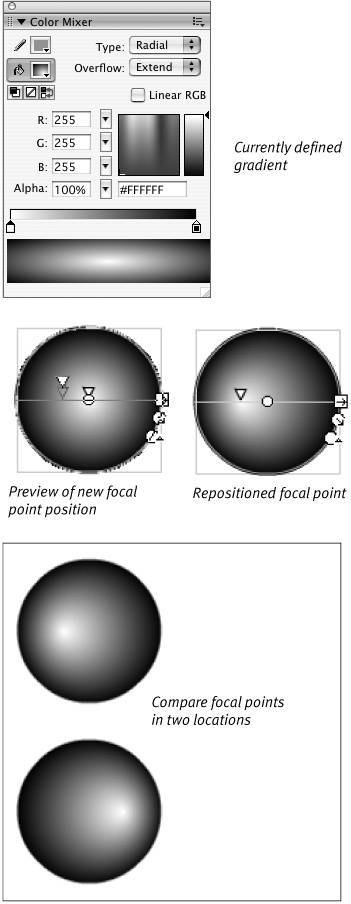
The focal point, the most concentrated amount of the gradient's central color, shifts to the new location.
|
To resize a gradient in a fill or stroke 1. | With the gradient-transform tool selected in the Tools panel, click the graphic element that contains the gradient you want to modify.
| 2. | To change the way the gradient fits inside the fill or stroke, do one of the following:
- To change the width of a linear gradient, drag the square handle (Figure 4.43).
Figure 4.43. With a linear gradient selected, use the gradient-transform tool to drag the square handle inward and create a narrower rectangle for a gradient. 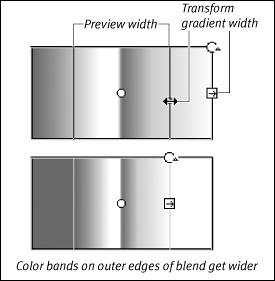
The pointer changes to a double-headed arrow. Dragging toward the center of your shape squeezes the transition into a narrower space; dragging away from the center of your shape spreads the transition over a wider space.
- To change the shape of a radial gradient, drag the square handle (Figure 4.44).
Figure 4.44. With a radial gradient selected, use the gradient-transform tool to drag the square handle inward to create a narrower oval for a gradient. 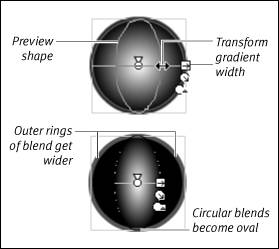
The pointer changes to a double-headed arrow. Dragging toward the center of your shape creates a narrower oval space for the transition; dragging away from the center of your shape creates a wider oval space.
- To change the radius of a radial gradient, drag the circular handle next to the square handle (Figure 4.45).
Figure 4.45. With a radial gradient, drag the first round handle outward to create a larger radius. 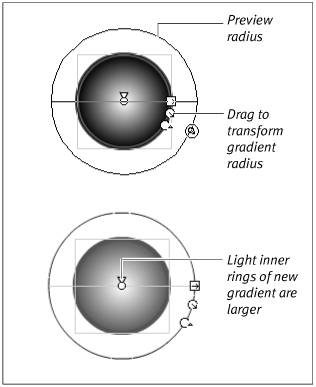
The pointer changes to an arrow within a circle. Dragging toward the center of your shape squeezes the transition into a smaller circular space; dragging away from the center of your shape spreads the transition over a larger circular space.
|
To control overflow (for Flash Player 8) 1. | Follow the steps in the preceding task to create a gradient that is narrower than the shape it sits in.
| 2. | In the Color Mixer panel, from the Overflow menu (Figure 4.46), choose one of the following:
- To extend the colors in the leftmost and rightmost gradient pointers, choose Extend (the first menu item).
- To repeat the gradient, but with the colors in reverse order, choose Reflect (the second menu item).
- To repeat the gradient with colors in the original order, choose Repeat.
Figure 4.46. When you're set to publish your movie to Flash Player 8 (see Chapter 16), the Color Mixer panel's Overflow menu is active. You can choose how Flash fills out a gradient that you have made narrower than the shape it sits in. 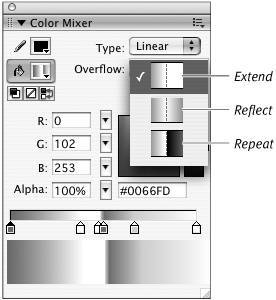
Note that to view the Overflow menu, your Publish Settings must be set to publish for Flash Player 8 (see Chapter 16). If you're set to publish to earlier versions of Flash Player, the Overflow menu is inactive.
|
The Mystery of Gradient Overflow When you resize a gradient to be narrower than the shape it sits in, you create a gap. In previous versions, Flash always filled that gap by extending the colors on the outside edges of the gradient. In Flash 8, when you're publishing for Flash Player 8 (see Chapter 16), you control the filling of that gap by choosing an Overflow setting in the Color Mixer panel. There are three overflow styles to choose from: Extend, Reflect, and Repeat (Figure 4.47). Figure 4.47. When you resize a gradient to make it narrower, Flash 8's default overflow style, Extend, fills the gap by extending the colors on the outside of the gradient (top-right). Reflect fills the gap by reversing the order of the colors and displaying however many bands fit the space (bottom-left). Repeat starts the gradient over again, showing the bands in the original order (bottom-right). 
|
To rotate a gradient fill 1. | With the gradient-transform tool selected in the Tools panel, click the fill or stroke containing the gradient you want to modify.
| 2. | To rotate the gradient, do either of the following:
- To rotate a linear gradient, drag the round handle (Figure 4.48).
Figure 4.48. As you drag the gradient's rotate handle with the gradient-transform tool, you spin the gradient around its center point. 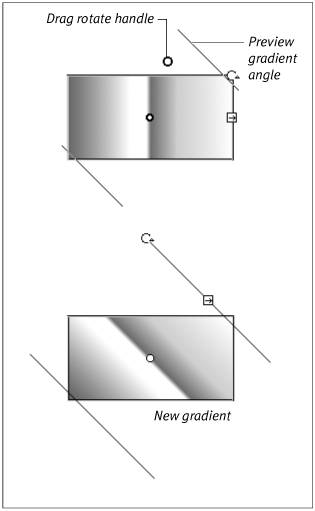
- To rotate a radial gradient, drag the round handle farthest from the square handle.
The pointer changes to a circular arrow. You can rotate the gradient clockwise or counterclockwise.
|
Tips Click and drag with the paint-bucket tool to rotate the gradient as you apply it. To constrain the gradient angle to vertical, horizontal, or 45-degree angles, hold down the Shift key as you drag. When you rotate a gradient interactively with the paint-bucket tool, the Fill Color control continues to display the gradient in its vertical position, but the rotation persists for some tools. If you switch to the brush or paint bucket tool, it uses the rotated gradient. (The oval and rectangle tools use the original unrotated gradient.) To remove the angle modification, use the paint-bucket tool to modify the gradient again, or choose another fill and then choose the gradient again.
|