| Flash's five snapping features help you align elements on the Stage. Snap to Grid helps you position the edge or center of an element to sit directly on top of a user-defined grid. Snap to Guide does the same thing with elements and guidelines. Snap to Objects helps you position one element in relation to another. Snap to Pixels helps you move elements in whole-pixel steps; at magnifications over 400% it displays a 1-pixel-by-1-pixel grid. Snap Align helps you align elements once you've dragged them within a user-definable distance from one another or from the edge of the Stage. By default, Snap Align, Snap to Guides, and Snap to Objects are active each time you launch Flash. To snap elements to a grid - Choose View > Snapping > Snap to Grid, or press Shift-
 -apostrophe (') (Mac) or Ctrl-Shift-apostrophe (') (Windows) (Figure 1.28). -apostrophe (') (Mac) or Ctrl-Shift-apostrophe (') (Windows) (Figure 1.28).
Figure 1.28. Choose View > Snapping > Snap to Grid to get help aligning items to the grid as you move them around the Stage. 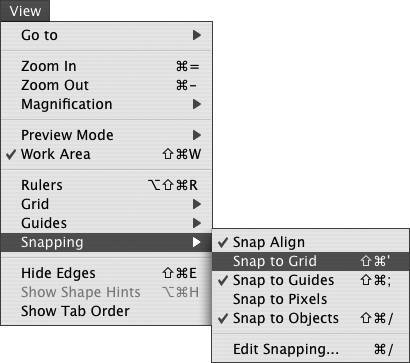
or
1. | Choose View > Grid > Edit Grid, or press Option--G (Mac) or Ctrl-Alt-G (Windows).
The Grid dialog appears.
| 2. | Select the Snap to Grid check box (Figure 1.29).
Figure 1.29. In the Grid dialog, selecting the Snap to Grid check box turns on snapping. 
| 3. | Click OK.
A check appears next to the Snap to Grid command in the menu.
As you drag an element, a circle called the snap ring appears beneath the tip of the selection tool. As the element nears a grid line, Flash highlights potential snap points by enlarging the snap ring (Figure 1.30).
Figure 1.30. As you drag elements, the snap ring, a small circle, appears beneath the tip of the pointer (top). The snap ring grows larger when it moves over an item that you've chosen to snap to, such as a grid, a guide, or the edge or center of another element. 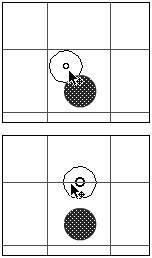
|
 Tips Tips
The snap ring appears roughly in the place where the selection tool connects with the element you're dragging. Flash can snap an element only by its center point or a point on its perimeter, however. If you have trouble seeing the snap ring, try grabbing the element nearer to its center, an edge, or a corner. You can also access the Grid dialog by choosing View > Grid > Edit Grid or pressing Option--G (Mac) or Ctrl-Alt-G (Windows).
To set parameters for snapping to the grid 1. | Choose View > Grid > Edit Grid.
| 2. | In the Grid dialog, choose a parameter from the Snap Accuracy pop-up menu (Figure 1.31).
Figure 1.31. Choose a Snap Accuracy setting to determine how close an element must be to the grid before Flash snaps the element to the grid line. Choosing Always Snap forces the edge or center of an element to lie directly on a grid line. 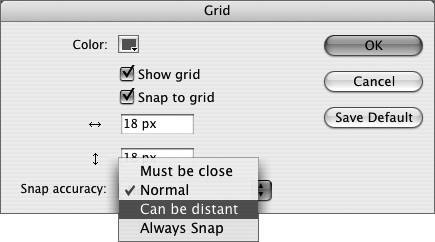
| 3. | Click OK.
|
To snap elements to guides - Choose View > Snapping > Snap to Guides, or press Shift--semicolon (;) (Mac) or Ctrl-Shift-semicolon (;) (Windows).
or
1. | Choose View > Guides > Edit Guides, or press Option-Shift--G (Mac) or Ctrl-Alt-Shift-G (Windows).
The Guides dialog appears (Figure 1.32).
Figure 1.32. In the Guides dialog, you can set the color and visibility of guides, their status as locked or unlocked, and how close items must be before they will snap to the guides. 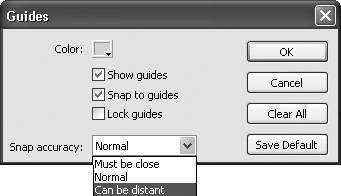
| 2. | Select the Snap to Guides check box.
| 3. | Click OK.
|
To set parameters for snapping to guides 1. | Choose View > Guides > Edit Guides.
| 2. | In the Guides dialog, choose a parameter from the Snap Accuracy pop-up menu.
| 3. | Click OK.
|
To snap elements to elements - Choose View > Snapping > Snap to Objects, or press Shift--/ (Mac) or Ctrl-Shift-/ (Windows).
or
- With the selection, line, oval, rectangle, polystar, free-transform, or fill-transform tool selected, in the options section of the Tools panel, click the magnet icon.
To snap elements to pixels - Choose View > Snapping > Snap to Pixels.
Flash creates a grid whose squares measure 1 pixel by 1 pixel. To see the grid, you must set the Stage's magnification to at least 400 percent (Figure 1.33). You'll learn more about magnified views in "Viewing at Various Magnifications" later in this chapter.
Figure 1.33. With Flash's Snap to Pixels feature enabled, a 1-pixel grid becomes visible at magnifications of 400 percent or greater. You can use this mode for precise positioning of graphic elements. 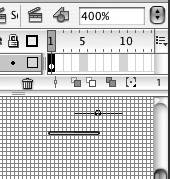
Tip Although the Snap to Pixels feature uses a 1-pixel grid, the graphic elements you move don't snap to the grid's coordinates unless you set the element's x and y position to a whole number in the Info panel or Properties tab of the Property inspector. (You'll learn to set coordinates for graphic elements in Chapter 4.)
To turn on Snap Align - Choose View > Snapping > Snap Align.
With Snap Align active, as you drag elements on the Stage, Flash displays a dotted-line alignment guide whenever the element gets within a user-specified distance of another element's edge, its center, or the edge of the Stage (Figure 1.34).
Figure 1.34. Flash's Snap Align feature displays a dotted guideline whenever an element comes within the user-specified distance of another element or the edge of the Stage. You can also set Snap Align to display the dotted guideline for aligning to the centers of elements. 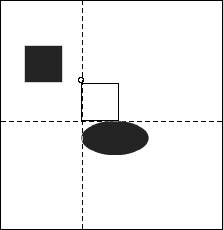
Tip
To turn off snapping - From the View > Snapping menu, choose the snapping option that you want to turn off.
The items with check marks are currently turned on. You can only select one item at a time from the menu.
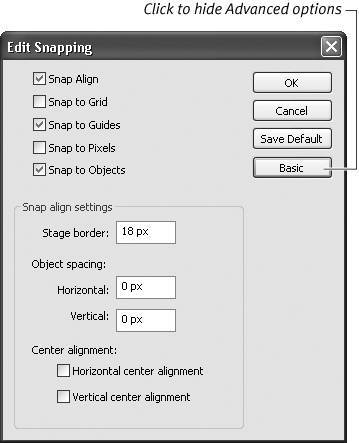
Tips You can turn off snapping for grids and guides from within the dialogs where you set their parameters. Choose View > Grid > Edit Grid (or View > Guides > Edit Guides); in the dialog that appears, deselect the Snap to Grids (or Snap to Guides) check box. To avoid making multiple trips to the View menu to turn individual snapping modes on and off, choose View > Snapping > Edit Snapping. The Edit Snapping dialog appears, listing all five snapping modes. Select the check boxes for the types you want to activate.
|