| The stand-alone Flash Player is an application file that installs with Flash. The Player opens when you double-click the icon of a file that has the .swf extension. (From within Flash Player, you can use the File > Open command to open and play SWF files.) To prepare a Flash movie for playing in the stand-alone Player, choose either the Export or Publish command in the Flash editor. The options are basically the same for both commands. To publish a Flash Player (SWF) file 1. | In the Flash editor, open the Flash (.fla) file you want to publish.
| 2. | Choose File > Publish Settings.
The Publish Settings dialog appears; choose a base publishing profile, or leave the current setting.
| 3. | Click the Formats tab (Windows) or button (Mac).
| 4. | In the Type section, select Flash (.swf).
If you wish, type a new name in the File field for the Flash (SWF) file. Be sure to include the .swf extension.
| 5. | Select the Flash tab (Windows) or button (Mac) (Figure 16.15).
Figure 16.15. The Flash section of the Publish Settings dialog offers options for publishing your Flash movie as a Flash Player (SWF) file. 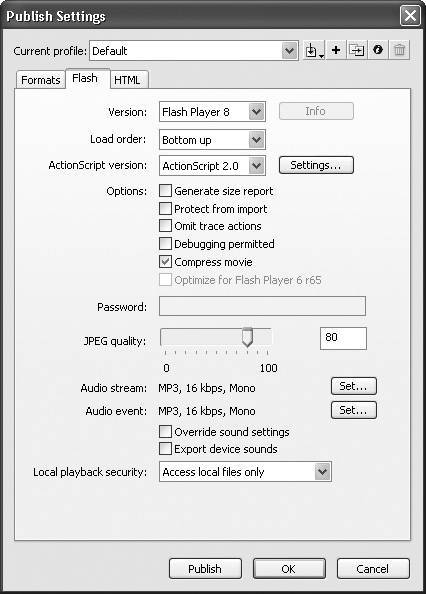
| 6. | Set Flash options as described in the following tasks.
| 7. | Click Publish.
|
To choose a Flash Player version From the Version pop-up menu, choose a version of Flash Player (Figure 16.16). Figure 16.16. Choose a version of Flash Player to publish to. Publishing to earlier versions makes some features of Flash 8 unavailable but ensures that a wider audience will have the correct player. Users of Flash Professional 8 (shown here) can also choose a Flash Lite version. 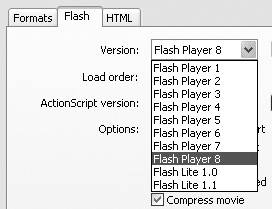 Your options are Flash Player 1 (formerly known as FutureSplash Animator) through 8. (Flash Professional 8 users can also choose to publish to Flash Lite 1.0 and 1.1: players that work in devices such as mobile phones.) If you publish your file as a version earlier than Flash Player 8, you lose some features specific to Flash 8.
 Tips Tips
Before you start creating ActionScripts, set the Flash export options in the Publish Settings dialog to the earliest version of Flash Player to which you plan to export. Any Flash 8 actions that won't work in that version appear with yellow highlighting in the Actions Toolbox in the Actions panel. When you choose Flash Player 6 from the Version pop-up menu, the Optimize for Flash Player 6 r65 check box becomes active. Select the check box to enable Flash to take advantage of performance improvements made to Flash Player 6 (these enhancements appear in release 65 and later of Flash Player 6).
To control how Flash draws the movie's frames From the Load Order pop-up menu, choose the order in which Flash loads a movie's layers for display (Figure 16.17). Figure 16.17. The Load Order pop-up menu determines the order in which Flash draws the layers of the frames of your movie. 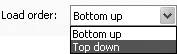 When playback over the Web is slow, Flash starts displaying individual layers as they download. The Top Down setting tells Flash to send (and display) the top layer first and then work its way to the bottom layer. Bottom Up does just the opposite.
To choose the version of ActionScript used (Flash Player 68) From the pop-up menu, choose ActionScript version.1. 0 or ActionScript version 2.0 (Figure 16.18). Figure 16.18. ActionScript 2.0 presents special tasks for the compiler when Flash publishes a SWF file. Be sure to select it if you use version 2.0 for scripting.  This setting tells Flash which version of the scripting language you've used in scripts in your document so the compiler treats the code appropriately. The menu becomes active only when you've chosen Player versions 68.
Tip
To list the amount of data in the movie by frame Select the Generate Size Report check box (Figure 16.19). Figure 16.19. Choose Generate Size Report (top) to have Flash create a text file that lists the amount of data in your movie (bottom). 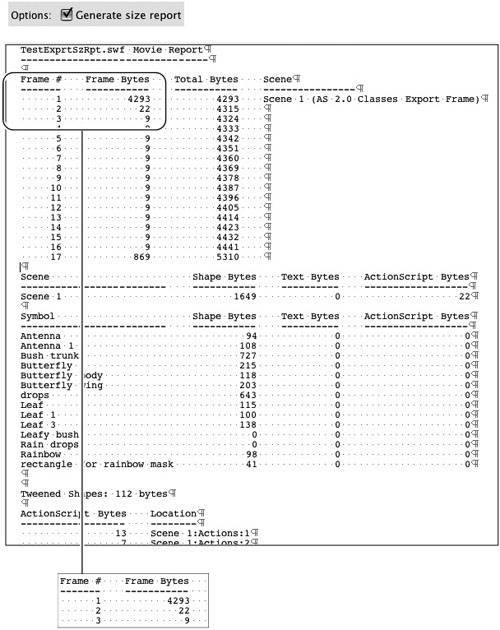 Flash creates a separate text file listing the frames of the movie and how much data each frame contains. (The Size report text also appears in the Output panel.) This report helps you find frames that bog down the movie's playback. You can then optimize or eliminate some of the content in those frames.
Tip
To protect your work Tip
To set trace and debug options To tell Flash how to deal with trace actions and debugging (options that are useful for more advanced ActionScripters), select either of the following check boxes: Omit trace actions prevents trace actions from appearing in the Output window during debugging. This option strips the trace actions from the published movie, allowing you to view only non-trace debugging items in the Output window. Omitting trace actions also reduces file size slightly if your scripts contain lots of trace actions. Debugging permitted allows remote debugging of ActionScripts. This option allows you or other users to debug a Flash Player (SWF) file as it plays over the Internet.
Tip
To compress the SWF file (Flash Player 68) 1. | Choose Flash Player 68 from the Version pop-up menu.
| 2. | Select the Compress Movie option (Figure 16.22).
Figure 16.22. When you've chosen to publish to Flash Player versions 68, you can also choose to compress the movie. Compression helps to reduce the file size, especially for text-heavy movies or those with lots of ActionScript. 
Compress Movie is an option only when you publish for Flash Player versions 68. The setting has no effect on the JPEG-quality and audio-compression settings you choose in the following tasks.
|
To compress the bitmaps in your movie To set JPEG compression, do either of the following: - Adjust the JPEG Quality slider.
- Enter a specific value in the JPEG Quality field (Figure 16.23).
Figure 16.23. To set JPEG compression for any bitmaps in your movie, type a value in the JPEG Quality field or use the slider. A setting of 0 results in the most compression (worst quality); 100 results in the least compression (best quality). 
This setting controls how Flash applies JPEG compression as it exports the bitmaps in your movie. A setting of 0 provides the most compression (and the lowest quality, because that compression leads to loss of data).
Tips Flash doesn't apply JPEG compression to GIF images that you've imported into your movie, because Flash defaults to using lossless compression for GIFs. You can also set compression for individual bitmaps in the library of your Flash document. Select the bitmap in the Library panel. From the panel's Options menu, choose Properties. The Compression pop-up menu in the Bitmap Properties dialog lets you choose lossy compression (JPEG) or lossless compression (PNG/GIF).
To control compression and sample rate for all movie sounds 1. | In the Audio Stream section (or the Audio Event section) of the Publish Settings dialog, click the Set button (Figure 16.24).
Figure 16.24. You must set the sample rate and compression options for stream sounds and event sounds separately. Click the Set button to access the options for each type of sound. 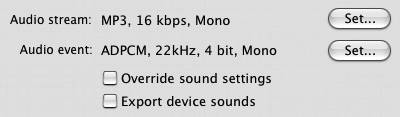
The Sound Settings dialog appears. Flash divides sounds into two types: stream and event (for more details, see Chapter 15). You must set the compression for each type separately, but the process and options are the same for both.
| 2. | To set compression parameters, from the Compression pop-up menu (Figure 16.25), choose one of the following options:
Disable makes Flash omit sound from the published file.
ADPCM sets compression for movies containing mostly short event sounds, such as handclaps or button clicks. (Generally, you'll use this setting in the Audio Event section.) The ADPCM options appear. From the ADPCM Bits pop-up menu, choose 2-Bit for the greatest degree of compression (resulting in the lowest-quality sound); choose 5-Bit for the least compression (resulting in the highest-quality sound). With the ADPCM setting, you can also set a sample rate and convert stereo sound to mono sound.
Figure 16.25. Choose a compression method from the Compression pop-up menu. Other options appropriate to the selected method appear. Choose Disable to turn off sound. 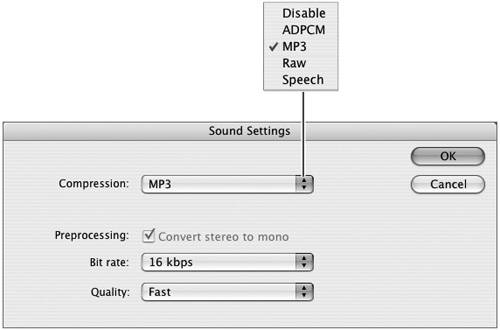
Sample-Rate Rule of Thumb Sample rates are measured in kHz or frequency. Recording for music CDs is done at 44 kHz. For multimedia CD-ROMs, 22 kHz is a standard rate. For music clips in Flash movies played on the Web, 11 kHz is often sufficient. For shorter sounds, including spoken words, you may be able to get away with even lower sampling rates. |
MP3 sets compression for movies containing mostly longer stream sounds. (Generally, you'll use this setting in the Audio Stream section.) The MP3 options appear. From the Bit Rate pop-up menu, choose one of 12 bit rates for the published sounds. At a Bit Rate setting of less than 20 Kbps, Flash converts sounds from stereo to mono; at settings of 20 Kbps and above, you can publish stereo sounds or convert them to mono sounds. From the Quality pop-up menu, choose Fast when you are testing your movie; choose Medium or Best when you publish for your target audience as they provide better quality.
Raw omits sound compression. Raw does allow you to control file size by choosing a sample rate and converting stereo sound to mono.
Speech sets compression for sounds consisting of spoken words. Choose a sample rate from the pop-up menu of options that appears.
|
Digitally Recorded Sounds As motion pictures are to movement, digital recordings are to sound. Both media capture slices of a continuous event. By playing the captured slices back in order, you re-create the event. In a movie, the slices are frames of film; in a digital recording, they're snippets of sound. You can think of the recording process as capturing a sound wave by laying a grid over it and copying a piece of the wave at each intersection on the grid. The lines across the horizontal axis are the sample ratehow often you capture the sound. The lines up and down the vertical axis are the bit ratehow much of detail of the sound wave's amplitude you capture. The greater the frequency and bit rate (the finer the mesh of your recording grid), the greater the realism of your recording during playback. Unfortunately, greater realism translates into larger files. The sound options in the Publish Settings dialog give you the flexibility to create different versions of your movie with different sample rates and bit rates without actually changing the sounds embedded in the movie. You might allow yourself larger file sizes and higher-quality sounds for a version being delivered on CD-ROM than for a version being distributed on the Web. As you try different sound options, be sure to listen to your published sounds to determine the best balance between sound quality and file size. |
To control access to local and network files for security To determine which types of files the SWF file can copy data from or write data to, in the Local playback security section, from the pop-up menu (Figure 16.26), choose either of the following options: Access local files only. With local-only access, the SWF file can share information with files located on the local system where the SWF file resides, but not with files located on the Internet. Local-only access prevents a SWF file from loading XML files from the Internet or posting data from an entry form to the Internet, for example. Access network only. With network-only access, the SWF file can share information only with files located on the Internet, not with local files. Figure 16.26. Flash 8 provides a new level of security by restricting SWF files from manipulating data on different systems. With Local Access Only as the setting, the published SWF file can only copy or write data to files on the local system. With Network Access Only, the SWF file can copy or write data only to files on the network and not on the local system. 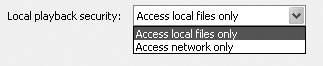
Advanced Sound Handling The sound-compression settings in the Publish Settings dialog apply to all the sounds in your movie unless you've specified sound settings for individual sounds in the library of the Flash document. A more advanced method of dealing with sound compression is to set compression options and sample rates for sounds individually. Assigning the highest quality to selected sounds helps you keep file size reasonable but still have high-quality sound where you need it. You set compression options for individual sounds via the Sound Properties dialog, which you access from the movie's Library panel. Control-click (Mac) or right-click (Windows) a sound name in the Library panel; then choose Properties from the contextual menu that appears. The Sound Properties dialog appears. Its Compression pop-up menu gives you access to the same sound-export settings as the Flash tab of the Publish Settings dialog. If some sounds in a movie have individual sound-export settings, Flash uses those settings for those sounds when you choose Publish. Flash uses the sound options you set in the Publish Settings dialog for all other sounds in that movie. If you've used individual compression methods for some sounds in your movie, you can force Flash to ignore them and publish all sounds with the sound options you've chosen in the Publish Settings dialog. In the Flash section of the Publish Settings dialog, choose Override Sound Settings. You might use this feature to make a lower-quality Web version of a movie you created for CD-ROM. |
A Note about Flash Player 8's Security Settings Flash 8 and Flash Player 8 allow you to create Flash content that uploads and/or downloads files at runtime; this capability gives Flash more power than in previous versions, but with that power comes the potential to do harm. A new security feature ensures that SWF files can't perform malicious deeds on the systems of your target audience. Flash's default local-security settings prohibit SWF files running locally (on a single computer) from communicating with files being served on the Internet (and vice versa); to allow such communication, you must give Flash Player specific permissions. If you test a movie published to Flash 8 locally, before deploying it to a server, and you use a button or link in the movie to connect to the Internet, you may receive a warning that Flash Player has stopped an operation that might be unsafe. If the file you're testing doesn't need to communicate with both the local system and the Internet, you can solve the problem by changing your Publish Settings. (In the Flash section of the Publish Settings dialog, under Local Playback Security, choose Access Network Only.) If, after changing the Local Playback Security setting, you still get the warning, you need to give your SWF file special permission to communicate with the Internet. When the Macromedia Flash Player Security dialog appears (Figure 16.27), click the Settings button. Flash opens a browser window and directs you to a page of the Flash Player documentation on the Macromedia site (http://www.macromedia.com/support/documentation/en/flashplayer/help/settings_manager04a.html). This page gives you access to the Settings Manager (Figure 16.28). Figure 16.27. When a SWF file on a local computer attempts to access a file on the Internet, Flash Player 8 won't allow it to, unless you've set the proper security settings. You'll see a warning dialog to alert you to the fact that your settings don't allow this communication. 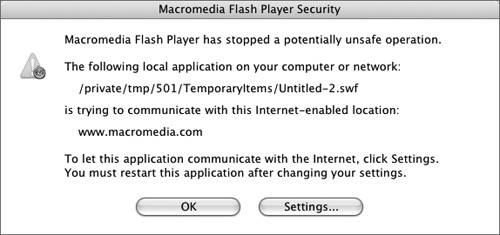
Figure 16.28. The Global Security Settings tab of Macromedia Flash Player Settings Manager lets you create a list of trusted files and/or folders for Flash Player 8 security. Any SWF files in locations covered by this list can communicate with Internet files. 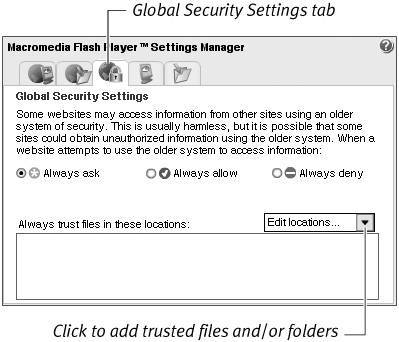
Use the Global Security Settings tab of the manager to create a list of trusted items. Flash Player always allows SWF files from the Global Security Settings list to communicate with the Internet, even though they're being run locally. Use the Edit Locations pop-up menu to add individual SWF files or folders to the trusted list or remove them from the list (Figure 16.29). Figure 16.29. Click the Edit Locations pop-up menu to manage a list of trusted files (top). Click Add Location to open a window (middle) where you can add a new file or folder to a Trusted list. If you opened the Global Security Settings Manager by clicking the Settings button of the security warning dialog (Figure 16.27), the window's Tip field shows the path name for the file you were working on. Copy and paste that name to the Trusted field (or use one of the Browse buttons to navigate to the file or folder you want to add); click Confirm to add the trusted file to the Trust list (bottom). 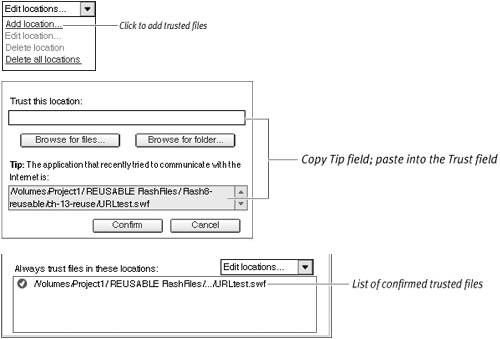
If you'll be doing lots of this type of testing, it makes sense to set up a special trusted folder where you keep only your own SWF files you need to test. Don't allow Flash Player to trust folders on your system that might include SWF files downloaded from other sources. Such files have the potential to do something dangerous, such as copying information from your system and sending it to an outside location. |
|
