| An HTML document is a master set of instructions that tells a browser how to display Web content. The Publish function of Flash creates an HTML document that tells the browser how to display the published files for your document (these files can be in Flash, GIF, JPEG, PNG, and/or QuickTime format, whatever you choose in the Formats tab of the Publish Settings dialog). The Publish command creates the required HTML by filling in blanks in a template document. Flash comes with ten templates; you can also create your own. To publish HTML for displaying a Flash file 1. | Open the Flash document you want to publish for the Web.
| 2. | Choose File > Publish Settings.
The Publish Settings dialog appears; choose a new publishing profile, or leave the current setting.
| 3. | Click the Formats tab (Windows) or button (Mac).
| 4. | In the Type section, choose HTML (.html).
When you choose HTML, Flash automatically selects Flash (.swf) as well.
| 5. | Select the HTML tab (Windows) or button (Mac) (Figure 16.30).
Figure 16.30. The HTML section of the Publish Settings dialog contains options for displaying your Flash movie in the browser window. 
The options for displaying your Flash movie in the browser window appear in the dialog. When you publish the current file, Flash feeds your choices into the appropriate HTML tags and parameters in the template of your choice.
|
To create HTML for Flash only From the Template pop-up menu, choose Flash Only (Figure 16.31). Figure 16.31. Choose Flash Only (A) as the template when you want to create HTML for displaying only a Flash movie with no other options for alternate images. Click the Info button (B) to see a description of what the template does (C). 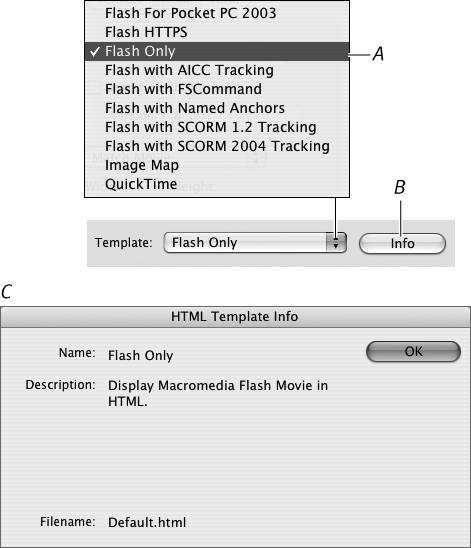 This template is the simplest one. It uses the HTML OBJECT and EMBED tags to display your Flash content for viewers who are properly equipped with the Flash Player version that you select in the Flash section of the Publish Settings dialog. Other viewers will be unable to see your content. (Other template choices create HTML that performs other tasks; for example, the Image Map template creates HTML that displays alternate images or files when the viewer lacks the proper plug-in.)
 Tip Tip
If you can't remember what one of the included HTML templates does, select it from the Template pop-up menu in the HTML tab of the Publish Settings dialog, and then click the Info button next to the menu. Flash displays a brief description, including instructions about choosing alternate formats, if necessary.
The Mystery of HTML Templates The HTML codes (called tags) required for displaying a SWF file in a browser window are OBJECT for Internet Explorer (Windows) and EMBED for other browsers. (In addition, Flash can use the IMG tag to display a file in another format, such as a JPEG image or an animated GIF. If you've created named anchors in your Flash movie and you choose the Flash with Named Anchors template, Flash can create anchor tags for browser navigation, as well.) Flash's Publish command works hand in hand with HTML templateswhich are fill-in-the-blank recipesto define the parameters of those tags. These parameters include the width and height of the movie window, the quality of the images (the amount of antialiasing to provide), and the way the movie window aligns with the browser window. Each option and parameter in the HTML section of the Publish Settings dialog has an equivalent template variable. The template variable is a code word that starts with the dollar sign ($). When you choose an option in the Publish Settings dialog, Flash enters your choice as an HTML tag that replaces the variable in the template document. If you set the width of your movie as 500 pixels in the Publish Settings dialog for HTML, for example, Flash replaces the template variable for width ($WI) with the proper coding to display the movie in a window 500 pixels wide. Flash's HTML templates contain coding not only for displaying your Flash movie, but also for showing the JPEG, GIF, or PNG version of your movie that you want to make available to viewers who don't have the proper browser player to view Flash. During the publishing process, Flash saves a copy of the HTML template for your movie, giving it the name of your movie file and adding whatever extension the template file has. (The template files that come with Flash use the extension .html, for example.) You can go into a template file as you would any other text file and modify the HTML coding. You can extend the Publish command's capacity for creating HTML documents by setting up your own HTML templates. To be available to Flash's template menu, the HTML file must include a title (use the code $TT). The HTML file must be inside the HTML folder, which lives in the Configuration Folder. For more details on locating this folder, see the sidebar "The Mystery of the Configuration Folder" in Chapter 1. |
To set the dimensions of the movie-display window To set the width and height of the rectangle created by the OBJECT and EMBED tags for displaying your movie in the browser, from the Dimensions pop-up menu in the HTML section of the Publish Settings dialog (Figure 16.32), choose one of the following options: Match Movie uses the movie's dimensions (specified in the Document Properties dialog). Pixels lets you specify new dimensions. Type the new values in the Width and Height fields. Percent lets you specify the dimensions as a percentage of the browser window's dimensions. Type a value between 1 and 100 in the Width and Height fields. Figure 16.32. Choose a method for sizing the movie-display window (the window in which a browser displays your Flash movie). 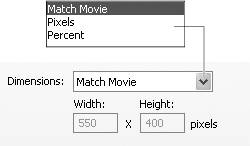
Fitting Movies into Browser Windows When you publish HTML for displaying movies in a Web page, think in terms of three windows: The browser window contains the entire Web page. Within the browser window is a movie-display window (created by the OBJECT, EMBED, and IMG tags) where the Flash plug-in displays a Flash movie. Inside the movie-display window is the actual movie window, which corresponds to the Stage of your Flash document.
Each of the three windows has its own dimensions, and you need to tell Flash where to put the windows and how to handle them if their aspect ratios differ, for example, or if a user resizes the browser window. To instruct browsers on how to deal with these three windows, choose settings in the HTML section of the Publish Settings dialog. When you define a movie-display window with a different width or height from the original Flash document, you must tell Flash how to scale the movie to fit in that window. |
To scale the movie to fit a movie-display window From the Scale pop-up menu (Figure 16.33), choose one of the following options: Figure 16.33. The scale method tells Flash how to fit the Flash movie inside the movie-display window that you define. You need to set the scale only if you define a movie-display window with different dimensions from those of the movie itselfas a percentage of the browser width and height, for example. 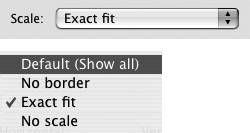 Default (Show All) keeps the movie's original aspect ratio (width to height) and resizes the movie so that it fits completely within the newly specified rectangle (Figure 16.34). (Be aware that the resized movie may not fill the new rectangle: Gaps may appear on the sides or at the top and bottom.) Figure 16.34. This 300-by-300pixel movie looks quite different in the different dimension-and-scale combinations. The movie-display window's dimensions and the scale setting are identified in the examples above. (Here the browser background has been set to black to make the movie display window visible.)  No Border keeps the movie's original aspect ratio and resizes the movie so the whole new rectangle is filled with it. (Some of the movie may slop over the edges and be cropped.) Exact Fit changes the movie's height and width to the new specifications, even if it involves changing the aspect ratio and distorting the image. No Scale keeps the movie at a constant size. Resizing the browser window can crop the image.
Tip If you define the movie-display window as 100 percent of the width and height of the browser window, in some browser versions, no matter how large your viewer makes the browser window, a scroll bar always appears. Setting the width and height to 95 percent (or lower) ensures that all viewers will be able to enlarge the browser window enough to eliminate the scroll bar.
To control placement of the movie window in the movie-display window To align the movie window within the movie-display window, in the Flash Alignment section of the HTML tab of the Publish Settings dialog, do either of the following: - From the Horizontal pop-up menu, choose Left, Center, or Right.
- From the Vertical pop-up menu, choose Top, Center, or Bottom.
Flash positions the movie within the movie-display window (Figure 16.35). Figure 16.35. The Flash Alignment section's Horizontal and Vertical pop-up menus allow you to position your movie within the movie-display window when the dimensions of that window differ from those of the movie. Compare the results of two different settings for this 300-by-300pixel movie set inside a 200-by-100pixel display window. The light-gray rectangle is the display window, which automatically fills with the same color as your movie's background. 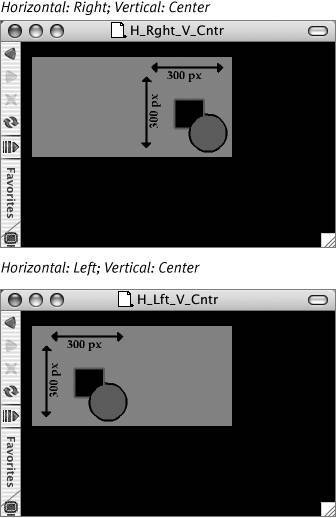
To set playback options In the Playback section of the HTML section of the Publish Settings dialog (Figure 16.36), choose any of the following options: Paused at start makes users begin the movie manually (by clicking a button or by choosing Play from the contextual menu). Display menu creates a contextual menu with playback options available to users. Loop makes the movie start over when it reaches the last frame. Device font speeds playback on Windows systems. The Device Font option allows Windows systems to substitute aliased system fonts for fonts that aren't installed on the user's system. This substitution takes place only in static text blocks where you've enabled device fonts during the authoring phase.
Figure 16.36. The HTML section of the Publish Settings dialog gives you options for controlling playback. You control whether the movie starts playing immediately in the browser window, or if it's in a paused state waiting for user input to start; whether the movie loops, or plays through just once; and whether users can control playback from the contextual menu. For Windows machines, you can improve speed playback by activating device fonts. 
To control antialiasing and smoothing From the Quality pop-up menu in the HTML section of the Publish Settings dialog (Figure 16.37), choose one of the following options: Low. Flash keeps antialiasing off. Auto Low. Flash starts playback with antialiasing off; but if it finds that the viewer's computer and connection can handle antialiasing while keeping the movie's specified frame rate, Flash turns antialiasing on. Auto High. Flash turns antialiasing on to start with and turns it off if playback drops below the movie's specified frame rate. Medium. Taking the middle ground, Flash forgoes bitmap smoothing but does some antialiasing. High. Flash uses antialiasing on everything but smooths bitmaps only if there is no animation. Best. Flash keeps antialiasing on and smooths all bitmaps.
Figure 16.37. The Quality setting for publishing HTML balances image quality against playback speed in a published movie. 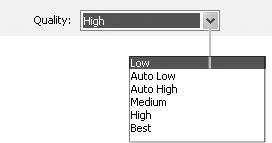
To control transparency From the Window Mode pop-up menu (Figure 16.38), choose one of the following options: Window plays the Flash movie in a separate movie-display window within the Web page. Flash sets the background color of the Web page to be the same as your movie's background color. The movie-display window prevents the appearance of HTML elements that lie on layers below the Flash movie and often prevents (or interferes with) the appearance of elements above the movie-display window as well. Window mode gives Flash complete control of the window-display area of the screen and therefore results in the best performance. Opaque Windowless plays the Flash movie window directly in the browser window. This setting allows elements of the Web page that lie above the Flash movie to appear. Elements of the Web page that lie below the Flash movie do not appear. Transparent Windowless plays the Flash movie window directly in the browser window. This setting allows elements of the Web page to show through in any areas of your Flash movie that don't contain objects. Using this setting may slow the playback of your animation. Only certain browsers (and certain versions of Flash Player) support the ability to create transparent backgrounds for your published SWF content. The earliest versions of Flash Player that support the transparent windowless setting are 6.0.65.0 (Windows) and 6.0.67.0 (Mac). In Mac OS X (browsers in Mac Classic mode don't support the transparent windowless setting), Internet Explorer (IE) 5.1 and 5.2 support this setting. In Windows, IE 3 or later supports it. Other browsers that support this setting, on both platforms, include Netscape 7.0 (or later), Mozilla 1.0 (or later), and AOL/CompuServe.
Figure 16.38. For viewers of your Flash movie who use qualified browsers, you can create a transparency effect that reveals Web-page elements beneath any transparent areas of the movie. In the HTML tab of the Publish Settings dialog, set Window Mode to Transparent Windowless. 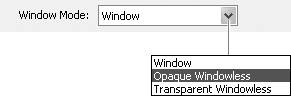
To see warnings about missing alternate content At the bottom of the HTML section of the Publish Settings dialog, select the Show Warning Messages check box if you want Flash to notify you if the currently selected template creates tags to display alternate contenta GIF file, for examplebut you've neglected to select the appropriate format in the Formats section of the Publish Settings dialog.
Tip The default HTML template automatically sets the background color of your Web page to the background color of your movie. If you want to use a different color, try creating a modified template (Figure 16.39). Open the default template, and save a copy with a new name. In the first line of code$TTFlash Onlychange the title to something like $TTFlash Only (BlackBackground), so Flash recognizes and adds the template to the Template menu. In the tag <BODY bgcolor="$BG">, replace $BG with the HTML code for a specific hex color (000000 for a black background, for example). Be sure to place the new template in Flash's HTML folder inside the Configuration folder (for more details, see the sidebar "The Mystery of the Configuration Folder," in Chapter 1). You will see the new template in the Template menu only after you restart Flash. Figure 16.39. The default HTML template picks up the movie's background color as the Web page's background color. You can modify a copy of the template (top). Change the Title tag, and set a specific background color (middle). The new title appears in the Template menu in the HTML tab of the Publish Settings dialog (bottom). 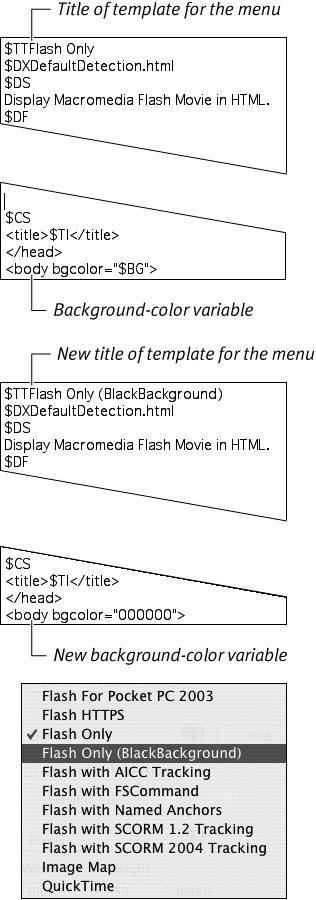
|